Folders and collections
Last updated: Apr-18-2024
Cloudinary provides two methods for organizing and sharing your assets: folders and collections.
- Folders are asset containers used to organize the assets stored in your product environment.
-
Collections are a dynamic way to create conceptual groupings of assets, regardless of their folder structure.
For Assets enterprise and free plans- Enterprise plans: The collections feature is a premium offering, and its availability depends on your account setup. If collections is not yet enabled for your account and you'd like to enable it, please contact your Customer Success Manager.
- Free plans: The number of collections you can have is limited. For more options and information, contact support.
Many Cloudinary product environments are already using dynamic folder mode, which decouples the public ID and delivery URL from the display names and asset folders in the Media Library. This mode involves a variety of new options and behavioral changes in both the Media Library and the APIs.
This page describes the expected behavior for both fixed and dynamic folder modes, wherever they may differ.
- If you have a Master admin role, you can check which folder mode your product environment uses in the Media Library Preferences page.
- If you are not yet using dynamic folders, your DAM administrator can request to migrate your product environment to the dynamic folder mode.
Comparison chart
A single asset can be in stored in a folder path and can also be included in one or more collections. The table below provides a comparison of the primary differences between these two organization methods.
| Folders | Collections | |
|---|---|---|
| Duplication | Each asset is located in a specific folder path. | The same asset can be included in multiple collections. |
| Structure | Multi-level hierarchy. Dynamic folder mode A folder can be moved to a different location within the folder hierarchy without impacting the assets in it. Fixed folder modeFolders can't be moved. | Flat. |
| SEO |
Dynamic folder mode The folder where the asset is located doesn't impact the asset's URL. However, independent of the asset's folder, the asset's public ID value can optionally include folder-like path components (with slashes) for SEO purposes. Fixed folder mode Folder paths are a part of the asset's URL and thus can provide an SEO benefit. |
Collections are a conceptual, internal grouping and thus have no impact on SEO. |
| Moving assets between | Dynamic folder modeYou can move assets from folder to folder freely without affecting the public ID and delivery URL used in production. Fixed folder modeMoving an asset from folder to folder changes its URL and can cause broken links. For the above reason, when choosing the folder structure for an asset, you should generally consider folders as a relatively "permanent" placement. They shouldn't be used as a method of assigning status or any other temporary organizational strategy. | You don't have an option to move an asset from one collection to another. You can include an asset in multiple collections, or you can delete from one and add to another. These changes have no impact on the asset URLs. |
| Removing/deleting assets | Deleting an asset from a folder deletes the asset from your product environment and can cause broken links. Note: Deleted assets are recoverable if your product environment has backups enabled |
Removing an asset from the collection just takes it out of that grouping. The asset remains in your product environment and in its current folder path. |
| Renaming | Dynamic folder modeYou can rename a folder freely without impacting the assets in it. Fixed folder modeYou can't rename a folder. | Renaming a collection doesn't impact the assets in it. The collection rename takes effect immediately for everyone who has permissions to view it (refresh may be required). |
| Creating | All users can create folders under any folder where they have Can Contribute or higher permissions. | Users with a Media Library user role must be given explicit permissions to create collections by a DAM administrator. |
|
Sharing / Inviting and permissions 1 |
Sharing folders Folders can be shared with either user groups or individual DAM users at a variety of permission levels.The permissions control what operations users can perform on the assets in a folder as well as whether users can further share the folders. | Inviting to collections You can invite your teammates (either user groups or individual DAM users) to collections at a variety of permission levels. The permissions control who can access, modify which assets are inside, and whether they can further invite to the collection or share it externally via public link. They do not impact what operations users can perform on individual assets inside the collection. However, when you invite users or group members to a collection, then the invited teammates will be able to view all assets in the collection, even if some or all assets in the collection are in folders that are not shared with that group. |
| Sharing externally via public link | Folders can't be shared externally. | Collections can be shared externally by creating a public link to a dedicated web page displaying the collection's assets, and then send that link to chosen stakeholders. |
Folder management
You can create folders and sub-folders to organize your assets and to control which user groups can access the contents of each folder. When you are in the Folders view (Folders is the selected Media Library Tab), the full folder path of the folder you are currently viewing is shown on the top left of the Media Library next to the Folders button.
The cloud icon represents the Home (root) folder of the Media Library. 
Depending on your user role and/or permissions, you can perform some or all of the folder operations described below:
- Browse folders
- Create folders
- Rename folders
- Move folders
- Delete folders
- Download folders
- Move assets between folders
- Share folders
- Access folders from the homepage (Assets users only)
Browse folders
You can browse through folders in a variety of ways:
- From the Media Library Tabs located at the top of the Console, select Folders. This brings you to the Home (root) folder. This is useful if you are in another view, such as search results or collections.

- Expand the Folders pane to view all folders in an expandable folder tree view. Begin typing in the folder name to utilize the search functionality for quickly navigating to specific folders.
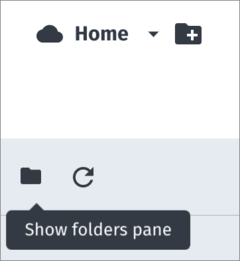
- Expand the Folders drop-down, to view all sub-folders of the current folder as small grid icons.

Folder preview details
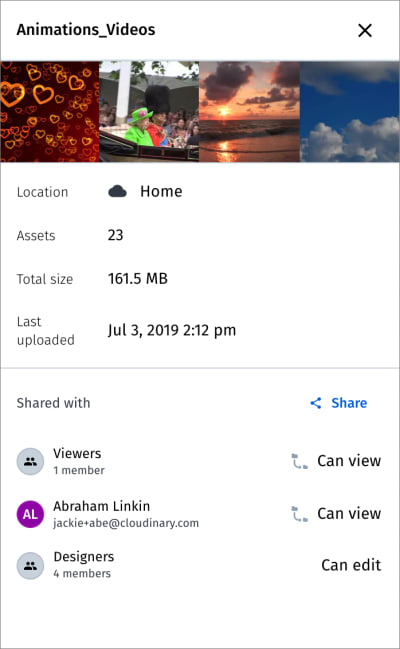
Single-click a folder to view summary details about the folder in the Preview pane, including total number of assets, total file size of the contents, date an asset was last uploaded to the folder and details about which user groups and users have access to the folder.
- The details relate to the selected folder and all sub-folders.
- The permission details are visible to all users with an admin role as well as to users with Can Manage permissions for the folder.
Tips for browsing folders
- Double-click a folder in the Folders drop-down or single click a folder in the Folders pane to view the contents of the folder.
- When in a non-folder view, such as advanced search or a collection view, you can navigate to the containing folder of a selected asset by right-clicking the asset and selecting Open containing folder or by clicking the folder link displayed on the bottom of the card.
- When located in a folder, you can filter the asset types displayed by selecting Search this Folder from the Folders drop-down, and then selecting the desired asset type from the Asset type filter.
- When performing an Advanced Search, results are returned from all folders (unless otherwise specified). When you open the Advanced Search, before you begin filtering, you will see all assets from all folders in a single view.
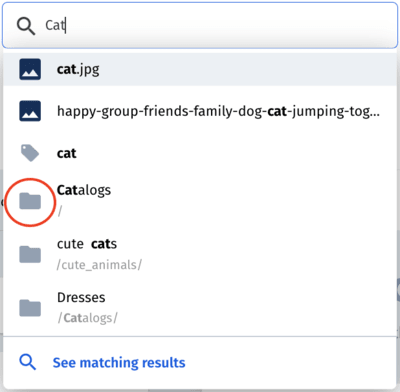
- If you know the name of the folder you want to view (or a part of it), you can quickly navigate to it from any view via the Global Search bar. As you type, any folder names matching the characters you've entered will be included in the search filter (along with assets, collections, and other entities that match your query). You can easily identify folders by the folder icon. Clicking on the folder in the search filter navigates directly to it. (For more information, see Global Search.)

Create folders
The easiest way to create folders or subfolders is from the Add Folder button near the folder path breadcrumbs. You can also create a new folder when moving assets to a new location.
Rename folders
If your product environment uses dynamic folder mode, You can select to Rename a folder from the options menu located next to the folder name.
If your product environment still uses fixed folder mode, you can't rename folders.
Move folders
If your product environment uses dynamic folder mode, you can select to Move a folder, together with all the assets and subfolders it contains, to a different location within the folder hierarchy. Use the options menu located next to the folder name. Because folder permissions cascade from parent to child folder, keep in mind that moving a folder to a new location in the folder structure may impact which user groups will have access permissions for those assets.
If your product environment still uses fixed folder mode, you can't move folders.
Delete folders
You can select to Delete a folder from the options menu located next to the folder name. Deleting a folder will delete all the contents of the selected folder including all subfolders.
Download folders
You can download a copy of a folder and all of its contents including any sub-folders by selecting the Download option from the options menu located next to the folder name.
- The folder is downloaded as a ZIP file that maintains the complete folder structure.
- For larger folders, it may take a few moments for Cloudinary to compile the ZIP file and begin downloading it.
- Some folders may be too large to download (based on quantity of items or total file size). A message is displayed if the folder you select exceeds these limits.
Move assets between folders
You can select one or multiple assets from a folder or from the search results and move them to an existing or new folder. Keep in mind that moving assets to another folder may impact which user groups will have access permissions for those assets.
Move assets by selecting them and then either clicking Move to Folder from the (3-dots) options menu in the assets toolbar, or dragging and dropping the assets into a folder within the tree or grid.
If your product environment uses dynamic folder mode, you can move assets freely without risking breaking links to assets in production.
If your product environment still uses fixed folder mode, the folder structure is part of the asset's delivery URL, so it's important to make sure that the assets you select to move are not currently delivered in any production websites or apps, or that the public ID paths for all relevant assets will be updated in the production code accordingly. Otherwise, your production applications could break.
Share folders
If there are users with the Media Library user role in your product environment, you can share folders at various permission levels with users or user groups. For details, see Folder sharing and permissions.
Access folders from the homepage
You can star folders your most-used saved searches as favorites, ensuring they're displayed in the My Favorites section on your homepage for quick and convenient access.
Collection management
If you either have an admin role or you have Can manage permissions for a particular collection, you can perform all of the operations described below. If you have lower-level permissions, you may only be able to perform some of these operations:
- Create and add assets to collections
- Create and manage dynamic collections (Beta)
- View the collections available to you
- Download collection assets
- Rename collections
- Delete collections or remove assets from collections
- Share collections
- Access collections from the homepage (Assets only)
Collection management video tutorial
This tutorial walks you through some of the basics of creating and managing collections to organize your assets.
Tutorial contents
Create and add assets to collections
This section shows you how to:
Follow the steps shown in the animations below or follow the written instructions.
Watch and learn: Create a collection
Read how to: Create a collection
From the Media Library Tabs located at the top of the Console, select Collections, and then click the Add collection button, and enter the name of the new collection.
Watch and learn: Add assets to an existing collection
Read how to: Add assets to an existing collection
From the Collections page, double-click a collection. Once inside the collection, click Add Assets to open the asset picker. Select the assets you want to add, and click Add.
Watch and learn: Add assets to a new collection
Read how to: Add assets to a new collection
From any asset view (e.g. from a folder, search results, another existing collection, etc.), select one or more assets and click Add to Collection from the share icon in the assets toolbar. In the Add to Collection dialog box, enter the name of your new collection, click the new collection name and click Add. This creates the new collection and adds the selected asset(s) to it. In the confirmation message, you can click Browse to navigate to the new collection.
- All users with admin roles can create collections. Users with the Media Library user role must be given permissions to Create collections by the DAM administrator.
- A collection can contain a maximum of 1000 assets.
- Collections created by the same user can't have the same name. However, collections created by different users can have the same name.
- You can't upload assets directly into a collection. You must first upload them to the Media Library, either via the Upload button or by dragging and dropping to a selected folder from within the Folders view. Afterwards, you can select the assets to add them to new or existing collections.
- The number of collections you can create and the number of assets you can add to a collection is limited. For more options and information, contact support.
Create and manage dynamic collections (Beta)
Enterprise plans:
- The dynamic collections feature is a premium offering, and its availability depends on your account setup. If dynamic collections is not yet enabled for your account and you'd like to enable it, please contact your Customer Success Manager.
Free plans:
- The number of dynamic collections you can have is limited. For more options and information, contact support.
- You can't add dynamic collections to media portals.
A dynamic collection, like a traditional collection, is a conceptual, internal grouping of assets that you can download, rename, and preview. Dynamic collections share almost all of the characteristics that define collections.
However, whereas collections contain assets that you manually select, dynamic collections contain assets that match a filter criteria that you set. Content in a dynamic collection is automatically updated under the following circumstances:
- If assets that previously matched your filter criteria are updated and no longer match the criteria, they're automatically removed from the collection.
- If assets that didn't previously match your filter criteria are updated and now match your filter criteria, they're automatically added.
- If your filters change, the assets in the collection are replaced by those that match the new criteria.
To create a new dynamic collection, select Create Dynamic Collection from the Collections drop-down menu in the Collections view of the Media Library:
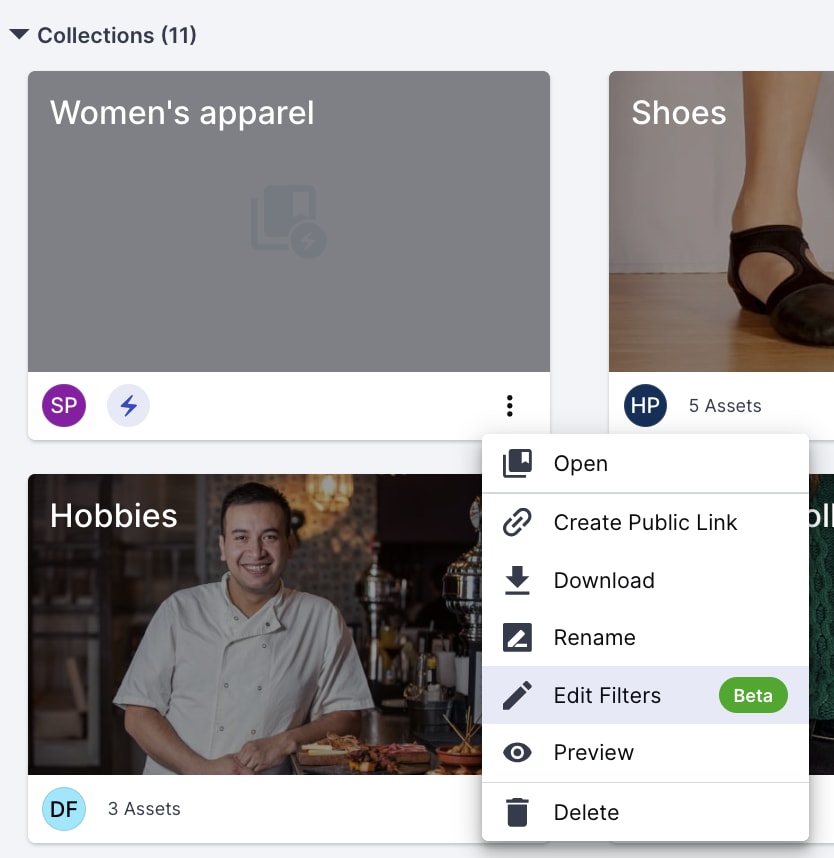
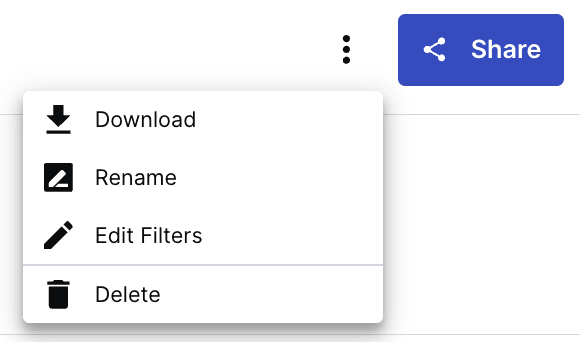
To edit a dynamic collection's filter, select Edit Filters from the (3-dots) options menu on the dynamic collection, or, when viewing the dynamic collection, from the drop-down menu at the top of page:
- After editing the filter, you may need to refresh the page before seeing the assets in the dynamic collection updated accordingly.
- You currently can't invite teammates to collaborate. We welcome customers interested in this functionality to contact us.
To externally share a public link to your collection: see Sharing collections externally via public links.
View collections available to you
If you have a Media Library user role, you can access any collections that you create as well as collections that others in your organization created and invited you to, either directly or by inviting a user group that you are a member of.
If you have an admin role, you can access all collections created by any DAM user.
To view your collections and those you're invited to, select Collections from the Media Library Tabs located at the top of the Console. You can:
- View collections in a card or list view.
- Navigate to a collection if you know all or part of its name.
- Filter collections by various categories to find relevant collections.
- View or edit summary details about a collection.
Card and list views
Card view:
Toggle between Card view and List view by clicking the View button:
List view:
Navigating to a collection
If you know the name of the collection you want to view (or a part of it), you can quickly navigate to it:
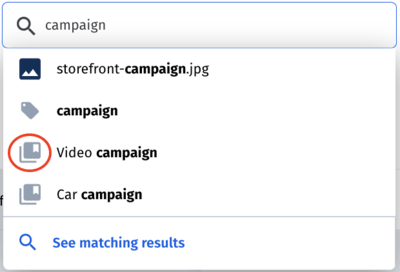
From any view via the Global Search bar. As you type, any collection names matching the characters you've entered will be included in the search filter (along with assets, folders, and other entities that match your query). You can easily identify collections by the collection icon. Clicking on the collection in the search filter navigates directly to it. (For more information, see Global Search.)

From the Collections view via the Filter by name bar. Collections created by different users can have the same name. If you get several results with the same name, identify the collection you're looking for by its creator.
Filtering collections
If you want to narrow down the displayed collections, you can filter the collections by the users who created them, by the date the collections were created, and/or by the users or user groups that were invited to the collections.
Watch a short video showing collection filtering, then read to learn the details.
Watch and learn: Filter collections using Created by, Creation date, and Shared with
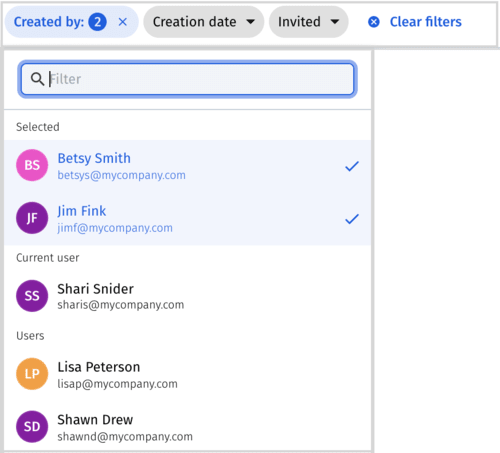
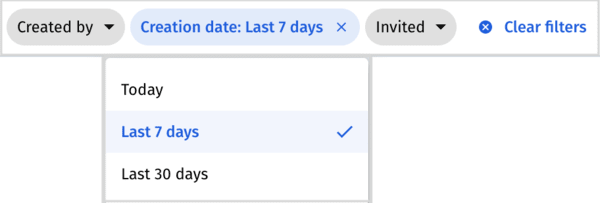
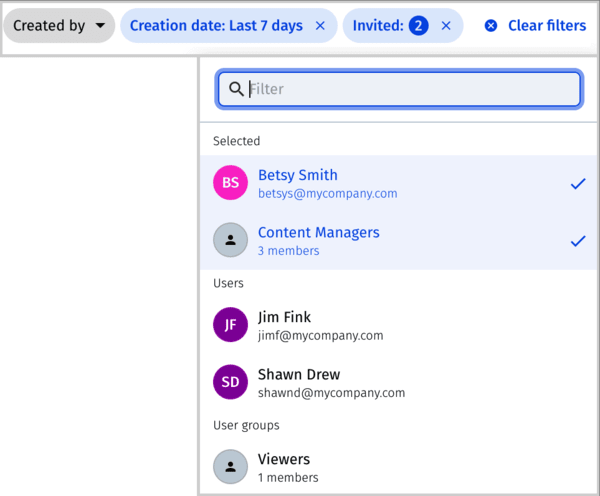
Read how to: Filter collections using Created by, Creation date, and Shared with
Selecting more than one filtering type is treated as an "AND" statement: the collections displayed are those that satisfy all selected criteria. For example, if you filter collections using Created by and a Creation date range, the collections displayed are only those that were created by the selected user during the selected creation date range.
Selecting more than one value within a single filtering type is considered an "OR" statement: the collections displayed are those that satisfy any of the selected items in that filter. For example, if you select more than one user from the Created by filter, the collections displayed are those that were created by any of the selected users.
You can start typing in any of the textbox filters to quickly find the value you're looking for. As you type, only values matching the characters you've entered are included in the dropdown list.
In the Created by filter, your name appears first by default. However, after you make a selection, the next time you open that dropdown list, the users you previously selected appear first.
In the Invited filter, users appear first followed by user groups by default. However, after you make a selection, the next time you open that drop-down list, the users and user groups you previously selected appear first.
Filter by creator:
Filter by creation date:
Filter by invited users or user groups
Collection Preview details
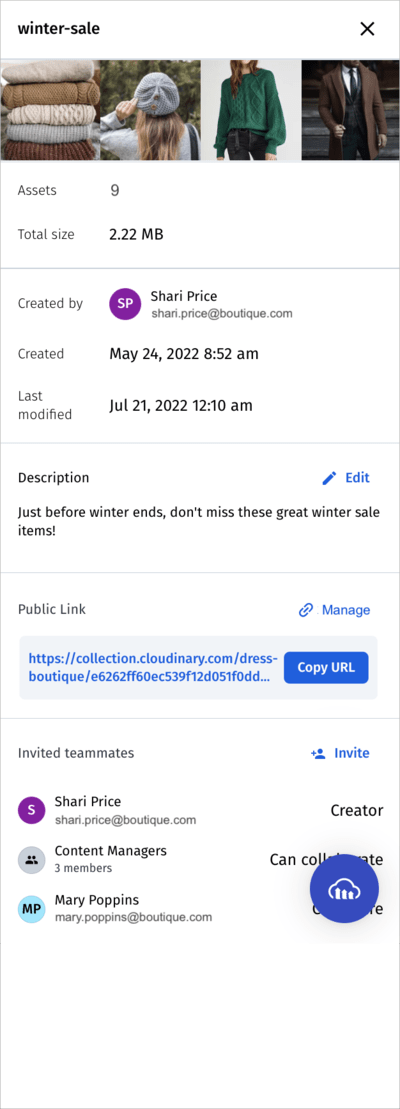
Single-click a collection in the Collection view to view (or edit) summary details about the collection in the Preview pane, including the number of assets in it, the total file size of the contents, who created it, when it was created or last modified, the collection description, the collection's public link and groups or users that are invited to the selected collection.
Download collection assets
You can download the contents of any collection you created or that you are invited to as a zipped file. Right-click the collection or click the options button on the collection and select Download.
Add/edit collection descriptions
If you are the creator or have Can manage permissions for a collection, you can add a description for the collection.
- If you invite teammates to your collection, this description can give details on the intended purpose of the collection and provide contribution guidelines for other collection users.
- If you share a collection externally via public link or your collection is included in one of your product environment's media portals, this description is displayed for external viewers immediately above the assets of that collection.
You add or update collection descriptions by clicking the Edit link in the Preview pane Description entry.
(If the Preview pane is closed, right-click the collection and select Preview or click the Show Preview Pane ![]() icon to open it).
icon to open it).
If you're inside the collection, click Edit Description.
Rename collections
If you are the creator or have Can Manage permissions for a collection, you can rename the collection by right-clicking it from the Collections view and selecting Rename.
You can also rename the collection from the Preview pane.
(If the Preview pane is closed, right-click the collection and select Preview or click the Show Preview Pane ![]() icon to open it).
icon to open it).
If you're inside the collection, select Rename from the 3 dots (options) menu at the top of the collection.
When renaming a collection, the name is updated for all users who have access to the collection.
Delete collections or remove assets from collections
When you remove assets from a collection or delete an entire collection, the assets still remain in your Media Library, they are just no longer grouped together in that collection. However, there may be users who had access to those assets only via that collection, so removing assets or deleting collections may prevent some users from being able to view those assets.
To delete a collection:
From the Collections view, right-click the collection and select Delete.
To remove assets from a collection:
Display the contents of the relevant collection, select the assets you want to remove, and click Remove from the assets toolbar. You can also remove a single asset from the collection by right-clicking it and selecting Remove from collection.
Share collections
You can share collections with other users and user groups of the Media Library, as well as with external stakeholders who don't have access to the Media Library:
Invite teammates to share collections internally.
If some of the users in your product environment have the Media Library user role, you can invite user groups or individual users to your collection at various permission levels.Create Public Links to share collections externally.
Enable external stakeholders without access to your product environment to view or download assets from a dedicated web page. Generate a public link, with or without an expiration date, to your dedicated collection web page and share its URL externally.
For details, see Collection sharing and permissions.
Access collections from the homepage
You can star your most-used collections as favorites, ensuring they're displayed in the My Favorites section on your homepage for quick and convenient access.
Folder sharing and permissions
Media Library administrators and managers can control access to assets by sharing folders (and thus their contents) with selected users or user groups at varying levels of access permissions, from full management control to view-only access. Conversely, they can prevent access to a folder's contents by not sharing that folder with a specific user or user group at all.
As a DAM user, you might also want to share folders to enable collaboration with other users. For Media Library users, permission to do so is granted per folder.
To share a folder, you must have one of the following user roles:
- Any of the admin roles
- A Media Library user role AND with Can Manage permissions on the folder you want to share.
How to share folders
To share a folder:
- Do one of the following:
- Select the users and/or user groups you want to share the folder with, as well as the permission level for each.
An email notification is automatically sent to anyone you've shared with who hasn't opted out of receiving emails in the My Profile page of the Console Settings.
Folder permission levels
When you select to share a folder, you can set one of the following permission levels (applies to the folder and all its sub-folders): Can view, Can contribute, Can edit, Can manage.
The table below summarizes the permissions available to each level:
| Can View | Can Contribute | Can Edit | Can Manage | |
|---|---|---|---|---|
| View assets | ✔ | ✔ | ✔ | ✔ |
| Download assets | ✔ | ✔ | ✔ | ✔ |
| Edit transformations1 (via Edit Transformation page or directly in browser URL) |
✔ | ✔ | ✔ | ✔ |
| Comment on assets | ✔ | ✔ | ✔ | ✔ |
| Search (including Advanced Search)2 | ✔ | ✔ | ✔ | ✔ |
| View version history | ✔ | ✔ | ✔ | ✔ |
| Upload assets | ✔ | ✔ | ✔ | |
| Create sub-folders | ✔ | ✔ | ✔ | |
| Overwrite existing on upload | ✔ | ✔ | ||
| Edit assets3 (including original asset, tags, structured and contextual metadata, rename, move to another folder) | ✔ | ✔ | ||
| Restore previous versions | ✔ | ✔ | ||
| Moderate assets4 | ✔ | ✔ | ||
| Delete assets | ✔ | |||
| Delete the folder | ✔ | |||
| Share the folder | ✔ |
- Editing transformations does not have any impact on the original asset, but any new transformations that are generated are counted against your monthly transformation quota.
- Search results will include only assets where the user has at least Can view permissions.
- Users with Can Contribute permissions can use the Add a tag option in the Media Library upload widget while uploading, and, depending on admin preferences, may be prompted to fill in metadata fields before uploading. However, those users cannot add tags to existing assets.
- Media Library users with the Moderate asset administrator permission can access the Moderation page and moderate assets in folders that they have Can Edit or Can Manage permissions to. Media Library users will only be able to see the assets that they have permission to moderate from the moderation queue.
Folder sharing guidelines and best practices
When planning your folder sharing strategy, consider the following:
-
Sharing rights:
- Users that have the Media Library user role with Can manage permissions for a folder can share that folder and its sub-folders. Users with lower level permissions cannot share a folder.
- Any user in a role other than Media Library user, Reports, or Billing can access, share, and manage all folders and assets in the Media Library.
- Only a user with the share permissions mentioned above can see which user groups a folder is shared with, and how many users are in each of those groups.
- Users that have the Media Library user role with Can manage permissions for a folder can share that folder and its sub-folders. Users with lower level permissions cannot share a folder.
Sharing with multiple groups: You can share a folder with multiple users and user groups at the same or at different levels.
-
Permissions on subfolders:
- When you share a folder at a certain level, that permission level cascades down to all subfolders under it.
- You can increase the permission level for a particular user or group in a sub-folder of a folder they already have access to, but you cannot decrease their permission level.
- If you don't share a folder (nor any parent of that folder) with a particular user or group at all, those users won't be able to see that folder or the contents inside it. Even when performing a search on all folders, the results will only include folders where the user has at least view permissions. Exception: If assets from a particular folder are included in a collection, and that collection is shared with a user group or users who otherwise do not have access to that folder, those users will still be able to view and download (but not modify) the assets in that collection.
Multiple user groups and permission levels: If a user belongs to multiple groups, and the same folder is shared to each of those groups at different permission levels (which are higher than the permissions they may have received individually), then the highest of those permission levels applies to the user.
Collection sharing and permissions
Collections often represent a group of assets targeted for a particular purpose. Once created, you may need to collaborate with other people either inside or outside of your organization regarding the compiled set of assets.
You can share your collection internally by inviting teammates (other user groups or individual Media Library users) at varying levels of access permissions.
You can also share your collection with external stakeholders, such as graphic designers, partners, or employees at your organization without access to your product environment. Generate a dedicated web page to display your collection's assets and share the link with the relevant parties. You can also set an optional date range during which the web page will be accessible to those with the link.
Users in an admin role can view, invite teammates, and share a public link to any collection in the product environment.
For a Media Library user to invite teammates and share a public link to a collection, they must both:
Be assigned Share collection permissions. This permission is set per user by a DAM administrator in the User Management page of the Console Settings.
Be the creator of the collection or have Can manage permissions on the collection they want to share.
Collection sharing video tutorial
This video demonstrates how to share collections by inviting internal users, and sharing a public link with external users.
Tutorial contents
Inviting teammates and permissions
To share a collection internally, invite teammates (Media Library users or user group members) to it. Your teammates can see the collection that they've been invited to and the collection creator's name in the main Collections view, as shown in View collections available to you.
To invite teammates to collections:
-
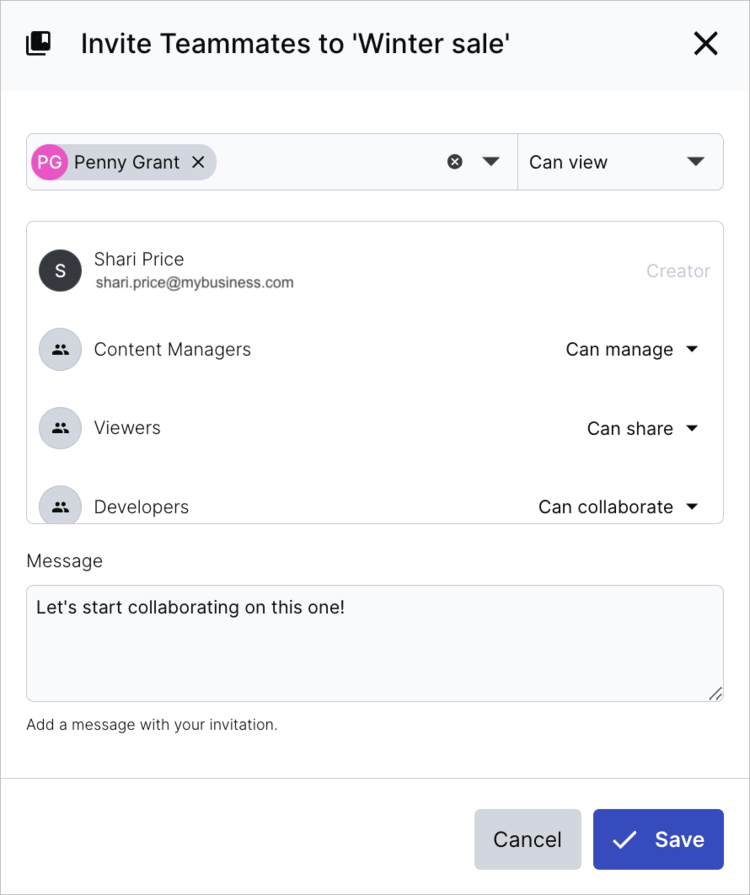
Open the Invite Teammates dialog box:
- From the main Collection view, right-click or click the (3-dots) options menu of a collection and select Invite.
- From the main Collection view, select a collection and click Invite teammates in the Preview pane. (If the Preview pane is closed, click the Open Preview Pane toggle button to display it.)
- When viewing the contents of a collection, click the Share drop-down button and select Invite.

-
Select the users and/or user groups you want to invite to your collection, as well as the permission level for each.
An email notification is automatically sent to all the invitees who haven't opted out of receiving emails in the My Profile page of the Console Settings.
Collection permissions
When inviting teammates to collections, you can set one of the following permission levels:
Can view, Can share, Can collaborate, Can manage.
The table below summarizes the permissions available to each level:
| Can view | Can share | Can collaborate | Can manage | |
|---|---|---|---|---|
| View assets in the collection1 | ✔ | ✔ | ✔ | ✔ |
| Download assets in the collection | ✔ | ✔ | ✔ | ✔ |
| Invite teammates to a collection2 | ✔ | ✔ | ||
| Publish a collection2 | ✔ | ✔ | ||
| Add assets to the collection | ✔ | ✔ | ||
| Remove assets from collection | ✔ | |||
| Rename the collection | ✔ | |||
| Delete collection | ✔ |
- Anyone with Can view or higher permissions to a collection can view (but not otherwise modify) all assets in that collection, even if they don't have Can view permissions for the folders containing those assets.
- Even if a user group or Media Library user was invited to a collection at Can manage level permissions, the user must also have Share collection permissions (set by an administrator) in order to invite teammates or publish the collection.
Sharing collections externally via public links
To share a collection with external stakeholders, create a public link to a dedicated collection web page. Share this link to allow external parties to view all assets in your collection and download them individually or grouped in a ZIP file.
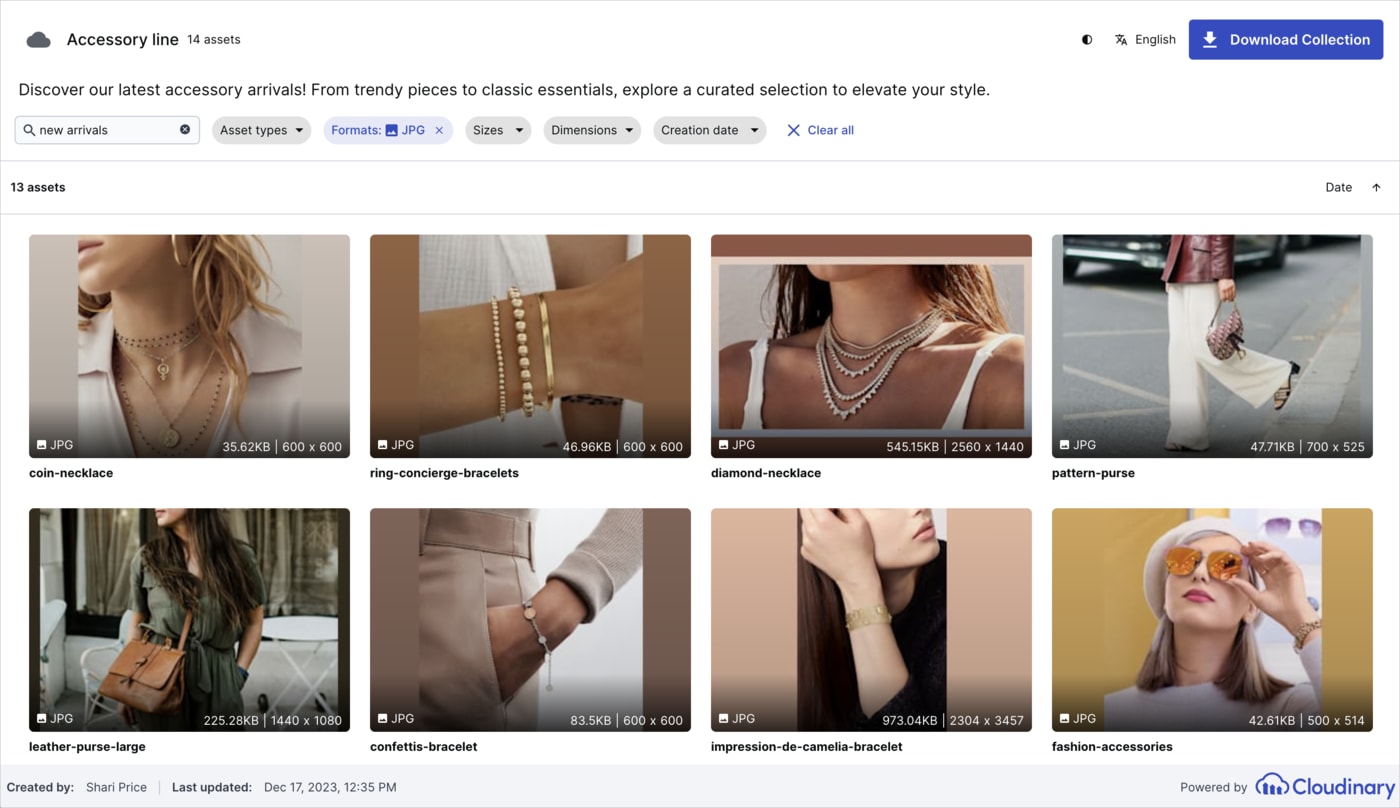
Stakeholders viewing your collection can filter the assets based on various criteria, such as format, size and creation date. Additionally, stakeholders have downloading options, including downloading the entire collection, search results, or single assets, subject to the settings you establish.
You can determine whether the option to download original images and videos, and/or the option to download modified images, will be available in your publicly shared collection. Depending on the options you choose, your target audience might be able to download individual images and videos, and groups of assets of different types as ZIP files. For more details, see Downloading options in publicly shared collections and media portals.
You can also optionally set a date range for the collection web page, outside of which the page is not available.
To create and manage a collection web page link:
- Open the Public Link dialog box:
- From the main Collection view, select a collection and click Create Public Link in the Preview pane. If a public link already exists, click Manage. (If the Preview pane is closed, click the Preview Pane toggle button to display it.)
- From the main Collection view, right-click or click the (3-dots) options menu of a collection. Click Create Public Link when creating the link for the first time and Manage Public Link when a link already exists.
- When viewing the contents of a collection, click the Share drop-down button and select Public Link.

-
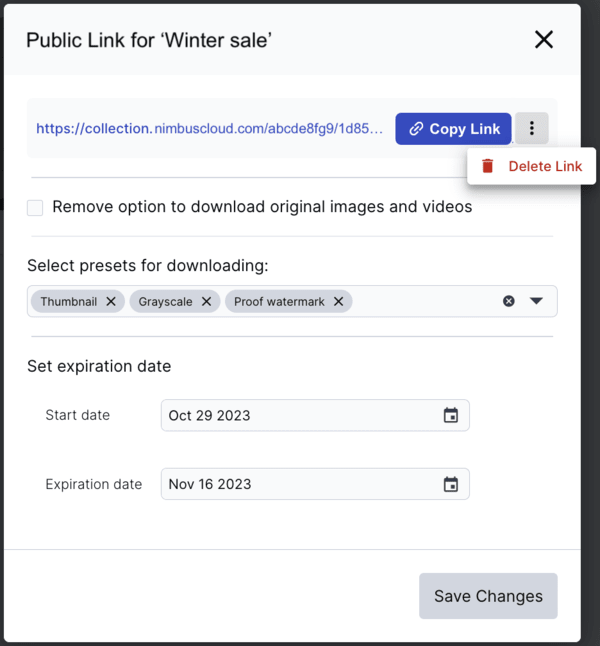
Determine the behavior for downloading original images and videos with the Remove the option to download original images and videos setting. When selected, the option to download original images and videos won't be offered.
NoteIf your administrator removed the option to download original images and videos in the Media Library preferences, you won't be able to change the setting when creating or managing a public link to a collection. -
Optionally enable downloading copies of images modified by transformation templates by selecting one or more transformation templates from the Selecting presets for downloading drop-down.
NoteFor more details, see Downloading options in publicly shared collections and media portals. -
Optionally set the availability of your externally shared collection by entering the Start and Expiration dates.
Even after sharing the collection web page link, you can change the availability dates at any time or click the Delete Link button from the (3-dots) option menu to immediately disable the web page.
Use the Copy Link button to quickly copy the link. You can also copy the link from the Preview pane when that collection is selected in the main Collections view. You can then take a look at the collection web page in any browser or send it to your external stakeholders.
From this web page, you can click to preview individual assets, download individual assets, copy the delivery URL of individual assets, or download the entire collection as a ZIP file. Filter assets using free text or various filtering criteria and set your preferred sorting order to find what you need.
Changes to your collection, including assets added or removed, renaming of assets or of the collection itself, are immediately reflected in the generated web page (upon refresh).
Notes and considerations for sharing collections externally
-
The collection web page displays all assets in the collection, including those with special access control restrictions. When you select to share a collection with restricted assets, a warning is displayed in the Publish dialog box. Additionally, the generated web page is set as
noindex, so it won't be found by search engines, but anyone with the link will be able to preview and download a copy of all assets in the collection.Therefore, make sure you only send these links to stakeholders you trust, especially if it includes restricted or otherwise sensitive content. It's also good practice to ensure the collection web page will be removed when your external stakeholders no longer need it, by setting an expiration date.
When sharing a dynamic collection externally, be aware that the dedicated collection web page you share will automatically update as assets are added or removed based on the filter criteria used to create the collection. This means that assets not originally intended to be visible may be seen by external stakeholders on the dedicated collection web page.
Because changes to your collection are immediately reflected in the collection web page that you've shared, it's important to make sure that all users who have Can collaborate or Can manage permissions to the shared collection are aware that any changes they make to an externally shared collection will also impact external stakeholders.
Fetched and social media assets are not supported for externally shared collections.
-
When someone selects to download a collection and a ZIP file is created for them, that ZIP file is stored as a raw file in your product environment under an automatically generated folder called generated_public_links.
- If any changes are made to the collection, then the next time someone requests to download the collection, an updated ZIP file is generated for that request. The updated ZIP file replaces the existing one in the generated_public_links folder.
- If you rename the collection after a ZIP file has already been created, the next time someone requests to download the collection, a different ZIP file will be created based on the new name of the collection.
The default language that your administrator set in the Media Library preferences will determine the initial language displayed in the dedicated collection web page. Viewers of externally shared collection web pages can switch languages by clicking the
 icon on the top-right corner of the web page and selecting from the available languages.
Media portals (Beta)
Enterprise plans:
- The Media portals feature is currently not at enterprise-grade level and is unavailable for Assets enterprise plans. If you have an enterprise Assets plan and you're looking for a media portal solution, we're here to help. Contact our Enterprise Support and Sales team or your Customer Success Manager for more information.
Free plans:
- You can create one portal. For more options and information, contact support.
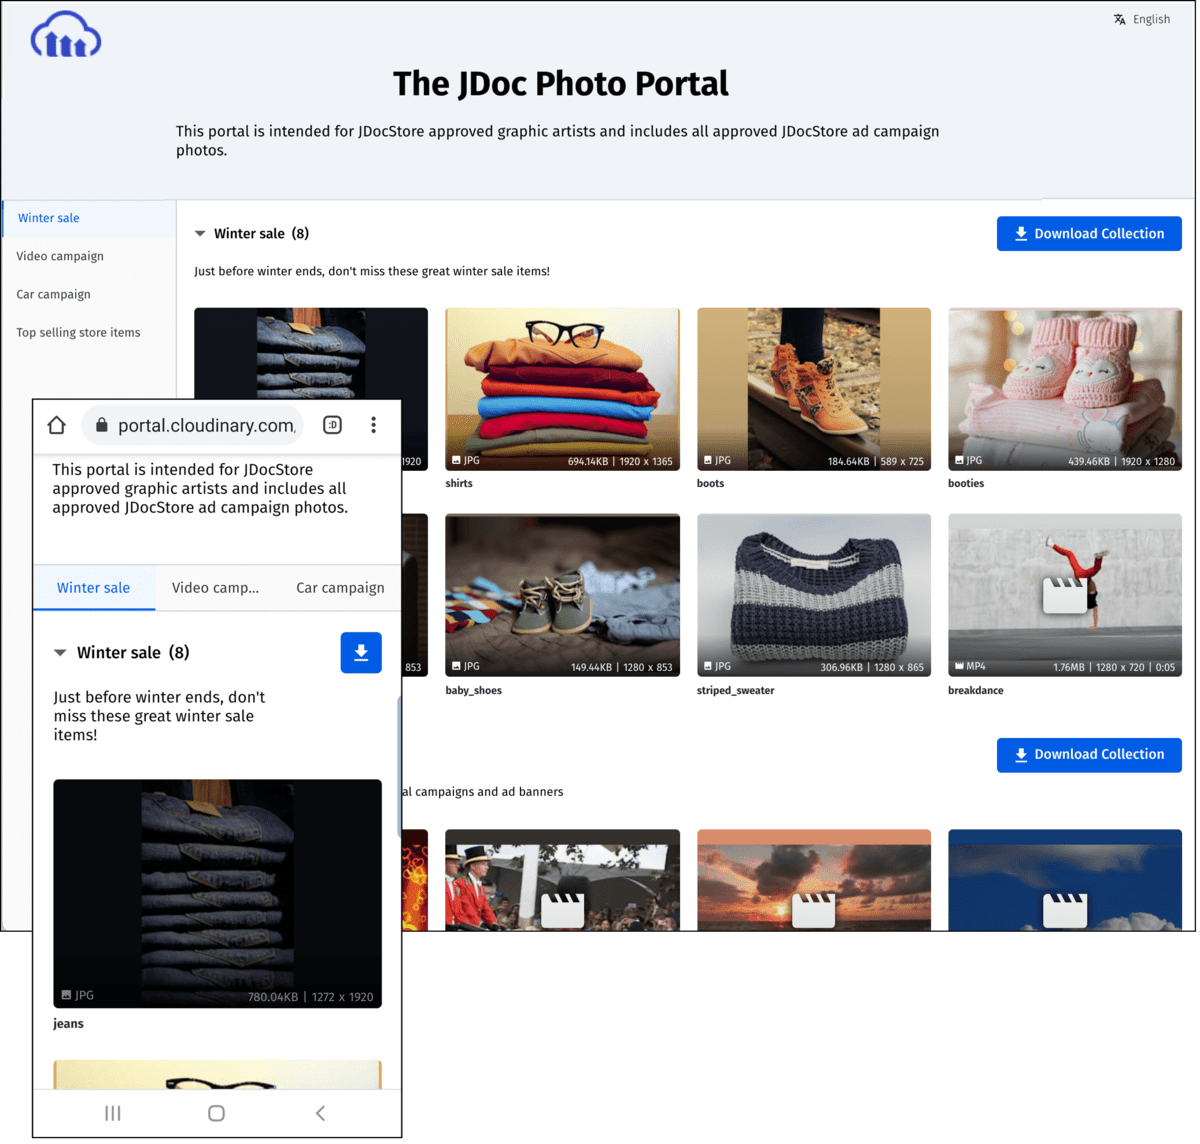
Cloudinary media portals enable you to automatically generate and then publish assets from multiple collections in the form of user-friendly and responsive web pages. You can customize the look of your media portal by displaying a logo at the top of the page. Your target audience can then preview any of the included assets, and download raw assets individually or grouped in a ZIP file.
You can determine whether the option to download original images and videos, and/or the option to download modified images, will be available in each of your media portals. Depending on the options you choose, your target audience might be able to download individual images and videos, and groups of assets of different types as ZIP files. For more details, see Downloading options in publicly shared collections and media portals.
Updates (asset additions, removals, renames, etc.) to any of the collections included in a portal are immediately reflected in the published portal. You can publish or unpublish a portal at any time.
Media portals can be used for a variety of different purposes. Some common use cases include Brand portal, Product launch portal, Photo gallery portal, or Event portal.
Read more about the Media Portal and common use cases in this blog post.
Create a media portal
- Select Portal from the Product Navigation menu, and in the landing page that opens, click Create New Portal.NoteIf at least one portal has already been created, when you select Portal the Portals page opens displaying a grid with information about your existing portals. Click Create new to add a new portal.
- In the Create New Portal form, enter a Title and Delivery name for your portal, and select the collections to include.
- The Title acts as the meta-title (browser tab label) for your portal. You can modify the title at any time.
- The Delivery name is the last element in your portal's URL. Once you Save your initial portal, this value cannot be changed. The rest of the portal's URL structure is standard and currently cannot be customized. You can see what the full URL will look like directly below the Delivery name field.
- Select one or more collections to include in your portal. You can add, remove, or change the order of the collections during the portal creation process or at any time in the future.
- Click the + Create button.
The Edit 'Portal Title' form opens, which means that your portal is created but not published.
You can continue configuring and/or publishing your portal now, or you access your portal later via the Portals page.
View created portals
If at least one portal has already been created, selecting Portal from the Product Navigation menu located on the left side of the Console, opens the Portals page, where you can:
- View details for all your portals.
- Select to modify, publish, or unpublish a portal.
- Select to create a new portal.
- Preview published portals.
Modify, publish, or unpublish a media portal
From the Portals page, click  next to the portal you want to modify, publish, or unpublish.
From the Edit 'Portal Title' form, you can:
Optionally add a logo, select its size and alignment (left, center, or right) at the top of the portal, or remove an existing one.
Optionally modify the Title or the Portal Collections included in your portal.
-
Optionally add or modify your portal Description.
- The Description enables you to provide details about your portal for your end users. The portal description is displayed just below the portal title on the portal page. For those collections in your portal that have collection descriptions defined, those descriptions are displayed just below the title of each collection.
-
Set or modify the Download Options for your portal audience:
- Determine the behavior for downloading original images and videos with the Remove the option to download original images and videos setting. When selected, the option to download original images and videos won't be offered. NoteIf your administrator removed the option to download original images and videos in the Media Library preferences, you won't be able to change the setting when creating or managing a public link to a collection.
- Optionally enable downloading copies of images modified by transformation templates by selecting one or more transformation templates from the Select presets for transforming and downloading assets: drop-down. NoteFor more details, see Downloading options in publicly shared collections and media portals.
- Determine the behavior for downloading original images and videos with the Remove the option to download original images and videos setting. When selected, the option to download original images and videos won't be offered.
When ready, you can change the status of the portal to Published.
-
When you Save your changes after changing the status to Published, your portal will immediately go live.
From the Portals page, you can preview your published portal by clicking the icon next to your portal.
 To unpublish your portal (immediately block all access to the portal URL), change the status to Unpublished and click Save.
Media portal notes and considerations
- The portal can be created or modified only by users with one of the admin roles.
- You can create up to 100 media portals per product environment.
- While published, the portal is accessible to anyone with the link.
- In the collection Preview pane, you can view a list of Media Portals that contain the selected collection. If you're an administrator, you can select to edit any one of the portals listed there. An administrator can also navigate directly from the collection Preview pane to the Portals page to view (and then edit) all portals.
-
Although only admins can create a portal or choose to add or remove collections from the portal, any user with Can contribute or higher permissions for a particular collection can make changes to the collection, including which assets are included in that collection or the name of the collection. Additionally, anyone with Can edit or higher permissions to a folder containing assets from any of your portal collections can delete or rename those assets.
Any of the above types of changes will immediately impact the assets that your target portal users see in your portal. Therefore, as an administrator, it's a best practice to carefully choose the users who have permissions to modify the collections you include in a portal. You should also consider the permissions of the folders where your collection assets are stored.
Fetched assets cannot be displayed in the portal. Additionally, while social media profile pictures are successfully displayed in the portal, an error occurs if you try to download one of them, or to download an entire collection that contains a social media image.
Some portal administration functionality, such as changing the order of collections, may be limited when accessing the Edit 'Portal Title' page from a mobile device.
The default language that your administrator set in the Media Library preferences will determine the initial language displayed in the media portal web page. Viewers of the portal can switch languages by clicking the
 icon on the top-right corner of the web page and selecting from the available languages.
Downloading options in publicly shared collections and media portals
In your publicly shared collections and published media portals, you can choose to offer the option to download original images and videos, and/or download images modified by transformation templates. The option to download original raw files, either individually or grouped as a ZIP file, is always available.
The options you choose to offer affect what can be done from your publicly shared collection, or from each collection in your media portal, in the following ways:
-
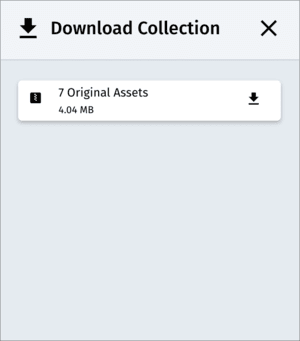
If you haven't removed the option to download original images and videos, external stakeholders can download original images, videos and raw assets individually, or the entire collection of original assets as a single ZIP file.
From your public link, the option to download all originals looks like this:
If you've removed the option to download original images and videos, external stakeholders can't download original images and videos individually or together a single ZIP file; they can only download original raw assets.
-
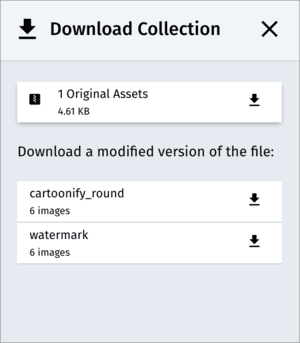
If you enable downloading copies of images modified by transformation templates, external stakeholders can download an individual image modified by a transformation template, or all the images in the collection modified by a transformation template as a ZIP file.
From your public link, the option to download original raw files only and modified images looks like this:
NoteRemoving the option to download images and videos means that your public link will offer previewing videos only.Removing the option to download images and videos without adding the option to download modified images means that your public link will offer previewing images only.
Learn how to set these options when sharing a collection externally via public link or creating a media portal.
 Programmable Media
 Digital Asset Management
