Uploading and storing assets
Last updated: Apr-10-2024
You can upload images, videos, and other files to your Media Library via drag-and-drop, file-system upload, or by selecting media files from a variety of remote sources. In all cases, you can upload multiple files at once. This single repository is then used by your creative team during all stages of the media review and selection workflow as well as by your developers for delivery in your production website or app.
When you upload assets to Cloudinary, they are stored in cloud storage buckets (such as Amazon S3 or Google Cloud Storage) with all of the backups, versioning, and replication that are standard with leading cloud storage vendors. For technical details about Cloudinary storage, architecture and delivery, see Service architecture.
Any settings that were configured in your Media Library upload preset defaults are applied to every uploaded file. For example, the preset may apply one or more auto-tagging add-ons, so that every uploaded asset will be tagged according to automatically detected categories, or the preset may activate manual or automated moderation to uploaded files. The Media Library upload preset defaults and other upload settings can be set by users with one of the Admin roles. For details, see Upload Settings.
- If you have one of the Admin roles, you can upload to all folders.
- If you have a Media Library user role, you can upload only to folders where you have at least Can contribute permissions. For details, see Folder sharing and permissions.
Upload options
The Media Library provides a variety of ways to upload media to Cloudinary from a variety of sources. Regardless of the option you choose, the selected files are uploaded to the currently selected folder.
Upload from the file system
There are two ways to upload from the file system:
Drag and drop: Drag and drop selected media files or folders into the Media Library from your file system. The files or folders you drag are added to the currently active folder. When you select folders, the entire folder structure, including any sub-folders, is created within the folder you dragged to.
Media Library Upload widget: To access the Media Library Upload widget, click the drop-down button next to the main Upload button. Make sure the My Files tab is selected and click Browse to open your file system folder and select the file(s) for uploading. If you need to upload an entire folder structure including sub-folders, drag and drop the top-level folder into the Media Library Upload widget.
When using either of these options, display name (relevant only for dynamic folder mode), public IDs and tags (if any) are applied according to your product environment's Media Library upload preset defaults. If you want to control the public ID, add custom tags for the files you select to upload, or select a different upload preset, use the Media Library Upload Widget.
- Make sure the folder names of any uploaded folders (including sub-folders) do not contain any special characters. Only alphanumeric characters and hyphens or underscores are supported.
- Only folders containing files are created. Empty folders or sub-folders are ignored.
- When you upload a folder with the same name as an existing folder within the same level of the directory, the files and sub-folders from the incoming folder are merged into the existing one.
- When you use the Media Library Upload widget to upload a file structure and specify a public ID, the public ID is applied to all uploaded assets with an added random suffix.
Media Library Upload widget
If you want to select media files from a source other than your computer/device, or you want to apply additional settings to the files you upload, click the Upload button at the top-right of the Media Library to open the Upload Widget. From the widget you can:
- Upload from your local file system or from remote sources such as a Web URL, Google Search, DropBox, Shutterstock and more.
-
Use the Advanced options to set the public ID and/or tags for all the media you select for upload or to select a signed upload preset that you want to apply to all assets you upload in that specific upload widget session. If you set a public ID when uploading multiple files, each uploaded file gets the specified public ID plus a counter suffix.
Notes- If you want to set Advanced options, you must set them before you select the files to upload.
- By default, the Upload Preset option in the Advanced options of the Media Library Upload Widget is hidden. If you would like it enabled for your product environment, submit a support request.

Watch the Media Library Upload video tutorial to see this in action.
Uploading from the Clipboard
Assets can also be uploaded by pasting them from the clipboard. This method allows quick and convenient uploading of assets copied from various sources such as web browsers, documents, or other applications. Copy the asset to your clipboard and paste it into the Media Library.
- Display name (relevant only for dynamic folder mode), public IDs and tags (if any) are applied according to your product environment's Media Library upload preset defaults. If you want to control the public ID, add custom tags for the files you select to upload, or select a different upload preset, use the Media Library Upload Widget.
- If applicable, navigate to the desired destination folder within the Media Library before pasting the asset to ensure it is uploaded to the correct location.
Apply add-ons
You can apply add-ons to assets that you upload by selecting the upload preset from the Upload widget that your administrator configured with the desired add-on. For more information on registering for and setting up add-ons, see Add-ons in the Admin Guides. For more information on applying add-ons, see Add-ons in the User Guides.
Auto-tagging and captioning on every upload
Depending on your product environment setup, your images may be automatically tagged and captioned with AI generated metadata on every upload. You may be shown a preview of the tags, allowing you to decide whether or not they're applied.
The auto-generated caption is saved in your Title (caption) contextual metadata field.
Upload with existing display name (dynamic folder mode only)
More than one asset can have the same display name, even within the same folder. However, if you upload one or more assets using a display name that already exists, you'll be asked to decide how to proceed before uploading continues.
This situation will occur if your Media Library's default upload preset or the upload preset you manually selected in the Upload Widget has been configured with overwrite enabled, with the Use the filename of the uploaded file as the asset's Display Name option selected (either within the Default or Custom options), and the file name of at least one of the assets you are uploading matches the display name of an existing asset or assets.
The following table describes the possible scenario and resulting options:
| Scenario | Options | Dialog box |
|---|---|---|
| You're uploading an asset using the same display name as exactly one existing asset in the same folder. | Replace the existing asset with the new one being uploaded 1 OR Keep the new and existing assets with the same display name OR Enter a different display name for the new asset being uploaded | 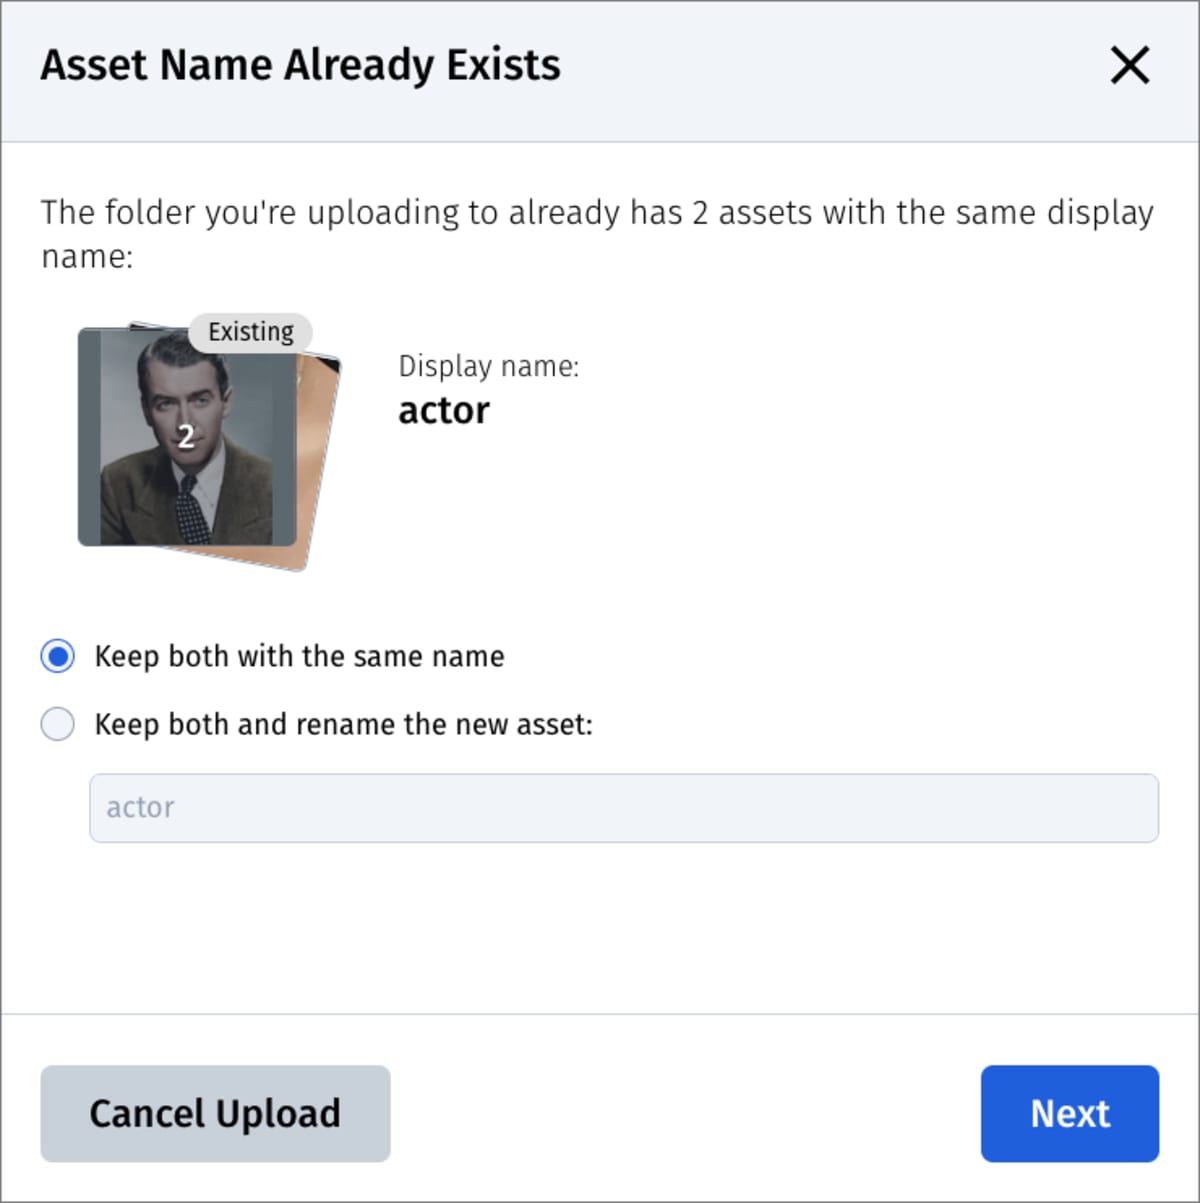 |
| You're uploading an asset using the same display name as multiple existing assets in the same folder. | Keep the new and existing assets with the same name OR Enter a different display name for the new asset being uploaded | |
| More than one asset that you're uploading has the same display name as existing assets in that folder. | Keep the new and existing assets with the same display name OR Add a unique suffix to the display name of the new assets
You'll be able to apply the selected behavior to all of the assets that fall into this category or to determine the naming option for each uploaded asset individually. |
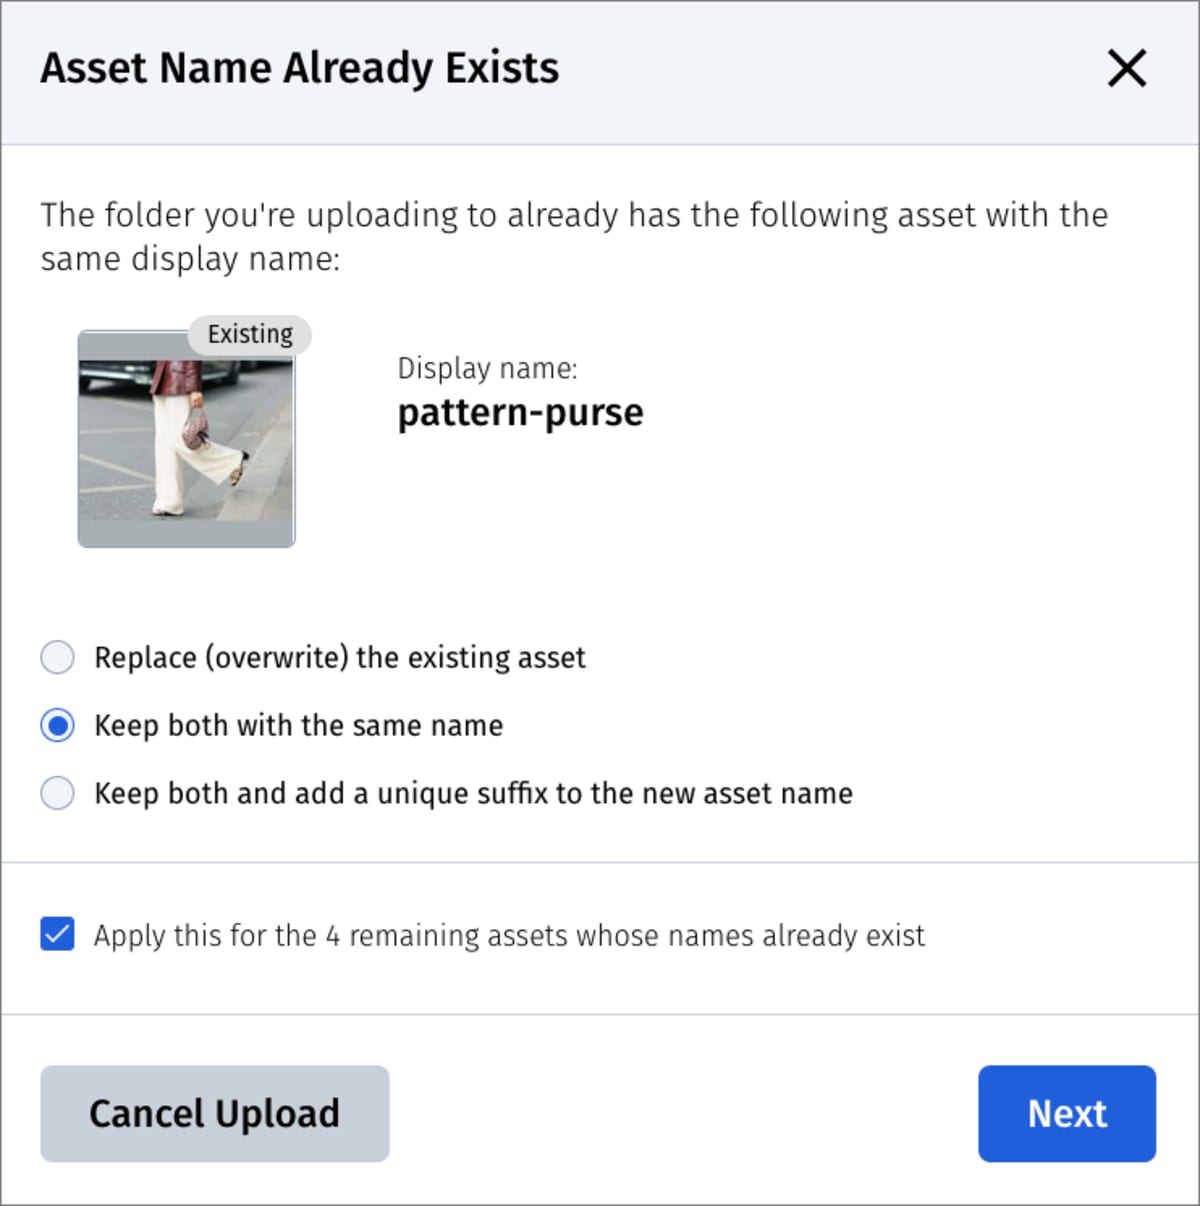 |
- When a new asset replaces an existing asset (with the same display name in the same asset folder), the new asset retains the exact, existing public ID value. Therefore, no additional public ID prefix is added to the overwritten asset's public ID, even if the Set the public ID path to match the initial asset folder path or Prepend this path to the Public ID settings in the upload preset were turned on.
Structured metadata on upload
Structured metadata is a crucial part of maintaining your Media Library. Entering accurate and descriptive metadata helps you and your team manage your assets by providing better searchability and categorization capabilities, and enables developers to perform a variety of operations on your assets. One way that Cloudinary ensures that metadata is populated completely and correctly is by monitoring metadata entry upon asset upload.
When you upload assets to the Media Library, you may be prompted to fill in metadata fields before uploading. Depending on the preferences set by your administrator in the Request structured metadata on upload section of the Media Library Preferences, you'll either be prompted every time you upload, or only if there are empty mandatory metadata fields that must be filled in.
In either of those scenarios, the Update Metadata dialog box opens, prompting you to enter values in metadata fields. Uploading can continue once all required fields contain values, and all values entered meet the validation requirements, such as minimum or maximum field lengths and valid date ranges, set by your administrator. If a metadata field has a default value, that value appears in the dialog box, and you can either keep it or enter a different value instead.
If you upload more than one asset at a time, the metadata values that you enter are applied to all assets that you're uploading. This can be useful when uploading a group of assets that serve the same purpose and share the same metadata values.


When you replace (overwrite) existing assets, the Update metadata dialog box always opens, with the following variations:
If you're replacing one existing asset: The fields of the Update metadata dialog box are already populated with the metadata field values of the existing asset. You can either keep those values, or enter different values to overwrite the existing ones.
-
If you're uploading several assets: At least one of which is replacing an existing asset and at least one of which is new, the Update metadata dialog box prompts you to enter values for the new assets.
You are also asked to choose how the new values you enter affect the existing assets being replaced:
- If you select 'Overwrite metadata with your changes': The metadata in the existing assets are replaced by the new metadata entered.
- If you select 'Keep metadata unchanged': The metadata in the existing assets are retained.
-
If you're replacing several assets without adding new ones: You're asked to choose whether to keep the existing metadata or overwrite it:
- If you select 'Overwrite metadata with your changes': The Update metadata dialog box opens fully, showing all of the metadata fields. You can enter new metadata to replace the metadata from the existing assets.
- If you select 'Keep metadata unchanged': The upload continues, overwriting the existing assets but retaining their metadata.

Uploading tips and guidelines
- Default naming behavior when uploading assets depends on the folder mode your product environment is using:
- Dynamic folder mode: By default, the display name is based on the filename of the selected files, and the public ID (the file name that will be used in the URL) is randomly generated.
- Fixed folder mode: By default, the public ID (the file name that will be used in the URL) is based on the filename of the selected files, either with or without a random suffix.
These naming defaults can be customized by your DAM administrator by adjusting the settings in the default Media Library upload preset.
- Depending on the settings in your Media Library default upload presets (or those in the preset you select in the Upload widget) as well as the permissions you have for the folder where you upload assets, you may or may not be able to overwrite an existing asset.
When overwriting is supported, you'll be given a choice to either overwrite metadata with your changes, or keep your metadata unchanged. See Structured metadata on upload for more information.
NoteTo enable overwriting assets, turn Overwrite on in the Storage and Access tab of your upload preset. In addition, turn Use filename or externally defined Public ID on and Unique filename off (to use the incoming file name as the public ID without a random suffix). Then, if you upload a new asset with the same file name as an existing asset's public ID, you'll be able to overwrite the asset. - You can specify any public ID using the Advanced options in the Upload Widget. You can also use the Advanced options to specify tag(s) to assign to all assets that you upload in this upload session.
Keep in mind that you must set the Advanced options before you select the files to upload.
Additionally, note that if you set a public ID and then select multiple media assets to upload, they all get the same public ID with a counter suffix. - When uploading assets to a particular folder, keep in mind that different users may have different folder access permissions. Make sure to upload your assets to a folder that is shared only with the user groups that should be able to access them.
- Depending on which folder mode your product environment is using, the folder you upload to may affect asset delivery URLs:
- Dynamic folders mode: By default, the Media Library folder you upload to does not impact the delivery URL. (Your administrator can optionally use an upload preset to prepend the folder you initially upload the asset to as a prefix to the public ID.)
- Fixed folder mode: By default, the folder structure where an asset is stored is included in its delivery URL. This may be an important consideration when selecting the folder where you want to upload.
- Uploading password-protected PDFs is not supported.
Error
Rate this page:
