Image resizing and cropping
Last updated: Apr-09-2024
Responsive design and art direction generally requires displaying images at a variety of sizes, often much smaller than the original.
If you deliver full size images and rely on browser-side resizing (using CSS or HTML width and height attributes), users are forced to download unnecessarily large files. Therefore, images should always be delivered from the server at their final size.
When you use any of the Cloudinary resizing transformations, the sizing (scaling/cropping) is performed on the server side, and the asset is always delivered to the browser at the requested size.
Here are some examples of different cropping techniques used on the same image. Click each image to see the URL parameters applied in each case:
 Original image
 Focus on the
model in a
portrait crop
 Detect the
face for a
thumbnail crop
 Automatically determine what to keep in a banner crop
- To help you learn about the different cropping and resizing modes, try out the interactive demo.
- Resizing images can lead to a reduction in image quality. Cloudinary provides solutions for both upscaling and downscaling to help retain the details in your images.
Resize dimensions
You can set the target dimensions of your resized image by specifying width, height, and/or the target aspect ratio as qualifiers of your resize transformation.
- Using an integer value for w (width) or h (height) sets the new dimension to that number in pixels. For example,
w_150sets the width to exactly 150 pixels. - Using a decimal value for width or height sets the new dimension relative to the original dimension. For example,
w_0.5sets the width to half the original width. - Using
ihoriwas values sets the dimension to the initial height or initial width of the original image respectively. For example,w_iwsets the width to the same value as the original width of the image. This may be useful when applying chained transformations or setting the dimensions of an overlay. -
Aspect ratios are specified using the ar (aspect ratio) parameter, as follows:
-
a:bwhereasignifies the relative width andbthe relative height (e.g.,ar_4:3orar_16:9). - a decimal value representing the ratio of the width divided by the height (e.g.,
ar_1.33orar_2.5). 1.0 is a perfect square.
-
-
In most cases, you will specify both width and height or width/height along with an aspect ratio to define the exact required dimensions. However, in rare cases, you may choose to specify only one of these 3 resize qualifiers, and Cloudinary will automatically determine the missing dimension as follows:
-
If you provide only width or only height, then the other dimension is automatically calculated to deliver the original aspect ratio. For example, if your original asset is 400*600, then specifying
c_crop,w_200is the same as specifyingc_crop,w_200,h_300. Supported for all resize and crop modes.
-
If you provide only the aspect ratio: If
ar> 1, the original width is maintained and the height is cropped to deliver the requested ratio. Ifar< 1, the original height is maintained, and the width is cropped accordingly. Supported for cropping modes only. Not supported forimagga_crop.
-
If you provide only width or only height, then the other dimension is automatically calculated to deliver the original aspect ratio. For example, if your original asset is 400*600, then specifying
Resize and crop modes
When changing the dimensions of an uploaded image by setting the image's height, width, and/or aspect ratio, you need to decide how to resize or crop the image to fit into the requested size. Use the c (crop/resize) parameter for selecting the crop/resize mode. Cloudinary supports the following image resize/crop modes:
| Crop/resize mode | Behavior |
|---|---|
| Cropping modes | If the requested dimensions have a different aspect ratio than the original, these modes crop out part of the image. |
| fill | Resizes the image to fill the specified dimensions without distortion. The image may be cropped as a result. |
| lfill | Same as fill, but only scales down the image. |
| fill_pad | Same as fill, but avoids excessive cropping by adding padding when needed. Supported only with automatic cropping. |
| crop | Extracts a region of the specified dimensions from the original image without first resizing it. |
| thumb | Creates a thumbnail of the image with the specified dimensions, based on a specified gravity. Scaling may occur. |
| auto | Automatically determines the best crop based on a specified gravity. Scaling may occur. |
| Resize modes | These modes adjust the size of the delivered image without cropping out any elements of the original image. |
| scale | Resizes the image to the specified dimensions without necessarily retaining the original aspect ratio. |
| fit | Resizes the image to fit inside the bounding box specified by the dimensions, maintaining the aspect ratio. |
| limit | Same as fit, but only scales down the image. |
| mfit | Same as fit, but only scales up the image. |
| pad | Resizes the image to fit inside the bounding box specified by the dimensions, maintaining the aspect ratio, and applies padding if the resized image does not fill the whole area. |
| lpad | Same as pad, but only scales down the image. |
| mpad | Same as pad, but only scales up the image. |
| Add-on resize and crop modes | These modes adjust the size and/or crop the image using an add-on. |
| imagga_scale | Performs smart scaling, using the Imagga Crop and Scale add-on. |
| imagga_crop | Performs smart cropping, using the Imagga Crop and Scale add-on. |
c_<mode>), the image is scaled to the new dimensions by default. However, there is no default cropping mode when using the Cloudinary SDK helper methods (see Embedding images in web pages using SDKs), so a cropping mode must be explicitly set.Some of the cropping modes keep only a certain part of the original image in the resulting image. By default, the center of the image is kept in the crop, but this is not always ideal. To keep the parts of the image that are important to you, you can use the gravity parameter. For example, you can specify to keep faces, text, or certain objects in the crop, or gravitate towards an automatically-determined area of interest. You can also guide the crop towards areas of your image defined by compass points, for example, north to keep the top part of the image, or south_east to keep the bottom-right part. Additionally, if you know the coordinates of the area you want to keep, you can explicitly specify these.
Resize and crop mode examples
The following examples show the same image resized to a width and height of 200 pixels, using different methods of resizing and cropping.
The original image is 640 x 427 pixels:

Resizing the image to 200 x 200 pixels, using crop, scale, fill and pad results in the following images:
 c_crop,h_200,w_200
 c_scale,h_200,w_200
 c_fill,h_200,w_200
 b_brown,c_pad,h_200,w_200
You could deliver the c_fill transformation shown above as follows:
The following sections explain how each of the crop modes behave. Where resolution does not affect the behavior of the mode, the higher resolution image, camera.jpg (1280 x 853 pixels), is used. Where resolution matters, you'll see the 640 x 427 version (camera-640.jpg), or 100 x 67 version (camera-100.jpg), being used.
fill
The fill cropping mode creates an image with the exact specified dimensions, without distorting the image. This option first scales up or down as much as needed to at least fill both of the specified dimensions. If the requested aspect ratio is different than the original, cropping will occur on the dimension that exceeds the requested size after scaling. You can specify which part of the original image you want to keep if cropping occurs, using the gravity parameter (set to center by default).
Example 1: Fill a specific area with an image
Fill a 250-pixel square with the camera image:

Example 2: Fill a specific area with a specific part of an image
Fill a 250-pixel square with the top-right part (gravity northeast) of the camera image:

lfill (limit fill)
The lfill cropping mode behaves the same as the fill mode, but only if the original image is larger than the specified resolution limits, in which case the image is scaled down to fill the specified dimensions without distorting the image, and then the dimension that exceeds the request is cropped. If the original dimensions are smaller than the requested size, it is not resized at all. This prevents upscaling. You can specify which part of the original image you want to keep if cropping occurs using the gravity parameter (set to center by default).
Example 1: Scale down and fill an area defined by width and height
Fill a 150 x 200 pixel area with the camera image and limiting the size to no larger than the original image:

Example 2: Scale down and fill an area defined by aspect ratio and height
Scale down the camera image to fill a 200-pixel square defined by aspect ratio and height:

fill_pad
The fill_pad cropping mode tries to prevent a "bad crop" by first attempting to use the fill mode, but adds padding if it is determined that more of the original image needs to be included in the final image. This is especially useful if the aspect ratio of the delivered image is considerably different from the original's aspect ratio. It is only supported in conjunction with Automatic cropping (g_auto), and not supported for animated images.
Example: Compare standard fill mode with fill_pad mode
Compare the camera image delivered as an 80 x 400 image using the fill mode on the left, with the fill_pad mode on the right:
 fill
fill
 fill_pad
crop
The crop cropping mode extracts a region of the specified dimensions or a detected object from the original image. No scaling is applied, so if you specify dimensions, applying the crop mode to the same image of different resolutions can provide very different results. You can specify the gravity parameter to select which area or object to extract, or use fixed coordinates cropping.
camera-640 image, which is a 640 pixel wide version of the camera image. If you replace the public ID with camera (1280 pixels wide), you'll see how the resulting image differs based on the resolution.Example 1: Crop an image to specified dimensions (width and height)
Crop the camera-640 image to a width of 200 pixels and a height of 250 pixels, with northeast gravity:

Example 2: Crop an image to specified dimensions (aspect ratio and width)
Crop the camera-640 image to a width of 450 pixels and an aspect ratio of 1.5:

Example 3: Crop an image to keep only the face
Crop the camera-640 image without specifying dimensions, to keep only the face.

Example 4: Crop an image to keep only the largest image in a composition
Use the cld-decompose_tile special gravity position to crop an image composed of many images, such as this, keeping only the largest "tile":


Fixed coordinates cropping
You can specify a region of the original image to crop by giving the x and y coordinates of the top left corner of the region together with the width and height of the region. You can also use percentage based numbers instead of the exact coordinates for x, y, w and h (e.g., 0.5 for 50%) - in this case all four parameters must be percentage based.
Use this method when you know beforehand what the correct absolute cropping coordinates are, as in when your users manually select the region to crop out of the original image.
For example, here's the full camera-640 image (640 x 427 px).
To resize the picture so that only the camera is visible, the image is cropped to a 300x170 region starting at the coordinate x = 170 and y = 40:

The image can be further resized with chained transformations. For example, the 300x170 cropped version above, also scaled down to half that size:

thumb
The thumb cropping mode is specifically used for creating image thumbnails and must always be accompanied by the gravity parameter. This cropping mode generates a thumbnail of an image with the exact specified dimensions and with the original proportions retained, but the resulting image might be scaled to fit in the specified dimensions. You can specify the zoom parameter to determine how much to scale the resulting image within the specified dimensions.
Example 1: Crop to a thumbnail of a face
Create a 150 x 150 thumbnail with face detection, of the camera image. Below you can see the original image as well as the face detection based thumbnail:


Example 2: Crop to a thumbnail of a face using aspect ratio and zoom
Create a 150-pixel high thumbnail with aspect ratio 5:6 and face detection of the camera image, zoomed out by 75%.

auto
The auto cropping mode automatically determines the best crop based on the gravity and specified dimensions. It is less aggressive than thumb and provides more focus than fill. If the requested dimensions are smaller than the best crop, the result is downscaled. If the requested dimensions are larger than the original image, the result is upscaled. Use this mode in conjunction with the gravity parameter, in particular automatic gravity and with object aware cropping.
Example 1: Automatically crop to the most interesting part of the image (width and height)
Create a 300 x 350 crop of an image, automatically deciding which parts of the image to keep.

Example 2: Automatically crop to the camera (width and aspect ratio)
Create a 16:9 aspect ratio crop of an image, keeping focus on the camera (requires the Cloudinary AI Content Analysis add-on).

See also: Automatic gravity with the auto cropping mode
auto_pad
The auto_pad cropping mode tries to prevent a "bad crop" by first attempting to use the auto mode, but adds padding if it is determined that more of the original image needs to be included in the final image. This is especially useful if the aspect ratio of the delivered image is considerably different from the original's aspect ratio. It is only supported in conjunction with Automatic cropping (g_auto), and not supported for animated images.
Example 1: Compare standard auto cropping mode with auto_pad mode
Compare the following image delivered as an 100 x 300 image using the auto mode on the left, with the auto_pad mode on the right:
 auto
auto
 auto_pad
Example 2: Use auto_pad mode with auto_fill background
Rather than use a solid color to pad the background, use generative fill:

scale
The scale resize mode changes the size of the image exactly to the specified dimensions without necessarily retaining the original aspect ratio: all original image parts are visible but might be stretched or shrunk. If only the width or height is specified, then the image is scaled to the new dimension while retaining the original aspect ratio, unless you also include the ignore_aspect_ratio flag.
Example 1: Scale while maintaining aspect ratio
Scale the camera image to a width of 150 pixels (maintains the aspect ratio by default):

Example 2: Scale without maintaining aspect ratio
Scale the camera image to a width and height of 150 pixels without maintaining the aspect ratio:

Example 3: Scale by a percentage
Scale the camera image to a width of 25% (maintains the aspect ratio by default):

Example 4: Scale by setting the aspect ratio and width
Scale the camera image to a width of 100, changing the aspect ratio to 1:2:

Example 5: Scale in one dimension ignoring the aspect ratio
Scale the image to a height of 150, ignoring the aspect ratio:

scale mode can be used to scale up or scale down an image, however when scaling up, the image often loses clarity. To retain clarity while upscaling an image, consider upscaling with super resolution.fit
The fit resize mode resizes the image so that it takes up as much space as possible within a bounding box defined by the specified dimensions. The original aspect ratio is retained and all of the original image is visible.
Example 1: Fit the image inside a square bounding box
Resize the camera image to fit within a width and height of 250 pixels while retaining the aspect ratio:

Example 2: Use aspect ratio to define a bounding box
Resize the camera image to fit within a 150-pixel square defined by aspect ratio and height:

limit
The limit resize mode behaves the same as the fit mode but only if the original image is larger than the specified limit (width and height), in which case the image is scaled down so that it takes up as much space as possible within a bounding box defined by the specified dimensions. The original aspect ratio is retained and all of the original image is visible. This mode doesn't scale up the image if your requested dimensions are larger than the original image's.
Example 1: Limit the size of the image to a square bounding box
Limit the camera image to a width and height of 250 pixels while retaining the aspect ratio:

Example 2: Use aspect ratio to define a limiting bounding box
Limit the camera image to a 150-pixel square defined by aspect ratio and height:

mfit (minimum fit)
The mfit resize mode behaves the same as the fit mode but only if the original image is smaller than the specified minimum (width and height), in which case the image is scaled up so that it takes up as much space as possible within a bounding box defined by the specified dimensions. The original aspect ratio is retained and all of the original image is visible. This mode doesn't scale down the image if your requested dimensions are smaller than the original image's.
Example 1: Ensure an image fits a minimum bounding box
Fit the camera-640 image (640 x 427 pixels) to a minimum width and height of 250 pixels while retaining the aspect ratio. This results in the original larger image being delivered:

Example 2: Use aspect ratio to define a minimum size
Scale up the 100-pixel wide camera-100 image to fit a 150-pixel square defined by aspect ratio and height.

pad
The pad resize mode resizes the image to fill the specified dimensions while retaining the original aspect ratio and with all of the original image visible. If the proportions of the original image do not match the specified dimensions, padding is added to the image to reach the required size. You can also specify where the original image is placed by using the gravity parameter (set to center by default), and specify the color of the background in the case that padding is added.
Example 1: Resize and pad an image to fill the square defined by width and height
Resize and pad the camera image with a brown background to a width and height of 250 pixels:

Example 2: Resize and pad an image to fill the rectangle defined by aspect ratio
Resize and pad the camera image with a brown background to a rectangle of height of 150 pixels, and aspect ratio 2:1:

lpad (limit pad)
The lpad resize mode behaves the same as the pad mode but only if the original image is larger than the specified limit (width and height), in which case the image is scaled down to fill the specified dimensions while retaining the original aspect ratio and with all of the original image visible. This mode doesn't scale up the image if your requested dimensions are bigger than the original image's. If the proportions of the original image do not match the specified dimensions, padding is added to the image to reach the required size. You can also specify where the original image is placed by using the gravity parameter (set to center by default), and specify the color of the background in the case that padding is added.
Example 1: Scale down and pad an image
Limit the camera image to a bounding box of 400 x 150 pixels, and pad with a green background:

Example 2: Scale down and pad an image using aspect ratio
Limit the camera image to a bounding box specified by an aspect ratio of 0.66 with a width of 100 pixels, and pad with a green background:

mpad (minimum pad)
The mpad resize mode behaves the same as the pad mode but only if the original image is smaller than the specified minimum (width and height), in which case the image is unchanged but padding is added to fill the specified dimensions. This mode doesn't scale down the image if your requested dimensions are smaller than the original image's. You can also specify where the original image is placed by using the gravity parameter (set to center by default), and specify the color of the background in the case that padding is added.
Example 1: Pad an image to the specified width and height
Minimum pad the 100-pixel wide image camera-100 to a width and height of 200 pixels while retaining the aspect ratio:

Example 2: Ensure an image fits a minimum bounding box using padding
Minimum pad the camera image to a square of 200 pixels, defined by aspect ratio and width. This results in the original larger image being delivered:

Example 3: Pad non-centered image to the specified width and height
Minimum pad the 100-pixel wide image camera-100 to a 175 x 125 pixel rectangle, positioned offset from the top-left:

Resizing and cropping interactive demo
Try out this interactive demo to see the results of different cropping methods, given a specific viewport size.
Choose your starting image, cropping mode, gravity and cropping/viewport dimensions, then click the button to generate the new image.
Square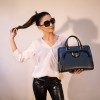
|
Portrait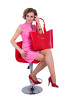
|
Landscape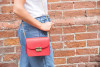
|
Small
|
|
Original image size: |
|||
|
|
|
|
|
|

Things to know about this demo:
- Not all combinations of cropping and gravity are valid, for example, gravity can't be used together with
scale, or any of thefitorpadoptions (exceptfill with padding), andfill with paddingonly works with auto-gravity options. - The gravity options
g_auto:handbagandg_handbaguse the Cloudinary AI Content Analysis Add-on. - Although Cloudinary recommends storing your highest resolution images, and delivering scaled-down versions, here you can choose between two sizes of one of the images to show how some modes can give different results depending on the resolution, and to demonstrate the different fit modes.
- The option to specify no dimensions is intended for use with
g_handbagand a cropping option. You can also use it to compare the difference in bytes delivered with and without dimensions using other cropping modes, by inspecting the resulting image properties in your browser.
Gravity positions for crops
When used with cropping modes that crop out part of an image, the gravity qualifier (g in URLs) specifies which part of the original image to keep when one or both of the requested dimensions is smaller than the original.
Compass positions
The basic gravity value is specified by giving a compass direction to include: north_east, north, north_west, west, south_west, south, south_east, east, or center (the default value). The compass direction represents a location in the image, for example, north_east represents the top right corner.
For example, fill a 250-pixel square with the sample image while retaining the aspect ratio:
- Original image:

- With gravity set to east:

- With gravity set to west:


Special positions
There are a number of special positions available to use as the focal point for image cropping, for example g_face to automatically detect the largest face in an image and make it the focus of the crop, and g_custom to use custom coordinates that were previously specified (e.g., as part of the image upload method) and make them the focus of the transformation.
For a full listing of the available gravity positions, see special positions in the transformation reference guide.
You can also specify specific objects, by registering for the Cloudinary AI Content Analysis add-on.
Liquid rescaling
Setting the gravity transformation parameter to liquid (g_liquid in URLs), enables content-aware liquid rescaling (also sometimes known as 'seam carving'), which can be useful when changing the aspect ratio of an image. Normal scaling retains all image content even when aspect ratios change, so important elements of an image can be distorted. Liquid rescaling intelligently removes or duplicates 'seams' of pixels that may zig zag horizontally or vertically through the picture. The seams are determined using an algorithm that selects pixels with the least importance (least color change on either side of the seam). The result is an image where the most 'important' elements of the image are retained and generally do not appear distorted although the relative height or width of items in an image may change, especially if you significantly change the aspect ratio.
Tips and guidelines for liquid gravity:
- It can be used only in conjunction with c_scale.
- The
liquidgravity works best when applied to scenic images with large 'unbusy' sections such as sky, grass, or water. - It also works best when applied to larger images. Thus, it is recommended to use this gravity to change aspect ratio using relative widths and heights, where one of the two dimensions remains at or close to
1.0. If you also want to resize the image, apply the resize on a different component of a chained transformation. - In some cases, over-aggressive liquid rescaling can result in significant artifacts.
For example, using liquid scaling to change an image to a square (aspect ratio of 1:1) based on the original image width, and then resize the result to 500x500:

Automatic gravity for crops (g_auto)
Cloudinary's intelligent gravity selection capabilities ensure that the most interesting areas of each image are selected as the main focus for the requested crop, not only for photos with faces, but for any content type. Each image is analyzed individually to find the optimal region to include while cropping. Automatically detected faces (or other elements) are, by default, given higher priority while analyzing the image content.
You apply automatic content-aware gravity by setting the gravity transformation parameter to auto (g_auto in URLs).
Here's an example of using automatic gravity when changing the aspect ratio of an image:
 Original
 c_fill,g_center,h_300,w_200
Regular fill
 c_fill,g_auto,h_300,w_200
Automatic fill
Automatic gravity for crops is supported for the fill, lfill, fill_pad, thumb, crop and auto modes.
- Automatic gravity can be further qualified with various focal gravity options, such as
g_auto:faces. - If custom coordinates have been specified for an image (using the Upload API or the Cloudinary Console), the cropping or overlay will be based on that definition, taking the custom coordinates as-is and overriding the detection algorithm (the same as
g_custom). This applies to allfocal_gravityoptions except forg_auto:custom_no_override,g_auto:aoi_<custom coordinates>andg_auto:none. - You can add the getinfo flag (
fl_getinfoin URLs) in your transformation to return the proposedg_autocropping results in JSON instead of delivering the transformed image. You can then integrate theg_autoresults into an external workflow, for example to display the proposedg_autocrop as the initial cropping suggestion in an external editing tool. - By default,
g_autoapplies an optimal combination of our AI and saliency-based algorithms to capture the best region to include in your cropped image. However, in certain situations you may want to explicitly request only one of the automatic gravity algorithms and/or adjust the default focal preference of the chosen algorithm. - Automatic gravity is not supported for animated images. If
g_autois used in an animated image transformation,centergravity is applied, except whenc_fill_padis also specified, in which case an error is returned.
Adjusting the automatic gravity focal preference
By default, both the saliency and subject automatic gravity algorithms give increased priority to detected faces. To adjust the focal preference of the automatic gravity algorithm, you can specify a different focal_gravity option.
For example, you can specify adv_face, adv_faces, or adv_eyes to instruct the algorithm to give priority to the eyes or faces detected by the Advanced Facial Attributes Detection add-on (as opposed to the coordinates selected by the built-in face-detection mechanism). Alternatively, you can use the value none if you don't want the algorithm to give special preference to any detected item, including faces.
If you are registered to the Cloudinary AI Content Analysis add-on, you can also instruct the gravity algorithm to give top priority to one or more specific objects or categories from an extensive list.
Additionally, the OCR Text Detection and Extraction Add-on lets you give a higher priority to text by setting the gravity qualifier to auto:ocr_text, while also giving priority to faces and other very prominent elements of an image.
For a complete list of all focal_gravity options, see the g_<special_position> section of the Transformation URL API Reference.
Automatic gravity with the fill mode
Use the fill mode with automatic gravity to keep most of the original image according to the requested dimensions of the derived image, ensuring that the most interesting regions of the original image are included in the resulting image.
Example of square aspect ratio cropping, regular vs. automatic:
 Original
 c_fill,g_center,h_200,w_200
Regular fill
 c_fill,g_auto,h_200,w_200
Automatic fill
Automatic gravity with the thumb mode
Use the thumb mode with automatic gravity to apply more aggressive cropping than the fill mode. This mode attempts to further zoom in and crop out less interesting image regions when relevant in order to include the most interesting objects in the resulting derived image. The automatic cropping algorithm decides whether and how aggressively to zoom-in and crop according to the content and cropping ratio of each image individually. A numerical value between 0 and 100 can be added to the g_auto parameter in order to advise the algorithm regarding the desired aggressiveness level (e.g., g_auto:0 for the most aggressive thumb cropping).
Example of a square thumbnail, regular vs. automatic cropping:
 Original
 c_thumb,g_center
 Regular thumbnail
 c_thumb,g_auto
 Automatic thumbnail
 c_thumb,g_auto:0
 Automatic thumbnail -
most aggressive
auto gravity together with thumb cropping indicates your preference for more or less aggressive zooming and the algorithm takes that preference into account. However, the automatic gravity algorithm may still determine that for a particular image and aspect ratio, its default zoom selection is the appropriate zoom for this image. In such a case, you may not see a difference between the default g_auto and g_auto with a specific aggressiveness level.Automatic gravity with the crop mode
Use the crop mode with automatic gravity to crop a region of exactly the specified dimensions out of the original image while automatically focusing on the most interesting region of the original image that fits within the required dimensions. The portion of the interesting area depends on the resolution of the original image. The crop mode is less useful than the fill, lfill, and thumb modes, as it is only practical to use when both the dimensions of the original image and the size of the interesting region are already known.
Example of a square crop, regular vs. auto cropping:
 Original
 c_crop,g_center
 Regular crop
 c_crop,g_auto
 Automatic crop
Automatic gravity with the auto cropping mode
For maximum automation, use the automatic crop mode (c_auto) with automatic gravity (g_auto). This is less aggressive than automatic gravity with the thumb mode, and is smarter about what to keep than automatic gravity with the fill mode.

 c_fill,g_auto
 Fill crop
 c_thumb,g_auto
 Thumbnail crop
 c_auto,g_auto
 Automatic crop
Selecting a single automatic gravity algorithm
The default g_auto option applies an optimal mixture of two different methods of identifying the most important region of your image:
- AI-based algorithm (subject) - Uses deep-learning algorithms to identify the subjects of an image that are most likely to attract a person's gaze.
- Saliency algorithm (classic) - Uses a combination of saliency heuristics, edge detection, light, skin-tone prioritization, and more to automatically detect and prioritize significant region(s) in the image.
In the majority of cases, the most salient elements in an image are also the main subjects of the photo, and thus both algorithms often produce very similar or identical results. However, in some cases, results can be somewhat different and therefore the weighted mixture that g_auto applies by default usually gives the best results.
But if you find that for the types of images you are delivering, one of the algorithms consistently gives a better result than the other, you can override the default combined mechanism and instead explicitly request your preferred algorithm by specifying auto:subject or auto:classic as the gravity value (g_auto:subject or g_auto:classic in URLs), with or without an additional focal gravity option.
For example, when cropping the landscape image below to a portrait view, the classic algorithm selects the areas with the most graphically salient spots, which includes the colorful garden in the south east corner, while the subject algorithm focuses on the subjects that the AI-engine predicts are most likely to capture human attention, primarily the tower, cloud and fountains.
 Original image
 Default crop
(Center gravity)
 Auto-gravity
Saliency (classic) method
 Auto-gravity
AI-based subject method
Device Pixel Ratio (DPR)
Different devices support different DPR values, which is defined as the ratio between physical pixels and logical pixels. This means that a device with support for a higher DPR uses more physical pixels for displaying an image, resulting in a clearer, sharper image.

Use the dpr parameter to set the DPR value of the delivered image. The parameter accepts a numeric value specifying the DPR multiplier.
The dpr parameter is especially useful when adding overlays, as you need the overlay image to be correctly resized according to the required pixel density of the device (along with the containing image). Setting the dpr transformation parameter applies the same resizing rules both to the containing image, and the included overlay.
For example, the following URL dynamically generates a square (100x100) version of an image named pepper, and adds another image named sale_icon as a semi-transparent watermark to the bottom right with a width of 50% relative to the pepper image. Setting the dpr value to 1.0, 2.0 (as in the code example) or 3.0 generates the following images, while resizing both the containing image and the overlay to match the required DPR.
Now you can create a 100x100 HTML image tag and deliver an image with the resolution that best matches the specified pixel density of your users' devices. The three images below are all displayed within a 100x100 logical square using the <img> tag width and height attributes, while you see more details and a better visual result for the last two images if you view this documentation using a device that supports a higher DPR.
(100x100, 4.1KB)
(200x200, 10.1KB)
(300x300, 22.3KB)
You can alternatively use dpr_auto to automatically deliver the best image, depending on the requesting device's support for DPR. For details, see the Responsive images documentation.
Upscaling with super resolution
Normally, when you upscale a small image, the image loses detail and quality. Take, for example, this 200 x 303 pixel image of a hall:

If you upscale it to four times its dimensions using c_scale,w_4.0, this is the result:

Using the generative AI upscale effect, you can retain much more detail for the same scaling factor:

The upscale effect scales each dimension by four, multiplying the total number of pixels by 16, and uses AI-based prediction to fill in the details.
You can chain other transformations after the upscale, for example, creating a square image of the ceiling using the fill cropping mode, and switching it to grayscale:

- To use the upscale effect, the input image must be smaller than 0.25 megapixels (the equivalent of 625 x 400 pixels).
- There is a special transformation count for the upscale effect.
- The result of the upscale effect is cached, so even if it is used again together with different transformations, no further transformations are counted for its use on the same image.
- The upscale effect is not supported for animated images or fetched images.
Downscaling tips
When downscaling images, you may notice a reduction in image quality. Here are a few tips to help preserve more details.
You can use the sharpen effect to add definition to your images. This effect can be used with any plan, and counts as one transformation.


Alternatively, you can take advantage of the generative AI effect, generative restore, which also comes with any plan, but incurs a higher transformation count.

Our premium downscaling algorithm, which is available for select Enterprise plans, preserves more details by default, particularly at very low resolutions (less than 0.4 megapixels). You don't need to add any extra transformation parameters; it's applied as standard to any transformation that causes an image to be downscaled. It's great for small thumbnails, such as those used in product galleries.

To give this a try, contact your Customer Success Manager or our sales team.
Error
Rate this page:
