Cloudinary Blog

ChatBot Platform for Image Transformation

By Prosper Otemuyiwa
ChatBot Platform for Image Transformation

Bots - which have been around for a long time and perform different functions - are gradually replacing traditional applications. Consider Internet bots, also known as web robots, as software applications that run automated tasks over the internet, such as crawling websites and indexing search engines. Slack, the popular business messaging service, also popularized the use of bots for almost anything, from tracking stand-ups and sending reminders, to activating continuous integration and different types of activities.

Chatbots are the new trendy type of bots and they are becoming ubiquitous. Several organizations around the world are now taking advantage of chatbots to simulate conversations between users and computers. With chatbots, you can eliminate the need to have a human on the other end, for basic customer enquiries or requests. Messaging platforms, such as WeChat and Facebook Messenger, are massive advocates of chatbots.

The Image Editing Chatbot Platform
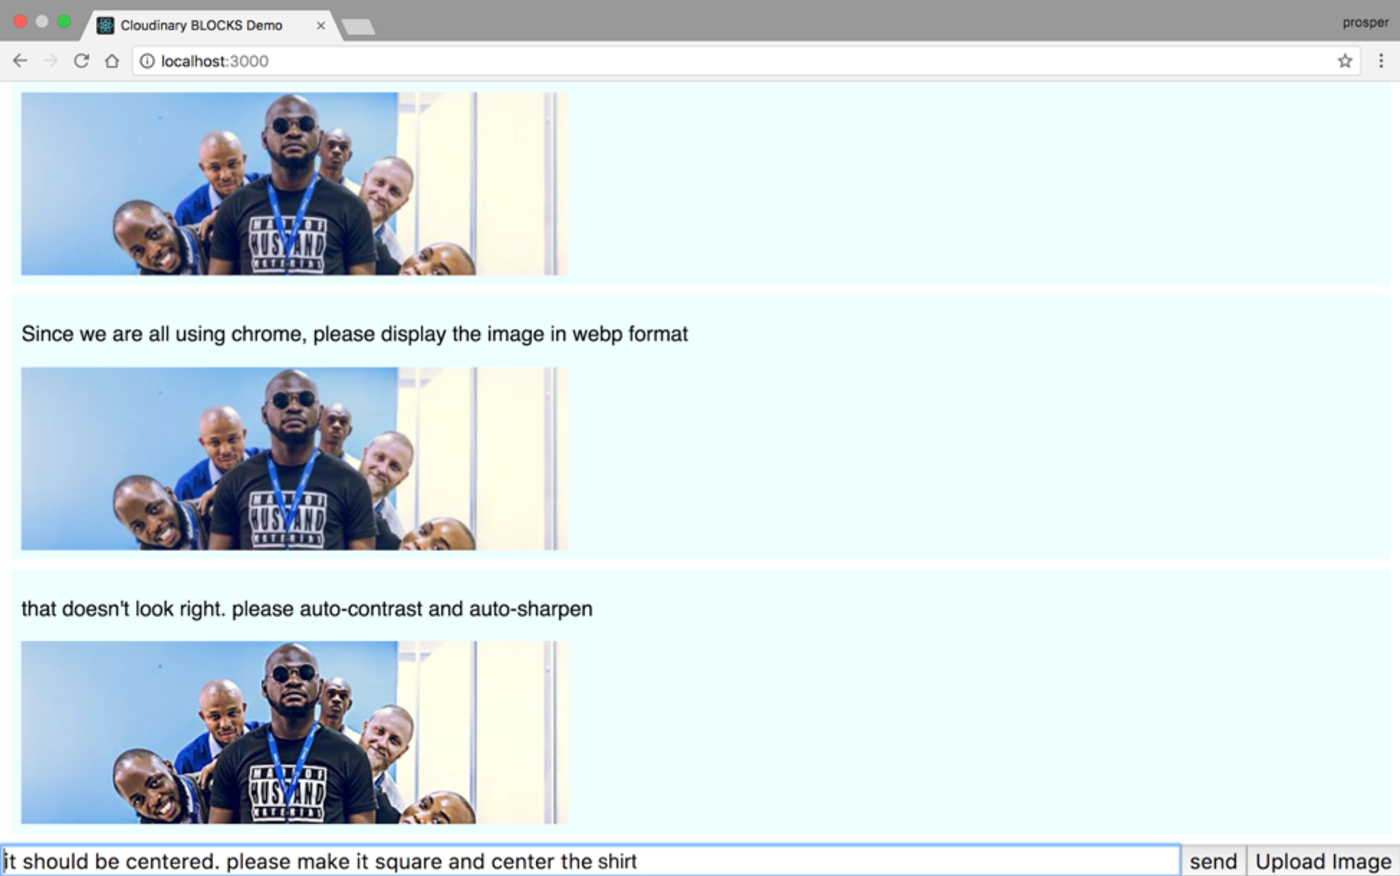
Chatbot screen

The Image Editing Chatbot is a simple prototype/experiment that can quickly solve your image editing challenges. Let’s examine a scenario here to illustrate my point better:

You work for an e-commerce store that has hundreds of images that are being delivered to different layouts, devices, screens and bandwidths. Manually creating these variants can be resource intensive and not scalable.

However, creating multiple variants of an image being delivered across different layouts, devices and bandwidth using an image transformation chatbot could help. In fact, you can avoid taking on some tasks by simply assigning the URL of the deployed chatbot for others to use. One of the main resulting benefits is that non-technical folks can comfortably use it to solve their image editing challenges, as well.

Some Tech Required

Let’s analyze the technology behind the chatbot platform.

Before we start, you will want to clone the chatbot from GitHub.

Follow the instructions on the README and execute the commands displayed on the repo in the right sequence. Are you having fun yet?
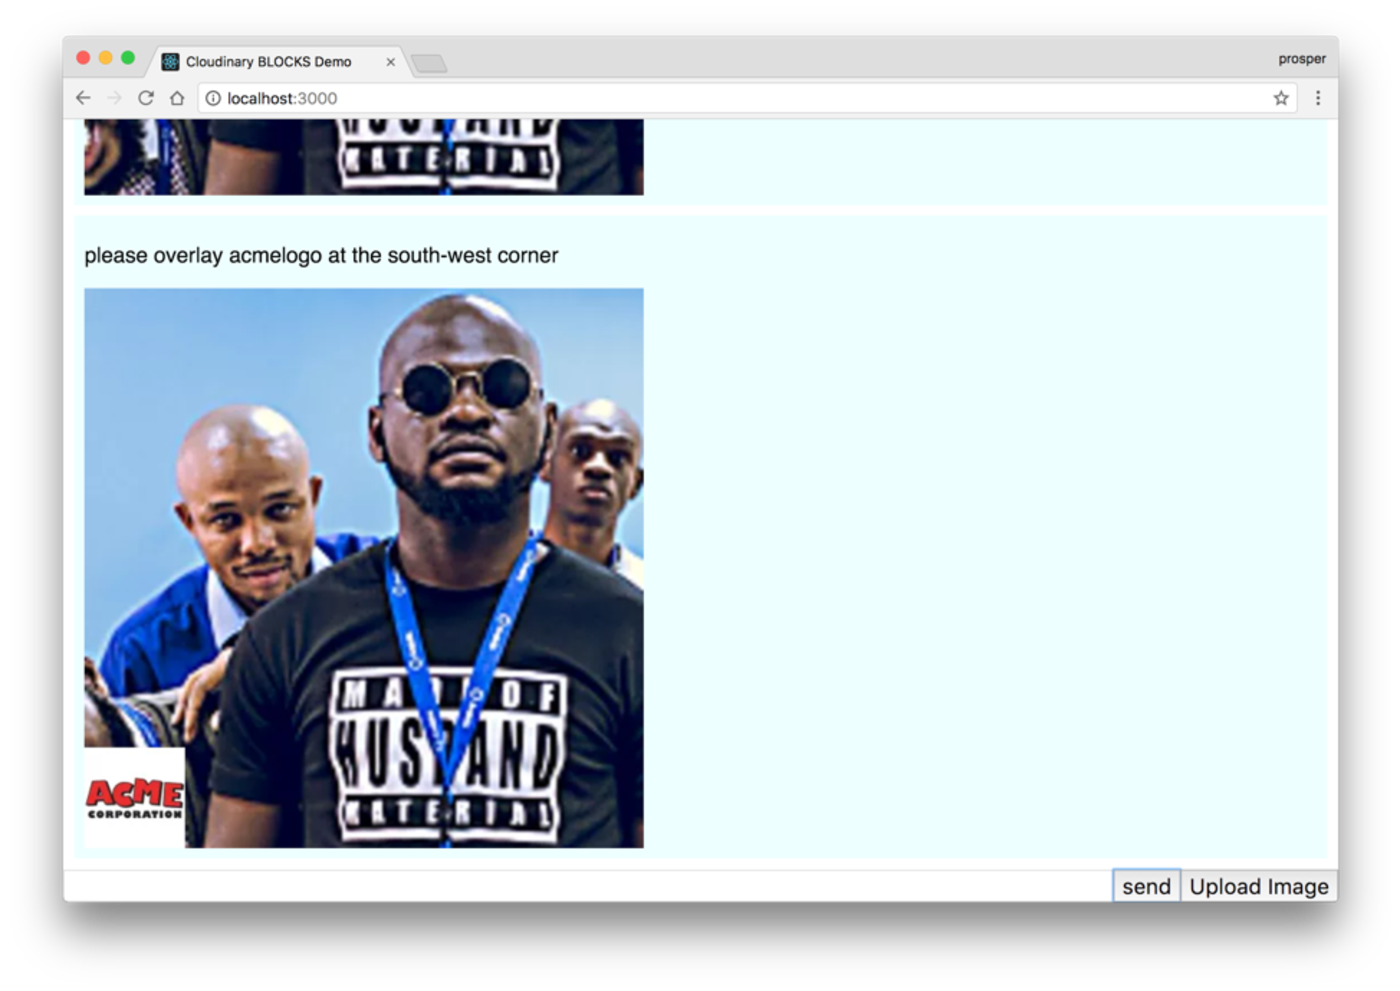
Chatbot screen

I used the command please overlay ACME logo at the south-west corner and the resulting image was the previously uploaded image with ACME logo placed on it as specified in the command.
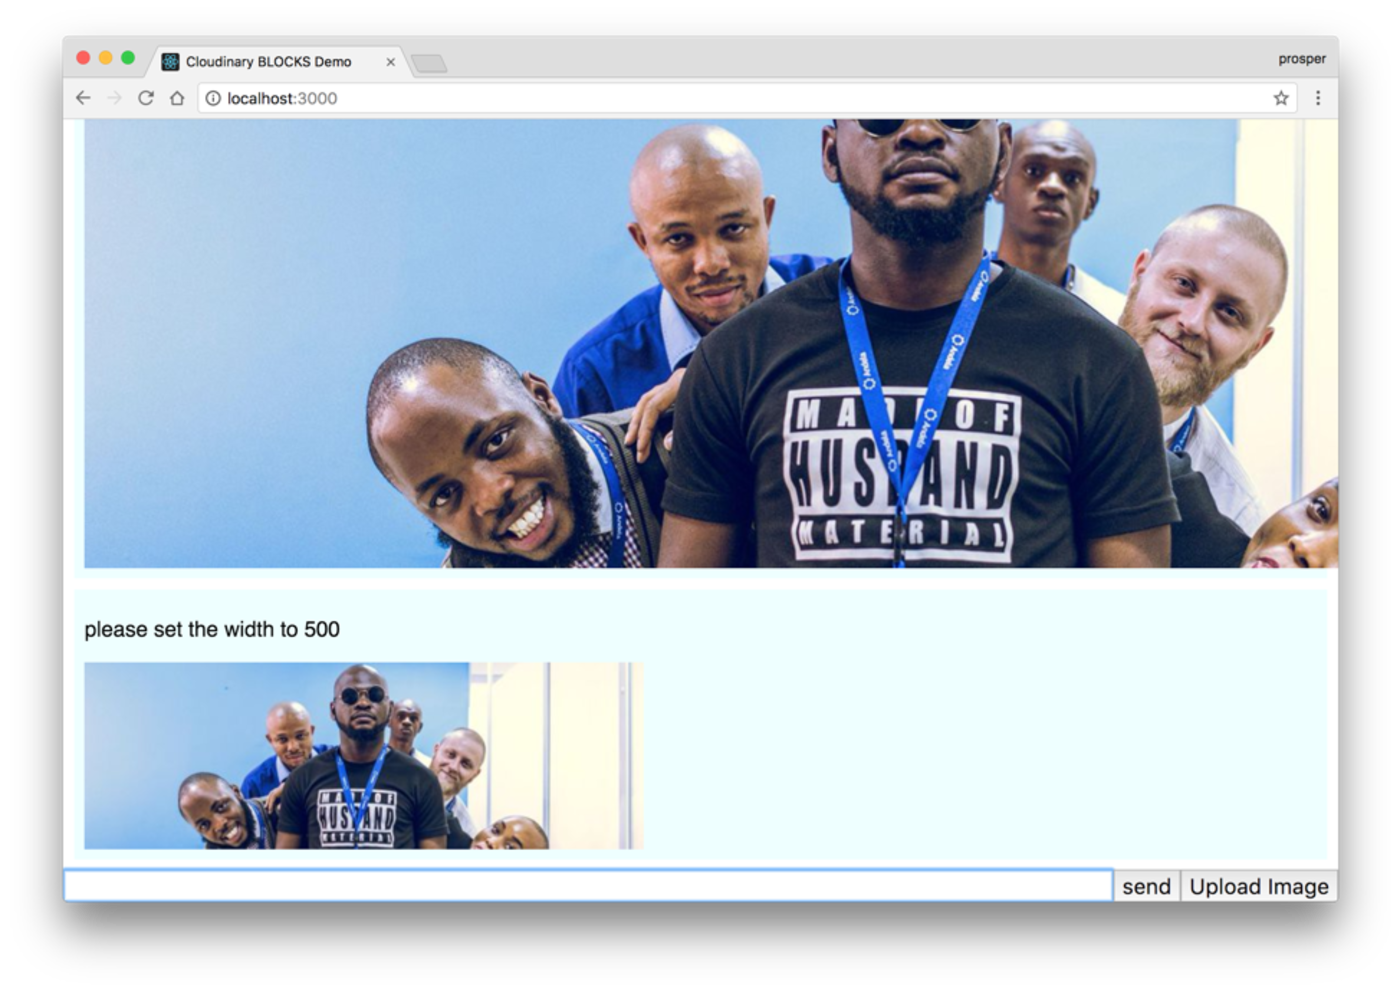
Chatbot screen

The first image is the original size of the uploaded image. I entered the command please set the width to 500 and it immediately cropped the image and returned the smaller size.

Easy, isn’t it? Next, let’s talk about the stack.

The chatbot platform is built with:

  • React - for building out the front-end of the image editing tool
  • Node - for building the backend that interacts with the Cloudinary service for image editing
  • Cloudinary - a cloud-based, end-to-end image and video management solution that enables uploads, storage, administration, image transformation and delivery
  • PubNub - a service for developing Real-time applications

Now, let’s go more in-depth. Open up the source code.

Check out the src/App.js file.

Copy to clipboard
render() {
        return (
            <div className="vbox fill">
                <div className="scroll grow" id="scroll">
                    {this.renderHistory()}
                </div>
                <div className="hbox">
                    <input ref='text' type="text" className="grow"
                           value={this.state.currentText} onChange={this.textEdit.bind(this)}
                           onKeyDown={this.textKeydown.bind(this)}
                    />
                    <button onClick={this.sendMessage.bind(this)}>send</button>
                    <button onClick={this.showUploader.bind(this)}>Upload Image</button>
                </div>
            </div>
        );
    }

    showUploader() {
        var cloudinary = window.cloudinary;
        cloudinary.openUploadWidget({ cloud_name: 'pubnub', upload_preset: 'mcipauzl'},
            (error, result) => {
                console.log(error, result);
                console.log("the upload path is", result[0].path);
                ImageService.setImagePath(result[0].path);
            });
    }

render() is responsible for displaying the send, Upload Image buttons and the history of messages sent in the chatbot.

showUploader() is responsible for calling the Cloudinary upload widget. Take a look at the image below:

Note: You can change the cloud_name and upload_preset to the credentials from your Cloudinary dashboard.

Upload Widget

Check out the src/ImageService.js.

You can change the publishKey and subscribeKey values to the credentials from our PubNub dashboard.

The ImageService is responsible for communicating with PubNub channels on setting and getting image paths in real time.

Check out the src/ParserService.js. The ParserService is a giant service responsible for analyzing keywords in the commands such as upload, display, show, resize, reset, make, overlay and processing it.

Copy to clipboard
src/ParserService.js

if(command.action === 'overlay') {
            console.log("doing an overlay");
            var fname = command.target;
            fname = "sample";
            var scale = 1.0;
            scale = 0.2;
            var grav = command.direction;
            if(command.direction === 'southwest') {
                grav = 'south_west';
            }
            transforms.push("l_"+fname+",w_"+scale+",g_"+grav);
        }

Taking the overlay action and applying the needed Cloudinary transformation.

Copy to clipboard
//apply the context
        if(!context.format) context.format = 'jpg';
        if(context.width) {
            transforms.push("w_"+context.width);
        }
        if(context.autoContrast) transforms.push("e_auto_contrast");
        if(context.autoSharpen) transforms.push("e_sharpen");
        if(context.crop) {
            transforms.push("w_"+context.width+",h_"+context.width
                +",c_fill,g_"+context.gravity);
        }

        console.log("final context is",context);


        //generate the final url
        var apiUrl = 'https://res.cloudinary.com/' +
            cloudName + '/' + resource + '/' + operation + '/';
        if(transforms.length > 0) {
            apiUrl += transforms.join("/") + "/"
        }
        var filename = context.path.substring(0,context.path.lastIndexOf('.'));
        apiUrl += filename  + '.' + context.format;
        return apiUrl;

It obtains the required transformation parameters and generates the Cloudinary URL with those parameters.

The server.js is simply responsible for processing the commands from the frontend via the parser service and returning the right responses.

Cloudinary Transformations

Using Cloudinary, you can quickly and easily optimize your images, regardless of your programming language preference. Cloudinary automatically performs certain optimizations on all transformed images by default. Its integrated, fast CDN delivery also helps to get all the image resources to your users quickly.

Let’s explore some image transformation techniques and transformations that are effortless using Cloudinary:

Cropping:

Ruby:
Copy to clipboard
cl_image_tag("lady.jpg", :width=>400, :height=>400, :crop=>"crop")
PHP v1:
Copy to clipboard
cl_image_tag("lady.jpg", array("width"=>400, "height"=>400, "crop"=>"crop"))
PHP v2:
Copy to clipboard
(new ImageTag('lady.jpg'))
  ->resize(Resize::crop()->width(400)->height(400));
Python:
Copy to clipboard
CloudinaryImage("lady.jpg").image(width=400, height=400, crop="crop")
Node.js:
Copy to clipboard
cloudinary.image("lady.jpg", {width: 400, height: 400, crop: "crop"})
Java:
Copy to clipboard
cloudinary.url().transformation(new Transformation().width(400).height(400).crop("crop")).imageTag("lady.jpg");
JS:
Copy to clipboard
cloudinary.imageTag('lady.jpg', {width: 400, height: 400, crop: "crop"}).toHtml();
jQuery:
Copy to clipboard
$.cloudinary.image("lady.jpg", {width: 400, height: 400, crop: "crop"})
React:
Copy to clipboard
<Image publicId="lady.jpg" >
  <Transformation width="400" height="400" crop="crop" />
</Image>
Vue.js:
Copy to clipboard
<cld-image publicId="lady.jpg" >
  <cld-transformation width="400" height="400" crop="crop" />
</cld-image>
Angular:
Copy to clipboard
<cl-image public-id="lady.jpg" >
  <cl-transformation width="400" height="400" crop="crop">
  </cl-transformation>
</cl-image>
.NET:
Copy to clipboard
cloudinary.Api.UrlImgUp.Transform(new Transformation().Width(400).Height(400).Crop("crop")).BuildImageTag("lady.jpg")
Android:
Copy to clipboard
MediaManager.get().url().transformation(new Transformation().width(400).height(400).crop("crop")).generate("lady.jpg");
iOS:
Copy to clipboard
imageView.cldSetImage(cloudinary.createUrl().setTransformation(CLDTransformation().setWidth(400).setHeight(400).setCrop("crop")).generate("lady.jpg")!, cloudinary: cloudinary)
lady

Image overlay:

Ruby:
Copy to clipboard
cl_image_tag("lady.jpg", :transformation=>[
  {:width=>500, :crop=>"scale"},
  {:overlay=>"cloudinary_icon", :width=>0.9, :gravity=>"south_east", :opacity=>70, :effect=>"brightness:50", :crop=>"scale"}
  ])
PHP v1:
Copy to clipboard
cl_image_tag("lady.jpg", array("transformation"=>array(
  array("width"=>500, "crop"=>"scale"),
  array("overlay"=>"cloudinary_icon", "width"=>"0.9", "gravity"=>"south_east", "opacity"=>70, "effect"=>"brightness:50", "crop"=>"scale")
  )))
PHP v2:
Copy to clipboard
(new ImageTag('lady.jpg'))
  ->resize(Resize::scale()->width(500))
  ->overlay(
      Overlay::source(Source::image('cloudinary_icon')
        ->transformation((new ImageTransformation())
          ->resize(Resize::scale()->width(0.9))
          ->adjust(Adjust::opacity(70))
          ->adjust(Adjust::brightness()->level(50))))
      ->position((new Position())
        ->gravity(Gravity::compass(Compass::southEast()))
  ));
Python:
Copy to clipboard
CloudinaryImage("lady.jpg").image(transformation=[
  {'width': 500, 'crop': "scale"},
  {'overlay': "cloudinary_icon", 'width': "0.9", 'gravity': "south_east", 'opacity': 70, 'effect': "brightness:50", 'crop': "scale"}
  ])
Node.js:
Copy to clipboard
cloudinary.image("lady.jpg", {transformation: [
  {width: 500, crop: "scale"},
  {overlay: "cloudinary_icon", width: "0.9", gravity: "south_east", opacity: 70, effect: "brightness:50", crop: "scale"}
  ]})
Java:
Copy to clipboard
cloudinary.url().transformation(new Transformation()
  .width(500).crop("scale").chain()
  .overlay(new Layer().publicId("cloudinary_icon")).width(0.9).gravity("south_east").opacity(70).effect("brightness:50").crop("scale")).imageTag("lady.jpg");
JS:
Copy to clipboard
cloudinary.imageTag('lady.jpg', {transformation: [
  {width: 500, crop: "scale"},
  {overlay: new cloudinary.Layer().publicId("cloudinary_icon"), width: "0.9", gravity: "south_east", opacity: 70, effect: "brightness:50", crop: "scale"}
  ]}).toHtml();
jQuery:
Copy to clipboard
$.cloudinary.image("lady.jpg", {transformation: [
  {width: 500, crop: "scale"},
  {overlay: new cloudinary.Layer().publicId("cloudinary_icon"), width: "0.9", gravity: "south_east", opacity: 70, effect: "brightness:50", crop: "scale"}
  ]})
React:
Copy to clipboard
<Image publicId="lady.jpg" >
  <Transformation width="500" crop="scale" />
  <Transformation overlay="cloudinary_icon" width="0.9" gravity="south_east" opacity="70" effect="brightness:50" crop="scale" />
</Image>
Vue.js:
Copy to clipboard
<cld-image publicId="lady.jpg" >
  <cld-transformation width="500" crop="scale" />
  <cld-transformation :overlay="cloudinary_icon" width="0.9" gravity="south_east" opacity="70" effect="brightness:50" crop="scale" />
</cld-image>
Angular:
Copy to clipboard
<cl-image public-id="lady.jpg" >
  <cl-transformation width="500" crop="scale">
  </cl-transformation>
  <cl-transformation overlay="cloudinary_icon" width="0.9" gravity="south_east" opacity="70" effect="brightness:50" crop="scale">
  </cl-transformation>
</cl-image>
.NET:
Copy to clipboard
cloudinary.Api.UrlImgUp.Transform(new Transformation()
  .Width(500).Crop("scale").Chain()
  .Overlay(new Layer().PublicId("cloudinary_icon")).Width(0.9).Gravity("south_east").Opacity(70).Effect("brightness:50").Crop("scale")).BuildImageTag("lady.jpg")
Android:
Copy to clipboard
MediaManager.get().url().transformation(new Transformation()
  .width(500).crop("scale").chain()
  .overlay(new Layer().publicId("cloudinary_icon")).width(0.9).gravity("south_east").opacity(70).effect("brightness:50").crop("scale")).generate("lady.jpg");
iOS:
Copy to clipboard
imageView.cldSetImage(cloudinary.createUrl().setTransformation(CLDTransformation()
  .setWidth(500).setCrop("scale").chain()
  .setOverlay("cloudinary_icon").setWidth(0.9).setGravity("south_east").setOpacity(70).setEffect("brightness:50").setCrop("scale")).generate("lady.jpg")!, cloudinary: cloudinary)
Lady

Text overlay:

Ruby:
Copy to clipboard
cl_image_tag("lady.jpg", :transformation=>[
  {:width=>500, :crop=>"scale"},
  {:overlay=>{:font_family=>"Arial", :font_size=>50, :text=>"Awesome"}}
  ])
PHP v1:
Copy to clipboard
cl_image_tag("lady.jpg", array("transformation"=>array(
  array("width"=>500, "crop"=>"scale"),
  array("overlay"=>array("font_family"=>"Arial", "font_size"=>50, "text"=>"Awesome"))
  )))
PHP v2:
Copy to clipboard
(new ImageTag('lady.jpg'))
  ->resize(Resize::scale()->width(500))
  ->overlay(Overlay::source(Source::text('Awesome', (new TextStyle('Arial', 50)))));
Python:
Copy to clipboard
CloudinaryImage("lady.jpg").image(transformation=[
  {'width': 500, 'crop': "scale"},
  {'overlay': {'font_family': "Arial", 'font_size': 50, 'text': "Awesome"}}
  ])
Node.js:
Copy to clipboard
cloudinary.image("lady.jpg", {transformation: [
  {width: 500, crop: "scale"},
  {overlay: {font_family: "Arial", font_size: 50, text: "Awesome"}}
  ]})
Java:
Copy to clipboard
cloudinary.url().transformation(new Transformation()
  .width(500).crop("scale").chain()
  .overlay(new TextLayer().fontFamily("Arial").fontSize(50).text("Awesome"))).imageTag("lady.jpg");
JS:
Copy to clipboard
cloudinary.imageTag('lady.jpg', {transformation: [
  {width: 500, crop: "scale"},
  {overlay: new cloudinary.TextLayer().fontFamily("Arial").fontSize(50).text("Awesome")}
  ]}).toHtml();
jQuery:
Copy to clipboard
$.cloudinary.image("lady.jpg", {transformation: [
  {width: 500, crop: "scale"},
  {overlay: new cloudinary.TextLayer().fontFamily("Arial").fontSize(50).text("Awesome")}
  ]})
React:
Copy to clipboard
<Image publicId="lady.jpg" >
  <Transformation width="500" crop="scale" />
  <Transformation overlay={{fontFamily: "Arial", fontSize: 50, text: "Awesome"}} />
</Image>
Vue.js:
Copy to clipboard
<cld-image publicId="lady.jpg" >
  <cld-transformation width="500" crop="scale" />
  <cld-transformation :overlay="{fontFamily: 'Arial', fontSize: 50, text: 'Awesome'}" />
</cld-image>
Angular:
Copy to clipboard
<cl-image public-id="lady.jpg" >
  <cl-transformation width="500" crop="scale">
  </cl-transformation>
  <cl-transformation overlay="text:Arial_50:Awesome">
  </cl-transformation>
</cl-image>
.NET:
Copy to clipboard
cloudinary.Api.UrlImgUp.Transform(new Transformation()
  .Width(500).Crop("scale").Chain()
  .Overlay(new TextLayer().FontFamily("Arial").FontSize(50).Text("Awesome"))).BuildImageTag("lady.jpg")
Android:
Copy to clipboard
MediaManager.get().url().transformation(new Transformation()
  .width(500).crop("scale").chain()
  .overlay(new TextLayer().fontFamily("Arial").fontSize(50).text("Awesome"))).generate("lady.jpg");
iOS:
Copy to clipboard
imageView.cldSetImage(cloudinary.createUrl().setTransformation(CLDTransformation()
  .setWidth(500).setCrop("scale").chain()
  .setOverlay("text:Arial_50:Awesome")).generate("lady.jpg")!, cloudinary: cloudinary)
Awesome/lady

Blur:

Ruby:
Copy to clipboard
cl_image_tag("flowers.jpg", :effect=>"blur:300")
PHP v1:
Copy to clipboard
cl_image_tag("flowers.jpg", array("effect"=>"blur:300"))
PHP v2:
Copy to clipboard
(new ImageTag('flowers.jpg'))
  ->effect(Effect::blur()->strength(300));
Python:
Copy to clipboard
CloudinaryImage("flowers.jpg").image(effect="blur:300")
Node.js:
Copy to clipboard
cloudinary.image("flowers.jpg", {effect: "blur:300"})
Java:
Copy to clipboard
cloudinary.url().transformation(new Transformation().effect("blur:300")).imageTag("flowers.jpg");
JS:
Copy to clipboard
cloudinary.imageTag('flowers.jpg', {effect: "blur:300"}).toHtml();
jQuery:
Copy to clipboard
$.cloudinary.image("flowers.jpg", {effect: "blur:300"})
React:
Copy to clipboard
<Image publicId="flowers.jpg" >
  <Transformation effect="blur:300" />
</Image>
Vue.js:
Copy to clipboard
<cld-image publicId="flowers.jpg" >
  <cld-transformation effect="blur:300" />
</cld-image>
Angular:
Copy to clipboard
<cl-image public-id="flowers.jpg" >
  <cl-transformation effect="blur:300">
  </cl-transformation>
</cl-image>
.NET:
Copy to clipboard
cloudinary.Api.UrlImgUp.Transform(new Transformation().Effect("blur:300")).BuildImageTag("flowers.jpg")
Android:
Copy to clipboard
MediaManager.get().url().transformation(new Transformation().effect("blur:300")).generate("flowers.jpg");
iOS:
Copy to clipboard
imageView.cldSetImage(cloudinary.createUrl().setTransformation(CLDTransformation().setEffect("blur:300")).generate("flowers.jpg")!, cloudinary: cloudinary)
Flowers

Artistic Filter effects:

Ruby:
Copy to clipboard
cl_image_tag("flowers.jpg", :effect=>"art:sizzle")
PHP v1:
Copy to clipboard
cl_image_tag("flowers.jpg", array("effect"=>"art:sizzle"))
PHP v2:
Copy to clipboard
(new ImageTag('flowers.jpg'))
  ->effect(Effect::artisticFilter(ArtisticFilter::sizzle()));
Python:
Copy to clipboard
CloudinaryImage("flowers.jpg").image(effect="art:sizzle")
Node.js:
Copy to clipboard
cloudinary.image("flowers.jpg", {effect: "art:sizzle"})
Java:
Copy to clipboard
cloudinary.url().transformation(new Transformation().effect("art:sizzle")).imageTag("flowers.jpg");
JS:
Copy to clipboard
cloudinary.imageTag('flowers.jpg', {effect: "art:sizzle"}).toHtml();
jQuery:
Copy to clipboard
$.cloudinary.image("flowers.jpg", {effect: "art:sizzle"})
React:
Copy to clipboard
<Image publicId="flowers.jpg" >
  <Transformation effect="art:sizzle" />
</Image>
Vue.js:
Copy to clipboard
<cld-image publicId="flowers.jpg" >
  <cld-transformation effect="art:sizzle" />
</cld-image>
Angular:
Copy to clipboard
<cl-image public-id="flowers.jpg" >
  <cl-transformation effect="art:sizzle">
  </cl-transformation>
</cl-image>
.NET:
Copy to clipboard
cloudinary.Api.UrlImgUp.Transform(new Transformation().Effect("art:sizzle")).BuildImageTag("flowers.jpg")
Android:
Copy to clipboard
MediaManager.get().url().transformation(new Transformation().effect("art:sizzle")).generate("flowers.jpg");
iOS:
Copy to clipboard
imageView.cldSetImage(cloudinary.createUrl().setTransformation(CLDTransformation().setEffect("art:sizzle")).generate("flowers.jpg")!, cloudinary: cloudinary)
Flowers

Note
There are several effects, such as athena, audrey, frost, quartz, zorro and more. Check out the docs for more filter effects.

And consult the Cloudinary documentation to see a wide array image transformation techniques.

Conclusion

The Image Transformation Chatbot can be further improved to provide more functionality. We can have the chatbot analyze images and detect objects in them. In addition, we can connect the chatbot with Google Cloud Speech API to enable a user to speak the commands to the bot. The chatbot will convert audio to text, pass the text onto the Parser Service, process and return the desired results.

One thing to consider, though. The chatbot understands commands written only in English. What about making it multilingual so that our Spanish, French, Dutch or Chinese colleagues could write commands in their language and have the chatbot process and work correctly? Awesome right? Google Cloud Translation Service might just come in handy here.

Building a chatbot platform is not rocket science. Harnessing the potential and competence of serverless backends, such as Cloudinary and PubNub, can empower you to automate tedious, time-consuming tasks by building interactive software that simply works.

What would you like a Cloudinary-powered Chatbot to do? Let me know in the comments section.

Recent Blog Posts

Our $2B Valuation

By
Blackstone Growth Invests in Cloudinary

When we started our journey in 2012, we were looking to improve our lives as developers by making it easier for us to handle the arduous tasks of handling images and videos in our code. That initial line of developer code has evolved into a full suite of media experience solutions driven by a mission that gradually revealed itself over the course of the past 10 years: help companies unleash the full potential of their media to create the most engaging visual experiences.

Read more
Direct-to-Consumer E-Commerce Requires Compelling Visual Experiences

When brands like you adopt a direct–to-consumer (DTC) e-commerce approach with no involvement of retailers or marketplaces, you gain direct and timely insight into evolving shopping behaviors. Accordingly, you can accommodate shoppers’ preferences by continually adjusting your product offering and interspersing the shopping journey with moments of excitement and intrigue. Opportunities abound for you to cultivate engaging customer relationships.

Read more
Automatically Translating Videos for an International Audience

No matter your business focus—public service, B2B integration, recruitment—multimedia, in particular video, is remarkably effective in communicating with the audience. Before, making video accessible to diverse viewers involved tasks galore, such as eliciting the service of production studios to manually dub, transcribe, and add subtitles. Those operations were costly and slow, especially for globally destined content.

Read more
Cloudinary Helps Minted Manage Its Image-Generation Pipeline at Scale

Shoppers return time and again to Minted’s global online community of independent artists and designers because they know they can count on unique, statement-making products of the highest quality there. Concurrently, the visual imagery on Minted.com must do justice to the designs into which the creators have poured their hearts and souls. For Minted’s VP of Engineering David Lien, “Because we are a premium brand, we need to ensure that every single one of our product images matches the selected configuration exactly. For example, if you pick an 18x24 art print on blue canvas, we will show that exact combination on the hero images in the PDF.”

Read more
Highlights on ImageCon 2021 and a Preview of ImageCon 2022

New year, same trend! Visual media will continue to play a monumental role in driving online conversions. To keep up with visual-experience trends and best practices, Cloudinary holds an annual conference called ImageCon, a one-of-a-kind event that helps attendees create the most engaging visual experiences possible.

Read more