Cloudinary Blog

Enhancing Audio in Videos With Dolby.io and Cloudinary MediaFlows

By Amarachi Amaechi
Enhancing Video’s Audio With Cloudinary

To capture audience attention, content creators produce videos with compelling imagery to tell engaging stories. However, many miss one of the most important aspects of video: audio. Not only does riveting audio immerse viewers in the experience, it also enhances visuals with sound effects, commentary, mood music, and such. Inferior audio quickly ruins the ambiance.

Cloudinary offers a wide range of modern media services—image and video upload, transformation, management, audio enhancement—with which developers can elevate media to state of the art.

This tutorial describes how to enhance audio in video with Cloudinary, such as by setting the audio codec and frequency, adjusting the volume, and creating and customizing waveform images. Also expounded is the procedure for further boosting video quality with Dolby.io and Cloudinary MediaFlows. To follow the steps, you need only a basic knowledge of JavaScript.

Uploading Videos to Cloudinary

To upload videos to Cloudinary, first create a free account if you don’t already have one. Next, copy the required credentials for later use, that is, your cloud name in the dashboard and the value of the upload preset in the Upload Presets section under Settings > Upload.

You can upload videos with a Cloudinary API through a RESTful API called from your front-end or back-end app. A more efficient alternative is through Cloudinary’s SDKs. Also, you can upload in bulk with the upload widget—a super fast process.

Whichever way you choose, your media files are always available from Cloudinary’s Digital Asset Management (DAM) solution through a dynamic URL or a robust integration of the development environment.

Because of its focus on video enhancement, this tutorial takes the quicker route of uploading with the Cloudinary upload widget, which requires less code.

  1. Create a folder and add an index.html file with the code below:

    Copy to clipboard
    <!DOCTYPE html>
    <html lang="en">
    <head>
    <meta charset="UTF-8">
    
    <meta http-equiv="X-UA-Compatible" content="IE=edge">
    
    <meta name="viewport" content="width=device-width, initial-scale=1.0">
    
    <title>Cloudinary</title>
    </head>
    <body>
    
    <form>
    
        <input type="button" class="file_upload" id="file_upload" value="File Upload">
    
    </form>
    </body>
    </html>
  2. Add the widget script:

    Copy to clipboard
    <script src="https://upload-widget.cloudinary.com/global/all.js" type="text/javascript"></script>
  3. Call the function to complete the integration by adding the code below to your file. Be sure to replace my_cloud and my_preset with your cloud name and preset value, respectively.

    Copy to clipboard
    <script type="text/javascript">  
    var myWidget = cloudinary.createUploadWidget({
      cloudName: 'my_cloud', 
      uploadPreset: 'my_preset'}, (error, result) => { 
        if (!error && result && result.event === "success") { 
          console.log('Your video media info: ', result.info); 
        }
      }
    )
    
    document.getElementById("file_upload").addEventListener("click", function(){
        myWidget.open();
      }, false);
    </script>
  4. Open the index.html file in the browser and click the Upload button, after which you can upload videos seamlessly to Cloudinary by dragging and dropping files from your local device.

Upload Widget

Afterward, your video URL displays in the dashboard, for example:

Enhancing Audio

Here comes the fun part of transforming audio.

With Cloudinary, you can perform numerous audio-related tasks: convert an audio file’s format, extract audio from a video, set audio frequency. Remarkably, you can convert videos to audio by simply changing the video’s file extension to any popular audio format. For example, tweaking a video file’s .mp4 extension to .mp3 converts the video to audio.

Setting the Audio Codec

To set a video’s audio codec in Cloudinary, configure the audioCodec parameter, which accepts numerous values, for example:

  • MP3. This option is for Flash videos (FLV) or MP4 files only, which support upload and delivery. An example:

    Copy to clipboard
    cloudinary.videoTag('rain', {audioCodec: "mp3"}).toHtml();
  • Opus. This option, which produces the .opus file extension, is slated for WebM files. Opus supports only upload. An example:

    Copy to clipboard
    cloudinary.videoTag('rain', {audioCodec: "opus"}).toHtml();
  • Advanced Audio Coding (AAC). This option, which produces the .aac file extension, is slated for MP4 and FLV files. AAC supports both upload and delivery. An example:

    Copy to clipboard
    cloudinary.videoTag('rain', {audioCodec: "aac"}).toHtml();
  • None. The none option removes the audio channel from a video altogether.

For instance, to set the audio codec to AC, edit the video’s URL after upload to read like this:

Ruby:
Copy to clipboard
cl_video_tag("Web-Assets/Blog/Fall-Rain", :audio_codec=>"aac")
PHP v1:
Copy to clipboard
cl_video_tag("Web-Assets/Blog/Fall-Rain", array("audio_codec"=>"aac"))
PHP v2:
Copy to clipboard
(new VideoTag('Web-Assets/Blog/Fall-Rain.mp4'))
  ->transcode(Transcode::audioCodec(AudioCodec::aac()));
Python:
Copy to clipboard
CloudinaryVideo("Web-Assets/Blog/Fall-Rain").video(audio_codec="aac")
Node.js:
Copy to clipboard
cloudinary.video("Web-Assets/Blog/Fall-Rain", {audio_codec: "aac"})
Java:
Copy to clipboard
cloudinary.url().transformation(new Transformation().audioCodec("aac")).videoTag("Web-Assets/Blog/Fall-Rain");
JS:
Copy to clipboard
cloudinary.videoTag('Web-Assets/Blog/Fall-Rain', {audioCodec: "aac"}).toHtml();
jQuery:
Copy to clipboard
$.cloudinary.video("Web-Assets/Blog/Fall-Rain", {audio_codec: "aac"})
React:
Copy to clipboard
<Video publicId="Web-Assets/Blog/Fall-Rain" >
  <Transformation audioCodec="aac" />
</Video>
Vue.js:
Copy to clipboard
<cld-video publicId="Web-Assets/Blog/Fall-Rain" >
  <cld-transformation audioCodec="aac" />
</cld-video>
Angular:
Copy to clipboard
<cl-video public-id="Web-Assets/Blog/Fall-Rain" >
  <cl-transformation audio-codec="aac">
  </cl-transformation>
</cl-video>
.NET:
Copy to clipboard
cloudinary.Api.UrlVideoUp.Transform(new Transformation().AudioCodec("aac")).BuildVideoTag("Web-Assets/Blog/Fall-Rain")
Android:
Copy to clipboard
MediaManager.get().url().transformation(new Transformation().audioCodec("aac")).resourceType("video").generate("Web-Assets/Blog/Fall-Rain.mp4");
iOS:
Copy to clipboard
cloudinary.createUrl().setResourceType("video").setTransformation(CLDTransformation().setAudioCodec("aac")).generate("Web-Assets/Blog/Fall-Rain.mp4")

Adjusting the Audio Frequency

To adjust the audio frequency, configure the audioFrequency parameter. The code below sets the frequency to 16,000 Hz:

cloudinary.videoTag('Fall-Rain', {audioFrequency: "16000"}).toHtml();

Alternatively, set the parameter through the URL:

Ruby:
Copy to clipboard
cl_video_tag("Web-Assets/Blog/Fall-Rain", :audio_codec=>"aac", :audio_frequency=>"16000")
PHP v1:
Copy to clipboard
cl_video_tag("Web-Assets/Blog/Fall-Rain", array("audio_codec"=>"aac", "audio_frequency"=>"16000"))
PHP v2:
Copy to clipboard
(new VideoTag('Web-Assets/Blog/Fall-Rain.mp4'))
  ->transcode(Transcode::audioCodec(AudioCodec::aac()))
  ->transcode(Transcode::audioFrequency(16000));
Python:
Copy to clipboard
CloudinaryVideo("Web-Assets/Blog/Fall-Rain").video(audio_codec="aac", audio_frequency="16000")
Node.js:
Copy to clipboard
cloudinary.video("Web-Assets/Blog/Fall-Rain", {audio_codec: "aac", audio_frequency: "16000"})
Java:
Copy to clipboard
cloudinary.url().transformation(new Transformation().audioCodec("aac").audioFrequency("16000")).videoTag("Web-Assets/Blog/Fall-Rain");
JS:
Copy to clipboard
cloudinary.videoTag('Web-Assets/Blog/Fall-Rain', {audioCodec: "aac", audioFrequency: "16000"}).toHtml();
jQuery:
Copy to clipboard
$.cloudinary.video("Web-Assets/Blog/Fall-Rain", {audio_codec: "aac", audio_frequency: "16000"})
React:
Copy to clipboard
<Video publicId="Web-Assets/Blog/Fall-Rain" >
  <Transformation audioCodec="aac" audioFrequency="16000" />
</Video>
Vue.js:
Copy to clipboard
<cld-video publicId="Web-Assets/Blog/Fall-Rain" >
  <cld-transformation audioCodec="aac" audioFrequency="16000" />
</cld-video>
Angular:
Copy to clipboard
<cl-video public-id="Web-Assets/Blog/Fall-Rain" >
  <cl-transformation audio-codec="aac" audio-frequency="16000">
  </cl-transformation>
</cl-video>
.NET:
Copy to clipboard
cloudinary.Api.UrlVideoUp.Transform(new Transformation().AudioCodec("aac").AudioFrequency("16000")).BuildVideoTag("Web-Assets/Blog/Fall-Rain")
Android:
Copy to clipboard
MediaManager.get().url().transformation(new Transformation().audioCodec("aac").audioFrequency("16000")).resourceType("video").generate("Web-Assets/Blog/Fall-Rain.mp4");
iOS:
Copy to clipboard
cloudinary.createUrl().setResourceType("video").setTransformation(CLDTransformation().setAudioCodec("aac").setAudioFrequency("16000")).generate("Web-Assets/Blog/Fall-Rain.mp4")

Changing the Audio Volume

To adjust the volume as a percentage of the current setting, configure the volume effect parameter. The code below reduces the current volume by 50%, which makes the audio barely audible.

cloudinary.videoTag('Fall-Rain', {effect: "volume:-50"}).toHtml();

Alternatively, set the parameter through the URL:

Ruby:
Copy to clipboard
cl_video_tag("Web-Assets/Blog/Fall-Rain", :audio_codec=>"aac", :audio_frequency=>"16000", :effect=>"volume:-50")
PHP v1:
Copy to clipboard
cl_video_tag("Web-Assets/Blog/Fall-Rain", array("audio_codec"=>"aac", "audio_frequency"=>"16000", "effect"=>"volume:-50"))
PHP v2:
Copy to clipboard
(new VideoTag('Web-Assets/Blog/Fall-Rain.mp4'))
  ->transcode(Transcode::audioCodec(AudioCodec::aac()))
  ->transcode(Transcode::audioFrequency(16000))
  ->videoEdit(VideoEdit::volume(-50));
Python:
Copy to clipboard
CloudinaryVideo("Web-Assets/Blog/Fall-Rain").video(audio_codec="aac", audio_frequency="16000", effect="volume:-50")
Node.js:
Copy to clipboard
cloudinary.video("Web-Assets/Blog/Fall-Rain", {audio_codec: "aac", audio_frequency: "16000", effect: "volume:-50"})
Java:
Copy to clipboard
cloudinary.url().transformation(new Transformation().audioCodec("aac").audioFrequency("16000").effect("volume:-50")).videoTag("Web-Assets/Blog/Fall-Rain");
JS:
Copy to clipboard
cloudinary.videoTag('Web-Assets/Blog/Fall-Rain', {audioCodec: "aac", audioFrequency: "16000", effect: "volume:-50"}).toHtml();
jQuery:
Copy to clipboard
$.cloudinary.video("Web-Assets/Blog/Fall-Rain", {audio_codec: "aac", audio_frequency: "16000", effect: "volume:-50"})
React:
Copy to clipboard
<Video publicId="Web-Assets/Blog/Fall-Rain" >
  <Transformation audioCodec="aac" audioFrequency="16000" effect="volume:-50" />
</Video>
Vue.js:
Copy to clipboard
<cld-video publicId="Web-Assets/Blog/Fall-Rain" >
  <cld-transformation audioCodec="aac" audioFrequency="16000" effect="volume:-50" />
</cld-video>
Angular:
Copy to clipboard
<cl-video public-id="Web-Assets/Blog/Fall-Rain" >
  <cl-transformation audio-codec="aac" audio-frequency="16000" effect="volume:-50">
  </cl-transformation>
</cl-video>
.NET:
Copy to clipboard
cloudinary.Api.UrlVideoUp.Transform(new Transformation().AudioCodec("aac").AudioFrequency("16000").Effect("volume:-50")).BuildVideoTag("Web-Assets/Blog/Fall-Rain")
Android:
Copy to clipboard
MediaManager.get().url().transformation(new Transformation().audioCodec("aac").audioFrequency("16000").effect("volume:-50")).resourceType("video").generate("Web-Assets/Blog/Fall-Rain.mp4");
iOS:
Copy to clipboard
cloudinary.createUrl().setResourceType("video").setTransformation(CLDTransformation().setAudioCodec("aac").setAudioFrequency("16000").setEffect("volume:-50")).generate("Web-Assets/Blog/Fall-Rain.mp4")

Creating Or Customizing Waveform Images

To create waveforms from audio and video files that you specify, change the delivery URL’s file extension to that of an image format and then add the waveform flag. For example:

Copy to clipboard
cloudinary.videoTag('rain.png', {transformation: [
  {height: 250, width: 650, crop: "scale"},
  {flags: "waveform"}
  ]}).toHtml();

The above code sets the following:

  • The height to 250
  • The width to 650
  • The crop value of the generated waveform to scale

You can customize the waveform’s color and background with the color and background parameters, respectively, like this:

Copy to clipboard
cloudinary.videoTag('rain.png', {transformation: [
  {height: 200, width: 500, crop: "scale"},
  {background: "white", color: "black", flags: "waveform"}
  ]}).toHtml();

Here’s the URL:

Ruby:
Copy to clipboard
cl_image_tag("Web-Assets/Blog/Fall-Rain.png", :resource_type=>"video", :transformation=>[
  {:end_offset=>"4.0", :start_offset=>"2.0"},
  {:height=>200, :width=>500, :crop=>"scale"},
  {:flags=>"waveform", :color=>"black", :background=>"white"}
  ])
PHP v1:
Copy to clipboard
cl_image_tag("Web-Assets/Blog/Fall-Rain.png", array("resource_type"=>"video", "transformation"=>array(
  array("end_offset"=>"4.0", "start_offset"=>"2.0"),
  array("height"=>200, "width"=>500, "crop"=>"scale"),
  array("flags"=>"waveform", "color"=>"black", "background"=>"white")
  )))
PHP v2:
Copy to clipboard
(new ImageTag('Web-Assets/Blog/Fall-Rain.png'))
  ->videoEdit(VideoEdit::trim()->startOffset(2.0)->endOffset(4.0))
  ->resize(Resize::scale()->width(500)->height(200))
  ->backgroundColor(Color::WHITE)->color(Color::BLACK)
  ->addFlag(Flag::waveform())
  ->assetType(AssetType::VIDEO);
Python:
Copy to clipboard
CloudinaryVideo("Web-Assets/Blog/Fall-Rain.png").image(transformation=[
  {'end_offset': "4.0", 'start_offset': "2.0"},
  {'height': 200, 'width': 500, 'crop': "scale"},
  {'flags': "waveform", 'color': "black", 'background': "white"}
  ])
Node.js:
Copy to clipboard
cloudinary.image("Web-Assets/Blog/Fall-Rain.png", {resource_type: "video", transformation: [
  {end_offset: "4.0", start_offset: "2.0"},
  {height: 200, width: 500, crop: "scale"},
  {flags: "waveform", color: "black", background: "white"}
  ]})
Java:
Copy to clipboard
cloudinary.url().transformation(new Transformation()
  .endOffset("4.0").startOffset("2.0").chain()
  .height(200).width(500).crop("scale").chain()
  .flags("waveform").color("black").background("white")).resourceType("video").imageTag("Web-Assets/Blog/Fall-Rain.png");
JS:
Copy to clipboard
cloudinary.videoTag('Web-Assets/Blog/Fall-Rain.png', {transformation: [
  {endOffset: "4.0", startOffset: "2.0"},
  {height: 200, width: 500, crop: "scale"},
  {flags: "waveform", color: "black", background: "white"}
  ]}).toHtml();
jQuery:
Copy to clipboard
$.cloudinary.image("Web-Assets/Blog/Fall-Rain.png", {resource_type: "video", transformation: [
  {end_offset: "4.0", start_offset: "2.0"},
  {height: 200, width: 500, crop: "scale"},
  {flags: "waveform", color: "black", background: "white"}
  ]})
React:
Copy to clipboard
<Video publicId="Web-Assets/Blog/Fall-Rain.png" resourceType="video">
  <Transformation endOffset="4.0" startOffset="2.0" />
  <Transformation height="200" width="500" crop="scale" />
  <Transformation flags="waveform" color="black" background="white" />
</Video>
Vue.js:
Copy to clipboard
<cld-video publicId="Web-Assets/Blog/Fall-Rain.png" resourceType="video">
  <cld-transformation endOffset="4.0" startOffset="2.0" />
  <cld-transformation height="200" width="500" crop="scale" />
  <cld-transformation flags="waveform" color="black" background="white" />
</cld-video>
Angular:
Copy to clipboard
<cl-video public-id="Web-Assets/Blog/Fall-Rain.png" resource-type="video">
  <cl-transformation end-offset="4.0" start-offset="2.0">
  </cl-transformation>
  <cl-transformation height="200" width="500" crop="scale">
  </cl-transformation>
  <cl-transformation flags="waveform" color="black" background="white">
  </cl-transformation>
</cl-video>
.NET:
Copy to clipboard
cloudinary.Api.UrlVideoUp.Transform(new Transformation()
  .EndOffset("4.0").StartOffset("2.0").Chain()
  .Height(200).Width(500).Crop("scale").Chain()
  .Flags("waveform").Color("black").Background("white")).BuildImageTag("Web-Assets/Blog/Fall-Rain.png")
Android:
Copy to clipboard
MediaManager.get().url().transformation(new Transformation()
  .endOffset("4.0").startOffset("2.0").chain()
  .height(200).width(500).crop("scale").chain()
  .flags("waveform").color("black").background("white")).resourceType("video").generate("Web-Assets/Blog/Fall-Rain.png");
iOS:
Copy to clipboard
cloudinary.createUrl().setResourceType("video").setTransformation(CLDTransformation()
  .setEndOffset("4.0").setStartOffset("2.0").chain()
  .setHeight(200).setWidth(500).setCrop("scale").chain()
  .setFlags("waveform").setColor("black").setBackground("white")).generate("Web-Assets/Blog/Fall-Rain.png")
Waveform image

Achieving Dolby.io Enhancement With Cloudinary MediaFlows

The Dolby.io Enhancement block in Cloudinary MediaFlows raises media quality through the Dolby.io API. How? By relying on an advanced algorithm, which carefully analyzes and significantly enhances your file’s content.

Note
Currently, this Dolby.io Enhancement block is available for certain users only. For access, contact Cloudinary Customer Support.

Generating an API Key

First, follow these steps to generate an API key:

  1. Sign up on the Dolby.io developer site, which offers thousands of minutes for free.

  2. Find your API key in the My First App block. Copy only the key for media processing, which is displayed in the Media Processing APIs section.

  3. Sign up with MediaFlows with your GitHub or Google account.

You can now start creating projects on MediaFlows.

Setting Up MediaFlows

Do the following to set up MediaFlows:

  1. In the management console, set up a Cloudinary subaccount, available on Plus plans or higher, for your first project.

    A Connect with Cloudinary link displays, prompting you to log in to your Cloudinary account.

  2. Log in and then choose a cloud account in the APPLICATION REQUESTS ACCESS TO YOUR DATA page.

  3. Click the Accept Access button.

Now you’re all set to create your first project by naming it in the modal that displays.

MediaFlows

You can enhance media in many ways with Dolby.io, such as through content leveling, noise reduction, loudness correction, speech isolation, tone shaping, speech leveling, dynamic equalization, sibilance, plosive, hum, and mouth-click reductions.

To begin using Dolby.io through MediaFlows:

  1. Double-click the Catch Webhook block.
  2. Click Create Upload Preset to place a new upload preset on your dashboard.
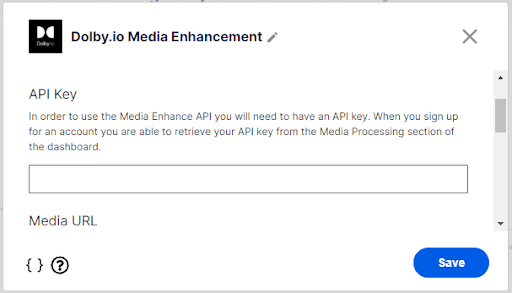
  3. Drag the Dolby.io Media Enhancement block to the main board and double-click it.
  4. Type your API key in the text field.

Dolby.io Media Enhancement

Optionally, you can set Dolby.io parameters to enhance your media in MediaFlows. See the subsections below.

Applying Loudness Correction

The loudness object specifies whether Dolby.io should apply loudness correction to a video file. Setting loudness to true means yes.

Copy to clipboard
{
“audio”:
   {
    “loudness”: 
     { 
      “enable”: true
     }
   }
}

Reducing Noise

The noise object suppresses a video’s static background noise.

Copy to clipboard
{
“audio”:
   {
    “noise”: 
     { 
      reduction:
         {
        “enable”: true
       }
     }
   }
}

Isolating Nuisance Sound

The isolation object isolates the audio from unwanted sound. Most would opt for the true setting.

Copy to clipboard
audio: {

      speech: {isolation: {enable: true}}
 }

Reducing Sibilance

Speech sibilance is the characteristic of harsh consonants, such as “th,” “sh,” and “s.” The sibilance reduction object reduces the severity of sibilant over pronunciation.

Copy to clipboard
 audio: {

     speech: {isolation: {enable: true}, sibilance: {reduction: {enable: true}}}
 }

Applying Enhancements

The screenshot below shows the code for the loudness parameter as an example:

Dolby.io media-enhancement parameters

To apply the parameters:

  1. Click Save.
  2. Connect the blue part of Catch Webhook to the output of the Dolby.io Media Enhancement block, as shown in the image below.
  3. Drag the Upload Media block to the board and connect it to the Dolby.io Media Enhancement block in the same manner.

New flow

Now you can upload to this flow with the upload preset you created earlier. The preset automatically applies transformations during upload.

After you upload a video, Cloudinary MediaFlows automatically requests a URL for the processed file. Subsequently, you can edit that URL on other MediaFlows blocks for further enhancement.

Trying Out Cloudinary’s Media-Enhancement Features

Many of Cloudinary’s media-transformation capabilities are the best in the market. Those highlighted above maximize the full potential of video and audio. Coupling them with the fully integrated Dolby.io Media Enhancement API within MediaFlows delivers a more captivating experience.

Do check out the features and Cloudinary’s other audio- and video-enhancing components. To get started, sign up for a free account, which offers thousands of transformations and 25 GB each of storage and bandwidth. Talk about a good deal!
Recent Blog Posts

Our $2B Valuation

By
Blackstone Growth Invests in Cloudinary

When we started our journey in 2012, we were looking to improve our lives as developers by making it easier for us to handle the arduous tasks of handling images and videos in our code. That initial line of developer code has evolved into a full suite of media experience solutions driven by a mission that gradually revealed itself over the course of the past 10 years: help companies unleash the full potential of their media to create the most engaging visual experiences.

Read more
Direct-to-Consumer E-Commerce Requires Compelling Visual Experiences

When brands like you adopt a direct–to-consumer (DTC) e-commerce approach with no involvement of retailers or marketplaces, you gain direct and timely insight into evolving shopping behaviors. Accordingly, you can accommodate shoppers’ preferences by continually adjusting your product offering and interspersing the shopping journey with moments of excitement and intrigue. Opportunities abound for you to cultivate engaging customer relationships.

Read more
Automatically Translating Videos for an International Audience

No matter your business focus—public service, B2B integration, recruitment—multimedia, in particular video, is remarkably effective in communicating with the audience. Before, making video accessible to diverse viewers involved tasks galore, such as eliciting the service of production studios to manually dub, transcribe, and add subtitles. Those operations were costly and slow, especially for globally destined content.

Read more
Cloudinary Helps Minted Manage Its Image-Generation Pipeline at Scale

Shoppers return time and again to Minted’s global online community of independent artists and designers because they know they can count on unique, statement-making products of the highest quality there. Concurrently, the visual imagery on Minted.com must do justice to the designs into which the creators have poured their hearts and souls. For Minted’s VP of Engineering David Lien, “Because we are a premium brand, we need to ensure that every single one of our product images matches the selected configuration exactly. For example, if you pick an 18x24 art print on blue canvas, we will show that exact combination on the hero images in the PDF.”

Read more
Highlights on ImageCon 2021 and a Preview of ImageCon 2022

New year, same trend! Visual media will continue to play a monumental role in driving online conversions. To keep up with visual-experience trends and best practices, Cloudinary holds an annual conference called ImageCon, a one-of-a-kind event that helps attendees create the most engaging visual experiences possible.

Read more