With Cloudinary's transformation options, you as web or mobile developers can transform images in real time through dynamic URLs, from optimization and responsive delivery to other tasks, complete with cool effects. For example, a robust transformation applies another image to displace your base image with a mapping algorithm that evaluates the base image's pixels, displacing them according to the intensity of the corresponding image's map pixels.
Specifically, the algorithm appraises the map image's red and green channels: the more intense the red color in the displacement map, the more the horizontal displacement of the corresponding pixel in the base image. Similarly, the more intense the green color in the displacement map, the larger the vertical displacement of the corresponding pixel in the base image.
How Do You Create a Displacement Map?
The following example demonstrates a base image displaced by an image map, creating a zoom effect:

The next example uses a displacement map to warp the perspective of an overlay image for final placement as an overlay on another image:

Using this overlay transformation for placement on a mug:

cl_image_tag("left_mug", :use_root_path=>true, :transformation=>[
  {:width=>500, :crop=>"scale"},
  {:overlay=>"sample.png", :width=>250, :height=>250, :crop=>"pad"},
  {:overlay=>"radialize"},
  {:flags=>"layer_apply", :effect=>"displace", :y=>-8},
  {:flags=>"layer_apply", :x=>10, :background=>"transparent"}
  ])
cl_image_tag("left_mug", array("use_root_path"=>true, "transformation"=>array(
  array("width"=>500, "crop"=>"scale"),
  array("overlay"=>"sample.png", "width"=>250, "height"=>250, "crop"=>"pad"),
  array("overlay"=>"radialize"),
  array("flags"=>"layer_apply", "effect"=>"displace", "y"=>-8),
  array("flags"=>"layer_apply", "x"=>10, "background"=>"transparent")
  )))
CloudinaryImage("left_mug").image(use_root_path=True, transformation=[
  {'width': 500, 'crop': "scale"},
  {'overlay': "sample.png", 'width': 250, 'height': 250, 'crop': "pad"},
  {'overlay': "radialize"},
  {'flags': "layer_apply", 'effect': "displace", 'y': -8},
  {'flags': "layer_apply", 'x': 10, 'background': "transparent"}
  ])
cloudinary.image("left_mug", {use_root_path: true, transformation: [
  {width: 500, crop: "scale"},
  {overlay: "sample.png", width: 250, height: 250, crop: "pad"},
  {overlay: "radialize"},
  {flags: "layer_apply", effect: "displace", y: -8},
  {flags: "layer_apply", x: 10, background: "transparent"}
  ]})
cloudinary.url().transformation(new Transformation()
  .width(500).crop("scale").chain()
  .overlay(new Layer().publicId("sample.png")).width(250).height(250).crop("pad").chain()
  .overlay(new Layer().publicId("radialize")).chain()
  .flags("layer_apply").effect("displace").y(-8).chain()
  .flags("layer_apply").x(10).background("transparent")).useRootPath(true).imageTag("left_mug");
cloudinary.imageTag('left_mug', {useRootPath: true, transformation: [
  {width: 500, crop: "scale"},
  {overlay: new cloudinary.Layer().publicId("sample.png"), width: 250, height: 250, crop: "pad"},
  {overlay: new cloudinary.Layer().publicId("radialize")},
  {flags: "layer_apply", effect: "displace", y: -8},
  {flags: "layer_apply", x: 10, background: "transparent"}
  ]}).toHtml();
$.cloudinary.image("left_mug", {use_root_path: true, transformation: [
  {width: 500, crop: "scale"},
  {overlay: new cloudinary.Layer().publicId("sample.png"), width: 250, height: 250, crop: "pad"},
  {overlay: new cloudinary.Layer().publicId("radialize")},
  {flags: "layer_apply", effect: "displace", y: -8},
  {flags: "layer_apply", x: 10, background: "transparent"}
  ]})
<Image publicId="left_mug" useRootPath="true">
  <Transformation width="500" crop="scale" />
  <Transformation overlay="sample.png" width="250" height="250" crop="pad" />
  <Transformation overlay="radialize" />
  <Transformation flags="layer_apply" effect="displace" y="-8" />
  <Transformation flags="layer_apply" x="10" background="transparent" />
</Image>
<cld-image publicId="left_mug" useRootPath="true">
  <cld-transformation width="500" crop="scale" />
  <cld-transformation :overlay="sample.png" width="250" height="250" crop="pad" />
  <cld-transformation :overlay="radialize" />
  <cld-transformation flags="layer_apply" effect="displace" y="-8" />
  <cld-transformation flags="layer_apply" x="10" background="transparent" />
</cld-image>
<cl-image public-id="left_mug" use-root-path="true">
  <cl-transformation width="500" crop="scale">
  </cl-transformation>
  <cl-transformation overlay="sample.png" width="250" height="250" crop="pad">
  </cl-transformation>
  <cl-transformation overlay="radialize">
  </cl-transformation>
  <cl-transformation flags="layer_apply" effect="displace" y="-8">
  </cl-transformation>
  <cl-transformation flags="layer_apply" x="10" background="transparent">
  </cl-transformation>
</cl-image>
cloudinary.Api.UrlImgUp.Transform(new Transformation()
  .Width(500).Crop("scale").Chain()
  .Overlay(new Layer().PublicId("sample.png")).Width(250).Height(250).Crop("pad").Chain()
  .Overlay(new Layer().PublicId("radialize")).Chain()
  .Flags("layer_apply").Effect("displace").Y(-8).Chain()
  .Flags("layer_apply").X(10).Background("transparent")).UseRootPath(true).BuildImageTag("left_mug")
MediaManager.get().url().transformation(new Transformation()
  .width(500).crop("scale").chain()
  .overlay(new Layer().publicId("sample.png")).width(250).height(250).crop("pad").chain()
  .overlay(new Layer().publicId("radialize")).chain()
  .flags("layer_apply").effect("displace").y(-8).chain()
  .flags("layer_apply").x(10).background("transparent")).useRootPath(true).generate("left_mug");
imageView.cldSetImage(cloudinary.createUrl().setUseRootPath( true).setTransformation(CLDTransformation()
  .setWidth(500).setCrop("scale").chain()
  .setOverlay("sample.png").setWidth(250).setHeight(250).setCrop("pad").chain()
  .setOverlay("radialize").chain()
  .setFlags("layer_apply").setEffect("displace").setY(-8).chain()
  .setFlags("layer_apply").setX(10).setBackground("transparent")).generate("left_mug")!, cloudinary: cloudinary)
The Displacement Effect
The displacement effect is controlled by a few configurable parameters that allow you to fine tune the desired result. The dynamic URL for the final image includes:
- The public_id of the base image.
- The public_id of the image map to use as a displacement template, added using the
overlayparameter (lin URLs). - The
effectparameter set todisplace(e_displacein URLs), which tells Cloudinary to use the image map as a displacement effect rather than adding it as an overlay. - The
xandyparameters to configure the maximum allowed displacement in the horizontal and vertical directions (negative values for left and up respectively, 0 for no displacement).
The final displacement of each pixel in the base image is determined by a combination of the red and green color channels, together with the configured x and y parameters. For example, for a given x value of 20 and a pixel with a red value of 255 (highest), the corresponding base image pixel would be displaced by 20 pixels horizontally, while a red value of 25 (10%) would only displace the base image pixel by 2 pixels horizontally.
The following example demonstrates the zoom displacement map shown above (along with an overlay of a magnifying glass) to "magnify" the base image.
cl_image_tag("woman.jpg", :use_root_path=>true, :transformation=>[
  {:width=>500, :height=>500, :crop=>"fill"},
  {:overlay=>"woman", :width=>500, :height=>500, :crop=>"fill"},
  {:width=>200, :height=>200, :x=>20, :y=>20, :crop=>"crop"},
  {:width=>200, :height=>200, :overlay=>"docs:zoom_map", :crop=>"fill"},
  {:flags=>"layer_apply", :effect=>"displace", :x=>20, :y=>20},
  {:flags=>"layer_apply", :gravity=>"north_west", :x=>20, :y=>20},
  {:overlay=>"mag-glass.png", :width=>330, :height=>215, :gravity=>"north_west", :x=>38, :y=>38, :flags=>"no_overflow"}
  ])
cl_image_tag("woman.jpg", array("use_root_path"=>true, "transformation"=>array(
  array("width"=>500, "height"=>500, "crop"=>"fill"),
  array("overlay"=>"woman", "width"=>500, "height"=>500, "crop"=>"fill"),
  array("width"=>200, "height"=>200, "x"=>20, "y"=>20, "crop"=>"crop"),
  array("width"=>200, "height"=>200, "overlay"=>"docs:zoom_map", "crop"=>"fill"),
  array("flags"=>"layer_apply", "effect"=>"displace", "x"=>20, "y"=>20),
  array("flags"=>"layer_apply", "gravity"=>"north_west", "x"=>20, "y"=>20),
  array("overlay"=>"mag-glass.png", "width"=>330, "height"=>215, "gravity"=>"north_west", "x"=>38, "y"=>38, "flags"=>"no_overflow")
  )))
CloudinaryImage("woman.jpg").image(use_root_path=True, transformation=[
  {'width': 500, 'height': 500, 'crop': "fill"},
  {'overlay': "woman", 'width': 500, 'height': 500, 'crop': "fill"},
  {'width': 200, 'height': 200, 'x': 20, 'y': 20, 'crop': "crop"},
  {'width': 200, 'height': 200, 'overlay': "docs:zoom_map", 'crop': "fill"},
  {'flags': "layer_apply", 'effect': "displace", 'x': 20, 'y': 20},
  {'flags': "layer_apply", 'gravity': "north_west", 'x': 20, 'y': 20},
  {'overlay': "mag-glass.png", 'width': 330, 'height': 215, 'gravity': "north_west", 'x': 38, 'y': 38, 'flags': "no_overflow"}
  ])
cloudinary.image("woman.jpg", {use_root_path: true, transformation: [
  {width: 500, height: 500, crop: "fill"},
  {overlay: "woman", width: 500, height: 500, crop: "fill"},
  {width: 200, height: 200, x: 20, y: 20, crop: "crop"},
  {width: 200, height: 200, overlay: "docs:zoom_map", crop: "fill"},
  {flags: "layer_apply", effect: "displace", x: 20, y: 20},
  {flags: "layer_apply", gravity: "north_west", x: 20, y: 20},
  {overlay: "mag-glass.png", width: 330, height: 215, gravity: "north_west", x: 38, y: 38, flags: "no_overflow"}
  ]})
cloudinary.url().transformation(new Transformation()
  .width(500).height(500).crop("fill").chain()
  .overlay(new Layer().publicId("woman")).width(500).height(500).crop("fill").chain()
  .width(200).height(200).x(20).y(20).crop("crop").chain()
  .width(200).height(200).overlay(new Layer().publicId("docs:zoom_map")).crop("fill").chain()
  .flags("layer_apply").effect("displace").x(20).y(20).chain()
  .flags("layer_apply").gravity("north_west").x(20).y(20).chain()
  .overlay(new Layer().publicId("mag-glass.png")).width(330).height(215).gravity("north_west").x(38).y(38).flags("no_overflow")).useRootPath(true).imageTag("woman.jpg");
cloudinary.imageTag('woman.jpg', {useRootPath: true, transformation: [
  {width: 500, height: 500, crop: "fill"},
  {overlay: new cloudinary.Layer().publicId("woman"), width: 500, height: 500, crop: "fill"},
  {width: 200, height: 200, x: 20, y: 20, crop: "crop"},
  {width: 200, height: 200, overlay: new cloudinary.Layer().publicId("docs:zoom_map"), crop: "fill"},
  {flags: "layer_apply", effect: "displace", x: 20, y: 20},
  {flags: "layer_apply", gravity: "north_west", x: 20, y: 20},
  {overlay: new cloudinary.Layer().publicId("mag-glass.png"), width: 330, height: 215, gravity: "north_west", x: 38, y: 38, flags: "no_overflow"}
  ]}).toHtml();
$.cloudinary.image("woman.jpg", {use_root_path: true, transformation: [
  {width: 500, height: 500, crop: "fill"},
  {overlay: new cloudinary.Layer().publicId("woman"), width: 500, height: 500, crop: "fill"},
  {width: 200, height: 200, x: 20, y: 20, crop: "crop"},
  {width: 200, height: 200, overlay: new cloudinary.Layer().publicId("docs:zoom_map"), crop: "fill"},
  {flags: "layer_apply", effect: "displace", x: 20, y: 20},
  {flags: "layer_apply", gravity: "north_west", x: 20, y: 20},
  {overlay: new cloudinary.Layer().publicId("mag-glass.png"), width: 330, height: 215, gravity: "north_west", x: 38, y: 38, flags: "no_overflow"}
  ]})
<Image publicId="woman.jpg" useRootPath="true">
  <Transformation width="500" height="500" crop="fill" />
  <Transformation overlay="woman" width="500" height="500" crop="fill" />
  <Transformation width="200" height="200" x="20" y="20" crop="crop" />
  <Transformation width="200" height="200" overlay="docs:zoom_map" crop="fill" />
  <Transformation flags="layer_apply" effect="displace" x="20" y="20" />
  <Transformation flags="layer_apply" gravity="north_west" x="20" y="20" />
  <Transformation overlay="mag-glass.png" width="330" height="215" gravity="north_west" x="38" y="38" flags="no_overflow" />
</Image>
<cld-image publicId="woman.jpg" useRootPath="true">
  <cld-transformation width="500" height="500" crop="fill" />
  <cld-transformation :overlay="woman" width="500" height="500" crop="fill" />
  <cld-transformation width="200" height="200" x="20" y="20" crop="crop" />
  <cld-transformation width="200" height="200" :overlay="docs:zoom_map" crop="fill" />
  <cld-transformation flags="layer_apply" effect="displace" x="20" y="20" />
  <cld-transformation flags="layer_apply" gravity="north_west" x="20" y="20" />
  <cld-transformation :overlay="mag-glass.png" width="330" height="215" gravity="north_west" x="38" y="38" flags="no_overflow" />
</cld-image>
<cl-image public-id="woman.jpg" use-root-path="true">
  <cl-transformation width="500" height="500" crop="fill">
  </cl-transformation>
  <cl-transformation overlay="woman" width="500" height="500" crop="fill">
  </cl-transformation>
  <cl-transformation width="200" height="200" x="20" y="20" crop="crop">
  </cl-transformation>
  <cl-transformation width="200" height="200" overlay="docs:zoom_map" crop="fill">
  </cl-transformation>
  <cl-transformation flags="layer_apply" effect="displace" x="20" y="20">
  </cl-transformation>
  <cl-transformation flags="layer_apply" gravity="north_west" x="20" y="20">
  </cl-transformation>
  <cl-transformation overlay="mag-glass.png" width="330" height="215" gravity="north_west" x="38" y="38" flags="no_overflow">
  </cl-transformation>
</cl-image>
cloudinary.Api.UrlImgUp.Transform(new Transformation()
  .Width(500).Height(500).Crop("fill").Chain()
  .Overlay(new Layer().PublicId("woman")).Width(500).Height(500).Crop("fill").Chain()
  .Width(200).Height(200).X(20).Y(20).Crop("crop").Chain()
  .Width(200).Height(200).Overlay(new Layer().PublicId("docs:zoom_map")).Crop("fill").Chain()
  .Flags("layer_apply").Effect("displace").X(20).Y(20).Chain()
  .Flags("layer_apply").Gravity("north_west").X(20).Y(20).Chain()
  .Overlay(new Layer().PublicId("mag-glass.png")).Width(330).Height(215).Gravity("north_west").X(38).Y(38).Flags("no_overflow")).UseRootPath(true).BuildImageTag("woman.jpg")
MediaManager.get().url().transformation(new Transformation()
  .width(500).height(500).crop("fill").chain()
  .overlay(new Layer().publicId("woman")).width(500).height(500).crop("fill").chain()
  .width(200).height(200).x(20).y(20).crop("crop").chain()
  .width(200).height(200).overlay(new Layer().publicId("docs:zoom_map")).crop("fill").chain()
  .flags("layer_apply").effect("displace").x(20).y(20).chain()
  .flags("layer_apply").gravity("north_west").x(20).y(20).chain()
  .overlay(new Layer().publicId("mag-glass.png")).width(330).height(215).gravity("north_west").x(38).y(38).flags("no_overflow")).useRootPath(true).generate("woman.jpg");
imageView.cldSetImage(cloudinary.createUrl().setUseRootPath( true).setTransformation(CLDTransformation()
  .setWidth(500).setHeight(500).setCrop("fill").chain()
  .setOverlay("woman").setWidth(500).setHeight(500).setCrop("fill").chain()
  .setWidth(200).setHeight(200).setX(20).setY(20).setCrop("crop").chain()
  .setWidth(200).setHeight(200).setOverlay("docs:zoom_map").setCrop("fill").chain()
  .setFlags("layer_apply").setEffect("displace").setX(20).setY(20).chain()
  .setFlags("layer_apply").setGravity("north_west").setX(20).setY(20).chain()
  .setOverlay("mag-glass.png").setWidth(330).setHeight(215).setGravity("north_west").setX(38).setY(38).setFlags("no_overflow")).generate("woman.jpg")!, cloudinary: cloudinary)

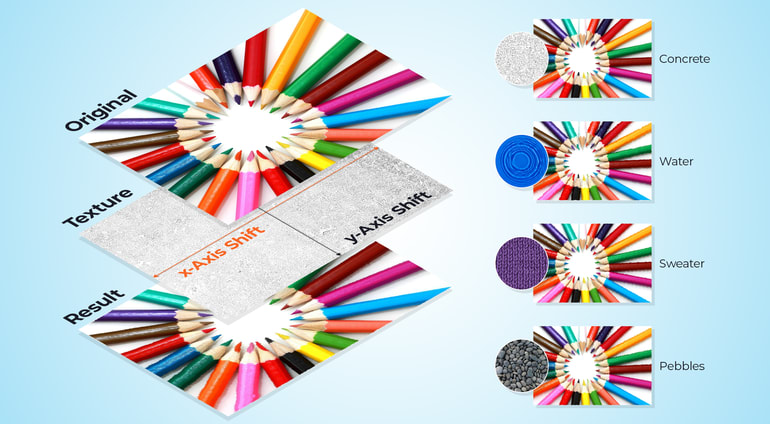
Custom Art Effects
Any image can be used as a displacement map, even if it hasn't been specifically created for that purpose. Most of the time, using a photograph as a map will give some surreal effects, but if you use a photograph with a (semi) repeating pattern, you can actually end up with some nice new texture effects. The following interactive example allows you to combine a base picture with various image "textures":
2 Pick an image to use as a distortion effect


3 Press the button!

Adapting Overlays to a Non-smooth Surface
Another more practical case for using the displacement effect is to make an overlay appear more realistic when placing it over an object with its own texture, making the overlay seem like its actually part of that object itself. This can be very useful for generating customized eCommerce images.
This can be achieved by using the base image itself as a displacement map for the overlay. For example, below we've added an overlay to a sweater, using the sweater itself as a displacement map for the overlay:
cl_image_tag("docs/bulls.png", array("transformation"=>array(
  array("width"=>490, "opacity"=>80, "crop"=>"scale"),
  array("height"=>"2.0", "width"=>"1.0", "crop"=>"pad"),
  array("overlay"=>"docs:sweater", "effect"=>"displace", "y"=>-8),
  array("effect"=>"trim"),
  array("underlay"=>"docs:sweater", "width"=>690)
  )))
cloudinary.url().transformation(new Transformation()
  .width(490).opacity(80).crop("scale").chain()
  .height(2.0).width(1.0).crop("pad").chain()
  .overlay(new Layer().publicId("docs:sweater")).effect("displace").y(-8).chain()
  .effect("trim").chain()
  .underlay(new Layer().publicId("docs:sweater")).width(690)).imageTag("docs/bulls.png");
cloudinary.imageTag('docs/bulls.png', {transformation: [
  {width: 490, opacity: 80, crop: "scale"},
  {height: "2.0", width: "1.0", crop: "pad"},
  {overlay: new cloudinary.Layer().publicId("docs:sweater"), effect: "displace", y: -8},
  {effect: "trim"},
  {underlay: new cloudinary.Layer().publicId("docs:sweater"), width: 690}
  ]}).toHtml();
$.cloudinary.image("docs/bulls.png", {transformation: [
  {width: 490, opacity: 80, crop: "scale"},
  {height: "2.0", width: "1.0", crop: "pad"},
  {overlay: new cloudinary.Layer().publicId("docs:sweater"), effect: "displace", y: -8},
  {effect: "trim"},
  {underlay: new cloudinary.Layer().publicId("docs:sweater"), width: 690}
  ]})
<Image publicId="docs/bulls.png" >
  <Transformation width="490" opacity="80" crop="scale" />
  <Transformation height="2.0" width="1.0" crop="pad" />
  <Transformation overlay="docs:sweater" effect="displace" y="-8" />
  <Transformation effect="trim" />
  <Transformation underlay="docs:sweater" width="690" />
</Image>
<cld-image publicId="docs/bulls.png" >
  <cld-transformation width="490" opacity="80" crop="scale" />
  <cld-transformation height="2.0" width="1.0" crop="pad" />
  <cld-transformation :overlay="docs:sweater" effect="displace" y="-8" />
  <cld-transformation effect="trim" />
  <cld-transformation :underlay="docs:sweater" width="690" />
</cld-image>
<cl-image public-id="docs/bulls.png" >
  <cl-transformation width="490" opacity="80" crop="scale">
  </cl-transformation>
  <cl-transformation height="2.0" width="1.0" crop="pad">
  </cl-transformation>
  <cl-transformation overlay="docs:sweater" effect="displace" y="-8">
  </cl-transformation>
  <cl-transformation effect="trim">
  </cl-transformation>
  <cl-transformation underlay="docs:sweater" width="690">
  </cl-transformation>
</cl-image>
cloudinary.Api.UrlImgUp.Transform(new Transformation()
  .Width(490).Opacity(80).Crop("scale").Chain()
  .Height(2.0).Width(1.0).Crop("pad").Chain()
  .Overlay(new Layer().PublicId("docs:sweater")).Effect("displace").Y(-8).Chain()
  .Effect("trim").Chain()
  .Underlay(new Layer().PublicId("docs:sweater")).Width(690)).BuildImageTag("docs/bulls.png")
MediaManager.get().url().transformation(new Transformation()
  .width(490).opacity(80).crop("scale").chain()
  .height(2.0).width(1.0).crop("pad").chain()
  .overlay(new Layer().publicId("docs:sweater")).effect("displace").y(-8).chain()
  .effect("trim").chain()
  .underlay(new Layer().publicId("docs:sweater")).width(690)).generate("docs/bulls.png");
imageView.cldSetImage(cloudinary.createUrl().setTransformation(CLDTransformation()
  .setWidth(490).setOpacity(80).setCrop("scale").chain()
  .setHeight(2.0).setWidth(1.0).setCrop("pad").chain()
  .setOverlay("docs:sweater").setEffect("displace").setY(-8).chain()
  .setEffect("trim").chain()
  .setUnderlay("docs:sweater").setWidth(690)).generate("docs/bulls.png")!, cloudinary: cloudinary)

Final Displacements
Displacement maps can be a useful addition to your arsenal of image transformations. They allow you to customize your images in interesting ways and add realistic effects. This capability is already being used by our customers to displace images overlays, and as shown in this post, can also be used in multiple, perhaps unexpected ways. The feature is available for use with all Cloudinary accounts, including the free tier.


