As a rule, user interfaces, whether for mobile or desktop apps, encompass a significant amount of visual media (images and videos), necessitating close collaboration among designers and front-end developers. The process for building UIs entails a designer-to-developer handoff, at which the designer transfers to the developer blueprints produced with such tools as Photoshop, InVision, and Sketch. The developer then implements the blueprints with Cascading Style Sheets (CSS).
Rotating image backgrounds is a common task. An excellent tutorial written by Craig Buckler in July 2018 describes how to do that with CSS. With Cloudinary, you can transform images in many ways—without using CSS or involving the designer. For example:
- Remove image backgrounds.
- Rotate images.
- Place an image over another.
- Make the image background transparent so that it blends with a background color.
This article steps you through the procedures. Overall, Cloudinary shines as an end-to-end solution for visual media: it effectively processes their uploads and on-the-fly transformations, automates optimizations, and delivers images and videos responsively across all devices.
Remarkably, you can transform images on Cloudinary by simply adding parameters to their URLs.
To rotate an image, such as this one— :

—upload it to Coudinary and then add to its URL the angle parameter with the number of degrees by which to rotate the image clockwise. An example is a_60, where 60 denotes a 60-degree rotation. The URL then reads—
Ruby:
cl_image_tag("180_yacaar.png", :angle=>60)
PHP v1:
cl_image_tag("180_yacaar.png", array("angle"=>60))
PHP v2:
(new ImageTag('180_yacaar.png'))
  ->rotate(Rotate::byAngle(60));
Python:
CloudinaryImage("180_yacaar.png").image(angle=60)
Node.js:
cloudinary.image("180_yacaar.png", {angle: 60})
Java:
cloudinary.url().transformation(new Transformation().angle(60)).imageTag("180_yacaar.png");
JS:
cloudinary.imageTag('180_yacaar.png', {angle: 60}).toHtml();
jQuery:
$.cloudinary.image("180_yacaar.png", {angle: 60})
React:
<Image publicId="180_yacaar.png" >
  <Transformation angle="60" />
</Image>
Vue.js:
<cld-image publicId="180_yacaar.png" >
  <cld-transformation angle="60" />
</cld-image>
Angular:
<cl-image public-id="180_yacaar.png" >
  <cl-transformation angle="60">
  </cl-transformation>
</cl-image>
.NET:
cloudinary.Api.UrlImgUp.Transform(new Transformation().Angle(60)).BuildImageTag("180_yacaar.png")
Android:
MediaManager.get().url().transformation(new Transformation().angle(60)).generate("180_yacaar.png");
iOS:
imageView.cldSetImage(cloudinary.createUrl().setTransformation(CLDTransformation().setAngle(60)).generate("180_yacaar.png")!, cloudinary: cloudinary)

Programmatically, you can rotate images with only one codeline in Ruby, PHP, Python, Node.js, Java, JavaScript, JQuery, React, Angular, .Net, Android, and iOs.
A positive value for the
angle parameter rotates the image clockwise; a negative value rotates it counterclockwise.
Cloudinary offers dozens of transformation effects for images. For example, for a shadow effect to the preceding rotated image, add a shadow-transformation parameter (e_shadow) before the angle parameter (a_60) in the URL, like this:
Ruby:
cl_image_tag("180_yacaar.png", :transformation=>[
  {:effect=>"shadow:40"},
  {:angle=>60}
  ])
PHP v1:
cl_image_tag("180_yacaar.png", array("transformation"=>array(
  array("effect"=>"shadow:40"),
  array("angle"=>60)
  )))
PHP v2:
(new ImageTag('180_yacaar.png'))
  ->effect(Effect::shadow()->strength(40))
  ->rotate(Rotate::byAngle(60));
Python:
CloudinaryImage("180_yacaar.png").image(transformation=[
  {'effect': "shadow:40"},
  {'angle': 60}
  ])
Node.js:
cloudinary.image("180_yacaar.png", {transformation: [
  {effect: "shadow:40"},
  {angle: 60}
  ]})
Java:
cloudinary.url().transformation(new Transformation()
  .effect("shadow:40").chain()
  .angle(60)).imageTag("180_yacaar.png");
JS:
cloudinary.imageTag('180_yacaar.png', {transformation: [
  {effect: "shadow:40"},
  {angle: 60}
  ]}).toHtml();
jQuery:
$.cloudinary.image("180_yacaar.png", {transformation: [
  {effect: "shadow:40"},
  {angle: 60}
  ]})
React:
<Image publicId="180_yacaar.png" >
  <Transformation effect="shadow:40" />
  <Transformation angle="60" />
</Image>
Vue.js:
<cld-image publicId="180_yacaar.png" >
  <cld-transformation effect="shadow:40" />
  <cld-transformation angle="60" />
</cld-image>
Angular:
<cl-image public-id="180_yacaar.png" >
  <cl-transformation effect="shadow:40">
  </cl-transformation>
  <cl-transformation angle="60">
  </cl-transformation>
</cl-image>
.NET:
cloudinary.Api.UrlImgUp.Transform(new Transformation()
  .Effect("shadow:40").Chain()
  .Angle(60)).BuildImageTag("180_yacaar.png")
Android:
MediaManager.get().url().transformation(new Transformation()
  .effect("shadow:40").chain()
  .angle(60)).generate("180_yacaar.png");
iOS:
imageView.cldSetImage(cloudinary.createUrl().setTransformation(CLDTransformation()
  .setEffect("shadow:40").chain()
  .setAngle(60)).generate("180_yacaar.png")!, cloudinary: cloudinary)

Also, you can customize the x and y shadow offsets and change the shadow’s color (co) by specifying the values you desire in the parameters, for example:
Ruby:
cl_image_tag("180_yacaar.png", :transformation=>[
  {:effect=>"shadow:40", :x=>15, :y=>15, :color=>"yellow"},
  {:angle=>60}
  ])
PHP v1:
cl_image_tag("180_yacaar.png", array("transformation"=>array(
  array("effect"=>"shadow:40", "x"=>15, "y"=>15, "color"=>"yellow"),
  array("angle"=>60)
  )))
PHP v2:
(new ImageTag('180_yacaar.png'))
  ->effect(Effect::shadow()->strength(40)->color(Color::YELLOW)
    ->offsetX(15)->offsetY(15))
  ->rotate(Rotate::byAngle(60));
Python:
CloudinaryImage("180_yacaar.png").image(transformation=[
  {'effect': "shadow:40", 'x': 15, 'y': 15, 'color': "yellow"},
  {'angle': 60}
  ])
Node.js:
cloudinary.image("180_yacaar.png", {transformation: [
  {effect: "shadow:40", x: 15, y: 15, color: "yellow"},
  {angle: 60}
  ]})
Java:
cloudinary.url().transformation(new Transformation()
  .effect("shadow:40").x(15).y(15).color("yellow").chain()
  .angle(60)).imageTag("180_yacaar.png");
JS:
cloudinary.imageTag('180_yacaar.png', {transformation: [
  {effect: "shadow:40", x: 15, y: 15, color: "yellow"},
  {angle: 60}
  ]}).toHtml();
jQuery:
$.cloudinary.image("180_yacaar.png", {transformation: [
  {effect: "shadow:40", x: 15, y: 15, color: "yellow"},
  {angle: 60}
  ]})
React:
<Image publicId="180_yacaar.png" >
  <Transformation effect="shadow:40" x="15" y="15" color="yellow" />
  <Transformation angle="60" />
</Image>
Vue.js:
<cld-image publicId="180_yacaar.png" >
  <cld-transformation effect="shadow:40" x="15" y="15" color="yellow" />
  <cld-transformation angle="60" />
</cld-image>
Angular:
<cl-image public-id="180_yacaar.png" >
  <cl-transformation effect="shadow:40" x="15" y="15" color="yellow">
  </cl-transformation>
  <cl-transformation angle="60">
  </cl-transformation>
</cl-image>
.NET:
cloudinary.Api.UrlImgUp.Transform(new Transformation()
  .Effect("shadow:40").X(15).Y(15).Color("yellow").Chain()
  .Angle(60)).BuildImageTag("180_yacaar.png")
Android:
MediaManager.get().url().transformation(new Transformation()
  .effect("shadow:40").x(15).y(15).color("yellow").chain()
  .angle(60)).generate("180_yacaar.png");
iOS:
imageView.cldSetImage(cloudinary.createUrl().setTransformation(CLDTransformation()
  .setEffect("shadow:40").setX(15).setY(15).setColor("yellow").chain()
  .setAngle(60)).generate("180_yacaar.png")!, cloudinary: cloudinary)

For a displacement effect, place one image over another by adding the e_displace parameter to the URL, as in this example:
Ruby:
cl_image_tag("glass.jpg", :transformation=>[
  {:overlay=>"sample", :width=>182, :height=>198},
  {:height=>2.0, :width=>1.0, :crop=>"pad"},
  {:overlay=>"radial_ipdlli", :effect=>"displace", :y=>-8},
  {:effect=>"trim"},
  {:flags=>"layer_apply", :x=>-26, :y=>28}
  ])
PHP v1:
cl_image_tag("glass.jpg", array("transformation"=>array(
  array("overlay"=>"sample", "width"=>182, "height"=>198),
  array("height"=>"2.0", "width"=>"1.0", "crop"=>"pad"),
  array("overlay"=>"radial_ipdlli", "effect"=>"displace", "y"=>-8),
  array("effect"=>"trim"),
  array("flags"=>"layer_apply", "x"=>-26, "y"=>28)
  )))
PHP v2:
This code example is not currently available.
Python:
CloudinaryImage("glass.jpg").image(transformation=[
  {'overlay': "sample", 'width': 182, 'height': 198},
  {'height': "2.0", 'width': "1.0", 'crop': "pad"},
  {'overlay': "radial_ipdlli", 'effect': "displace", 'y': -8},
  {'effect': "trim"},
  {'flags': "layer_apply", 'x': -26, 'y': 28}
  ])
Node.js:
cloudinary.image("glass.jpg", {transformation: [
  {overlay: "sample", width: 182, height: 198},
  {height: "2.0", width: "1.0", crop: "pad"},
  {overlay: "radial_ipdlli", effect: "displace", y: -8},
  {effect: "trim"},
  {flags: "layer_apply", x: -26, y: 28}
  ]})
Java:
cloudinary.url().transformation(new Transformation()
  .overlay(new Layer().publicId("sample")).width(182).height(198).chain()
  .height(2.0).width(1.0).crop("pad").chain()
  .overlay(new Layer().publicId("radial_ipdlli")).effect("displace").y(-8).chain()
  .effect("trim").chain()
  .flags("layer_apply").x(-26).y(28)).imageTag("glass.jpg");
JS:
cloudinary.imageTag('glass.jpg', {transformation: [
  {overlay: new cloudinary.Layer().publicId("sample"), width: 182, height: 198},
  {height: "2.0", width: "1.0", crop: "pad"},
  {overlay: new cloudinary.Layer().publicId("radial_ipdlli"), effect: "displace", y: -8},
  {effect: "trim"},
  {flags: "layer_apply", x: -26, y: 28}
  ]}).toHtml();
jQuery:
$.cloudinary.image("glass.jpg", {transformation: [
  {overlay: new cloudinary.Layer().publicId("sample"), width: 182, height: 198},
  {height: "2.0", width: "1.0", crop: "pad"},
  {overlay: new cloudinary.Layer().publicId("radial_ipdlli"), effect: "displace", y: -8},
  {effect: "trim"},
  {flags: "layer_apply", x: -26, y: 28}
  ]})
React:
<Image publicId="glass.jpg" >
  <Transformation overlay="sample" width="182" height="198" />
  <Transformation height="2.0" width="1.0" crop="pad" />
  <Transformation overlay="radial_ipdlli" effect="displace" y="-8" />
  <Transformation effect="trim" />
  <Transformation flags="layer_apply" x="-26" y="28" />
</Image>
Vue.js:
<cld-image publicId="glass.jpg" >
  <cld-transformation :overlay="sample" width="182" height="198" />
  <cld-transformation height="2.0" width="1.0" crop="pad" />
  <cld-transformation :overlay="radial_ipdlli" effect="displace" y="-8" />
  <cld-transformation effect="trim" />
  <cld-transformation flags="layer_apply" x="-26" y="28" />
</cld-image>
Angular:
<cl-image public-id="glass.jpg" >
  <cl-transformation overlay="sample" width="182" height="198">
  </cl-transformation>
  <cl-transformation height="2.0" width="1.0" crop="pad">
  </cl-transformation>
  <cl-transformation overlay="radial_ipdlli" effect="displace" y="-8">
  </cl-transformation>
  <cl-transformation effect="trim">
  </cl-transformation>
  <cl-transformation flags="layer_apply" x="-26" y="28">
  </cl-transformation>
</cl-image>
.NET:
cloudinary.Api.UrlImgUp.Transform(new Transformation()
  .Overlay(new Layer().PublicId("sample")).Width(182).Height(198).Chain()
  .Height(2.0).Width(1.0).Crop("pad").Chain()
  .Overlay(new Layer().PublicId("radial_ipdlli")).Effect("displace").Y(-8).Chain()
  .Effect("trim").Chain()
  .Flags("layer_apply").X(-26).Y(28)).BuildImageTag("glass.jpg")
Android:
MediaManager.get().url().transformation(new Transformation()
  .overlay(new Layer().publicId("sample")).width(182).height(198).chain()
  .height(2.0).width(1.0).crop("pad").chain()
  .overlay(new Layer().publicId("radial_ipdlli")).effect("displace").y(-8).chain()
  .effect("trim").chain()
  .flags("layer_apply").x(-26).y(28)).generate("glass.jpg");
iOS:
imageView.cldSetImage(cloudinary.createUrl().setTransformation(CLDTransformation()
  .setOverlay("sample").setWidth(182).setHeight(198).chain()
  .setHeight(2.0).setWidth(1.0).setCrop("pad").chain()
  .setOverlay("radial_ipdlli").setEffect("displace").setY(-8).chain()
  .setEffect("trim").chain()
  .setFlags("layer_apply").setX(-26).setY(28)).generate("glass.jpg")!, cloudinary: cloudinary)

For details, see Cloudinary’s demo of product personalization on Codepen.
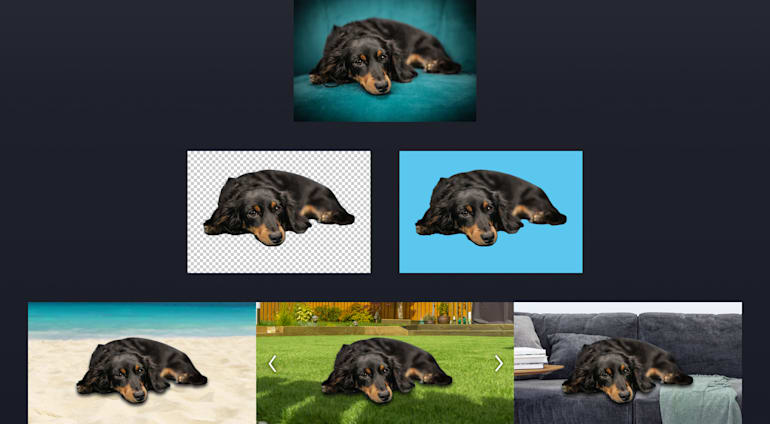
To remove the background of an image, e.g., a photo, first
activate the AI Removal Background add-on on your Cloudinary Dashboard.
You can then remove an image’s background with the following code:
Ruby:
Cloudinary::Uploader.upload("baseball.jpg",
  :public_id => "baseball_no_bg",
  :background_removal => 'cloudinary_ai',
  :notification_url => "https://mysite.example.com/hooks")
PHP:
\Cloudinary\Uploader::upload("baseball.jpg",
  array(
    "public_id" => "baseball_no_bg",
    "background_removal" => "cloudinary_ai",
    "notification_url" => "https://mysite.example.com/hooks"));
Python:
cloudinary.uploader.upload("baseball.jpg",
  public_id = "baseball_no_bg",
  background_removal = "cloudinary_ai",
  notification_url = "https://mysite.example.com/hooks")
Node.js:
cloudinary.v2.uploader.upload("baseball.jpg",
  { public_id: "baseball_no_bg",
    background_removal: "cloudinary_ai",
    notification_url: "https://mysite.example.com/hooks" }),
  function(error, result){console.log(result);});
Java:
cloudinary.uploader().upload("baseball.jpg",
  ObjectUtils.asMap(
    "public_id", "baseball_no_bg",
    "background_removal", "cloudinary_ai",
    "notification_url", "https://mysite.example.com/hooks"));
.NET:
var uploadParams = new ImageUploadParams(){
  File = new FileDescription(@"baseball.jpg"),
  PublicId = "baseball_no_bg",
  BackgroundRemoval = "cloudinary_ai",
  NotificationUrl = "https://mysite.example.com/hooks"};
var uploadResult = cloudinary.Upload(uploadParams);
In the code above, notification_url is the endpoint that receives a POST request when background removal is complete. Here’s an example:
{
    "info_kind": "cloudinary_ai",
    "info_status": "complete",
    "public_id": "bg",
    "uploaded_at": "2019-02-25T17:33:45Z",
    "version": 1551104931,
    "url": "https://res.cloudinary.com/demo/image/upload/v1551104931/bg.png",
    "secure_url": "https://res.cloudinary.com/demo/image/upload/v1551104931/bg.png",
    "etag": "6567d798ca4087468dc7d23bcb8a45ec",
    "notification_type": "info"
}
As a comparison, see—
|
These:
|
Become These!
|

|

|
By default, regardless of the programming language, Cloudinary automatically performs certain optimizations on all transformed images. For an enhanced user experience, before delivering them to users, further optimize your visual media by adding a couple of parameters to their URLs.
The q_auto parameter directs Cloudinary to select the optimal quality-compression level and encoding settings according to the image content and format, also the viewing browser. The resultant image, reduced in size to save bandwidth, is of excellent visual quality.
See this example URL:
Ruby:
cl_image_tag("180_yacaar.png", :transformation=>[
  {:effect=>"shadow:40", :quality=>"auto"},
  {:angle=>60}
  ])
PHP v1:
cl_image_tag("180_yacaar.png", array("transformation"=>array(
  array("effect"=>"shadow:40", "quality"=>"auto"),
  array("angle"=>60)
  )))
PHP v2:
(new ImageTag('180_yacaar.png'))
  ->effect(Effect::shadow()->strength(40))
  ->delivery(Delivery::quality(Quality::auto()))
  ->rotate(Rotate::byAngle(60));
Python:
CloudinaryImage("180_yacaar.png").image(transformation=[
  {'effect': "shadow:40", 'quality': "auto"},
  {'angle': 60}
  ])
Node.js:
cloudinary.image("180_yacaar.png", {transformation: [
  {effect: "shadow:40", quality: "auto"},
  {angle: 60}
  ]})
Java:
cloudinary.url().transformation(new Transformation()
  .effect("shadow:40").quality("auto").chain()
  .angle(60)).imageTag("180_yacaar.png");
JS:
cloudinary.imageTag('180_yacaar.png', {transformation: [
  {effect: "shadow:40", quality: "auto"},
  {angle: 60}
  ]}).toHtml();
jQuery:
$.cloudinary.image("180_yacaar.png", {transformation: [
  {effect: "shadow:40", quality: "auto"},
  {angle: 60}
  ]})
React:
<Image publicId="180_yacaar.png" >
  <Transformation effect="shadow:40" quality="auto" />
  <Transformation angle="60" />
</Image>
Vue.js:
<cld-image publicId="180_yacaar.png" >
  <cld-transformation effect="shadow:40" quality="auto" />
  <cld-transformation angle="60" />
</cld-image>
Angular:
<cl-image public-id="180_yacaar.png" >
  <cl-transformation effect="shadow:40" quality="auto">
  </cl-transformation>
  <cl-transformation angle="60">
  </cl-transformation>
</cl-image>
.NET:
cloudinary.Api.UrlImgUp.Transform(new Transformation()
  .Effect("shadow:40").Quality("auto").Chain()
  .Angle(60)).BuildImageTag("180_yacaar.png")
Android:
MediaManager.get().url().transformation(new Transformation()
  .effect("shadow:40").quality("auto").chain()
  .angle(60)).generate("180_yacaar.png");
iOS:
imageView.cldSetImage(cloudinary.createUrl().setTransformation(CLDTransformation()
  .setEffect("shadow:40").setQuality("auto").chain()
  .setAngle(60)).generate("180_yacaar.png")!, cloudinary: cloudinary)

The f_auto parameter directs Cloudinary to analyze the image content and then select the best delivery format. For example, Cloudinary delivers WebP images to Chrome browsers, JPEG-XR images to Internet Explorer browsers, and retain the original format for all other browsers. However, regardless of the browser, if the quality algorithm determines that the optimal format for certain images is PNG-8 or PNG-24, Cloudinary delivers them according to that deduction.
Ruby:
cl_image_tag("180_yacaar.png", :transformation=>[
  {:effect=>"shadow:40"},
  {:angle=>60}
  ])
PHP v1:
cl_image_tag("180_yacaar.png", array("transformation"=>array(
  array("effect"=>"shadow:40"),
  array("angle"=>60)
  )))
PHP v2:
(new ImageTag('180_yacaar.png'))
  ->effect(Effect::shadow()->strength(40))
  ->delivery(Delivery::format(Format::auto()))
  ->rotate(Rotate::byAngle(60));
Python:
CloudinaryImage("180_yacaar.png").image(transformation=[
  {'effect': "shadow:40"},
  {'angle': 60}
  ])
Node.js:
cloudinary.image("180_yacaar.png", {transformation: [
  {effect: "shadow:40"},
  {angle: 60}
  ]})
Java:
cloudinary.url().transformation(new Transformation()
  .effect("shadow:40").chain()
  .angle(60)).imageTag("180_yacaar.png");
JS:
cloudinary.imageTag('180_yacaar.png', {transformation: [
  {effect: "shadow:40"},
  {angle: 60}
  ]}).toHtml();
jQuery:
$.cloudinary.image("180_yacaar.png", {transformation: [
  {effect: "shadow:40"},
  {angle: 60}
  ]})
React:
<Image publicId="180_yacaar.png" >
  <Transformation effect="shadow:40" />
  <Transformation angle="60" />
</Image>
Vue.js:
<cld-image publicId="180_yacaar.png" >
  <cld-transformation effect="shadow:40" />
  <cld-transformation angle="60" />
</cld-image>
Angular:
<cl-image public-id="180_yacaar.png" >
  <cl-transformation effect="shadow:40">
  </cl-transformation>
  <cl-transformation angle="60">
  </cl-transformation>
</cl-image>
.NET:
cloudinary.Api.UrlImgUp.Transform(new Transformation()
  .Effect("shadow:40").Chain()
  .Angle(60)).BuildImageTag("180_yacaar.png")
Android:
MediaManager.get().url().transformation(new Transformation()
  .effect("shadow:40").chain()
  .angle(60)).generate("180_yacaar.png");
iOS:
imageView.cldSetImage(cloudinary.createUrl().setTransformation(CLDTransformation()
  .setEffect("shadow:40").chain()
  .setAngle(60)).generate("180_yacaar.png")!, cloudinary: cloudinary)

It’s a cakewalk to rotate or remove image backgrounds with Cloudinary. For more details, check out the related Cloudinary documentation and this article, which also describes how to perform other image transformations on Cloudinary.