Web accessibility (a11y) is about gaining an insight into—
- What your users see or hear when they open your app.
- How they understand your app through interpretation.
- How they can use your app with ease.

It’s a blurry line between accessibility and usability (or user experience) and one might argue that they are actually the same thing. Nonetheless, if your audience can't use your app with ease and confidence, then it’s not accessible enough and the user experience is not good enough.
The State of the Visual Web
Over the past decade, user behavior on the web has turned much more visual, as can be attested by, for example, Instagram’s success. After all, we tend to retain what we see more than what we read. As the old saw goes, a picture is worth 1,000 words; and studies have shown that a video is worth 1.8 million words.

Given that trend, accessibility of visual media to web users is key.
The behavior change for web users brings accessibility to a new level. Users, including those with visual impairments, rely on media to process the delivered information. The same reliance applies to companies in content delivery and user engagement. Hence the need for media accessibility (m16y).
And remember:
accessibility + visual web = media accessibility (m16y)
Web Content Accessibility Guidelines (WCAG)
Since their release years ago, the Web Content Accessibility Guidelines (WCAG) have been tough to comply with. They contain four main groups: perceivable, operable, understandable, and robust. Media accessibility is all about ensuring that your site is perceivable for time-based media (video and audio), color usage, and a combination of web contents.
Enablement of Media Accessibility (m16y) With Cloudinary
Solutions for enabling media accessibility abound, ranging from straightforward tools like CSS to complex ones that involve algorithms. Cloudinary's dynamic-transformation capability stands out as being intuitive and simple, requiring the least code. Following are the features that relate to media accessibility.
Put Yourself in Your Audience’s Shoes With the simulate_colorblind Effect
Color blindness is one of the most onerous visual-impairment challenges to overcome, let alone that no standards exist for solutions. The best way to understand how color-blind people experience your site is by experimenting with it yourself: apply Cloudinary's latest transformation effect simulate_colorblind to an image, like this:

The default mode is simulation of deuteranopia. To simulate another color-blind type, such as tritanopia, edit the e_simulate_colorblind portion of the URL, like this:

cl_image_tag("pie_chart.jpg", :transformation=>[
  {:width=>700, :height=>500, :crop=>"fill"},
  {:overlay=>"pie_chart", :width=>700, :height=>500, :x=>700, :effect=>"simulate_colorblind:tritanopia", :crop=>"fill"},
  {:overlay=>"pie_chart", :width=>700, :height=>500, :y=>500, :x=>-350, :effect=>"simulate_colorblind", :crop=>"fill"},
  {:overlay=>"pie_chart", :width=>700, :height=>500, :y=>250, :x=>350, :effect=>"simulate_colorblind:tritanomaly", :crop=>"fill"}
  ])
cl_image_tag("pie_chart.jpg", array("transformation"=>array(
  array("width"=>700, "height"=>500, "crop"=>"fill"),
  array("overlay"=>"pie_chart", "width"=>700, "height"=>500, "x"=>700, "effect"=>"simulate_colorblind:tritanopia", "crop"=>"fill"),
  array("overlay"=>"pie_chart", "width"=>700, "height"=>500, "y"=>500, "x"=>-350, "effect"=>"simulate_colorblind", "crop"=>"fill"),
  array("overlay"=>"pie_chart", "width"=>700, "height"=>500, "y"=>250, "x"=>350, "effect"=>"simulate_colorblind:tritanomaly", "crop"=>"fill")
  )))
(new ImageTag('pie_chart.jpg'))
  ->resize(Resize::fill()->width(700)->height(500))
  ->overlay(
      Overlay::source(Source::image('pie_chart')
        ->transformation((new ImageTransformation())
          ->resize(Resize::fill()->width(700)->height(500))
          ->effect(Effect::simulateColorBlind()->condition(SimulateColorBlind::tritanopia()))))
      ->position((new Position())
        ->offsetX(700)))
    ->overlay(
        Overlay::source(Source::image('pie_chart')
          ->transformation((new ImageTransformation())
            ->resize(Resize::fill()->width(700)->height(500))
            ->effect(Effect::simulateColorBlind())))
        ->position((new Position())
          ->offsetX(-350)->offsetY(500)))
          ->overlay(
              Overlay::source(Source::image('pie_chart')
                ->transformation((new ImageTransformation())
                  ->resize(Resize::fill()->width(700)->height(500))
                  ->effect(Effect::simulateColorBlind()->condition(SimulateColorBlind::tritanomaly()))))
              ->position((new Position())
                ->offsetX(350)->offsetY(250)


          ));
CloudinaryImage("pie_chart.jpg").image(transformation=[
  {'width': 700, 'height': 500, 'crop': "fill"},
  {'overlay': "pie_chart", 'width': 700, 'height': 500, 'x': 700, 'effect': "simulate_colorblind:tritanopia", 'crop': "fill"},
  {'overlay': "pie_chart", 'width': 700, 'height': 500, 'y': 500, 'x': -350, 'effect': "simulate_colorblind", 'crop': "fill"},
  {'overlay': "pie_chart", 'width': 700, 'height': 500, 'y': 250, 'x': 350, 'effect': "simulate_colorblind:tritanomaly", 'crop': "fill"}
  ])
cloudinary.image("pie_chart.jpg", {transformation: [
  {width: 700, height: 500, crop: "fill"},
  {overlay: "pie_chart", width: 700, height: 500, x: 700, effect: "simulate_colorblind:tritanopia", crop: "fill"},
  {overlay: "pie_chart", width: 700, height: 500, y: 500, x: -350, effect: "simulate_colorblind", crop: "fill"},
  {overlay: "pie_chart", width: 700, height: 500, y: 250, x: 350, effect: "simulate_colorblind:tritanomaly", crop: "fill"}
  ]})
cloudinary.url().transformation(new Transformation()
  .width(700).height(500).crop("fill").chain()
  .overlay(new Layer().publicId("pie_chart")).width(700).height(500).x(700).effect("simulate_colorblind:tritanopia").crop("fill").chain()
  .overlay(new Layer().publicId("pie_chart")).width(700).height(500).y(500).x(-350).effect("simulate_colorblind").crop("fill").chain()
  .overlay(new Layer().publicId("pie_chart")).width(700).height(500).y(250).x(350).effect("simulate_colorblind:tritanomaly").crop("fill")).imageTag("pie_chart.jpg");
cloudinary.imageTag('pie_chart.jpg', {transformation: [
  {width: 700, height: 500, crop: "fill"},
  {overlay: new cloudinary.Layer().publicId("pie_chart"), width: 700, height: 500, x: 700, effect: "simulate_colorblind:tritanopia", crop: "fill"},
  {overlay: new cloudinary.Layer().publicId("pie_chart"), width: 700, height: 500, y: 500, x: -350, effect: "simulate_colorblind", crop: "fill"},
  {overlay: new cloudinary.Layer().publicId("pie_chart"), width: 700, height: 500, y: 250, x: 350, effect: "simulate_colorblind:tritanomaly", crop: "fill"}
  ]}).toHtml();
$.cloudinary.image("pie_chart.jpg", {transformation: [
  {width: 700, height: 500, crop: "fill"},
  {overlay: new cloudinary.Layer().publicId("pie_chart"), width: 700, height: 500, x: 700, effect: "simulate_colorblind:tritanopia", crop: "fill"},
  {overlay: new cloudinary.Layer().publicId("pie_chart"), width: 700, height: 500, y: 500, x: -350, effect: "simulate_colorblind", crop: "fill"},
  {overlay: new cloudinary.Layer().publicId("pie_chart"), width: 700, height: 500, y: 250, x: 350, effect: "simulate_colorblind:tritanomaly", crop: "fill"}
  ]})
<Image publicId="pie_chart.jpg" >
  <Transformation width="700" height="500" crop="fill" />
  <Transformation overlay="pie_chart" width="700" height="500" x="700" effect="simulate_colorblind:tritanopia" crop="fill" />
  <Transformation overlay="pie_chart" width="700" height="500" y="500" x="-350" effect="simulate_colorblind" crop="fill" />
  <Transformation overlay="pie_chart" width="700" height="500" y="250" x="350" effect="simulate_colorblind:tritanomaly" crop="fill" />
</Image>
<cld-image publicId="pie_chart.jpg" >
  <cld-transformation width="700" height="500" crop="fill" />
  <cld-transformation :overlay="pie_chart" width="700" height="500" x="700" effect="simulate_colorblind:tritanopia" crop="fill" />
  <cld-transformation :overlay="pie_chart" width="700" height="500" y="500" x="-350" effect="simulate_colorblind" crop="fill" />
  <cld-transformation :overlay="pie_chart" width="700" height="500" y="250" x="350" effect="simulate_colorblind:tritanomaly" crop="fill" />
</cld-image>
<cl-image public-id="pie_chart.jpg" >
  <cl-transformation width="700" height="500" crop="fill">
  </cl-transformation>
  <cl-transformation overlay="pie_chart" width="700" height="500" x="700" effect="simulate_colorblind:tritanopia" crop="fill">
  </cl-transformation>
  <cl-transformation overlay="pie_chart" width="700" height="500" y="500" x="-350" effect="simulate_colorblind" crop="fill">
  </cl-transformation>
  <cl-transformation overlay="pie_chart" width="700" height="500" y="250" x="350" effect="simulate_colorblind:tritanomaly" crop="fill">
  </cl-transformation>
</cl-image>
cloudinary.Api.UrlImgUp.Transform(new Transformation()
  .Width(700).Height(500).Crop("fill").Chain()
  .Overlay(new Layer().PublicId("pie_chart")).Width(700).Height(500).X(700).Effect("simulate_colorblind:tritanopia").Crop("fill").Chain()
  .Overlay(new Layer().PublicId("pie_chart")).Width(700).Height(500).Y(500).X(-350).Effect("simulate_colorblind").Crop("fill").Chain()
  .Overlay(new Layer().PublicId("pie_chart")).Width(700).Height(500).Y(250).X(350).Effect("simulate_colorblind:tritanomaly").Crop("fill")).BuildImageTag("pie_chart.jpg")
MediaManager.get().url().transformation(new Transformation()
  .width(700).height(500).crop("fill").chain()
  .overlay(new Layer().publicId("pie_chart")).width(700).height(500).x(700).effect("simulate_colorblind:tritanopia").crop("fill").chain()
  .overlay(new Layer().publicId("pie_chart")).width(700).height(500).y(500).x(-350).effect("simulate_colorblind").crop("fill").chain()
  .overlay(new Layer().publicId("pie_chart")).width(700).height(500).y(250).x(350).effect("simulate_colorblind:tritanomaly").crop("fill")).generate("pie_chart.jpg");
imageView.cldSetImage(cloudinary.createUrl().setTransformation(CLDTransformation()
  .setWidth(700).setHeight(500).setCrop("fill").chain()
  .setOverlay("pie_chart").setWidth(700).setHeight(500).setX(700).setEffect("simulate_colorblind:tritanopia").setCrop("fill").chain()
  .setOverlay("pie_chart").setWidth(700).setHeight(500).setY(500).setX(-350).setEffect("simulate_colorblind").setCrop("fill").chain()
  .setOverlay("pie_chart").setWidth(700).setHeight(500).setY(250).setX(350).setEffect("simulate_colorblind:tritanomaly").setCrop("fill")).generate("pie_chart.jpg")!, cloudinary: cloudinary)

Display Colors With the Color-Blind Support Effect
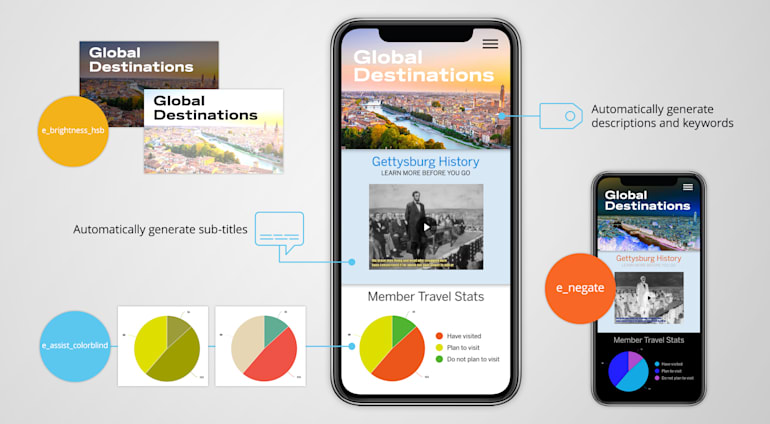
Displaying colors for the visually impaired is a knotty task. To do that—even for fundamental user-interface elements, such as text and buttons—involves complex calculations with JavaScript and CSS. But what about displaying red and green colors in images for those who are afflicted with deuteranopia? Cloudinary's color-blind support effect, e_assist_colorblind, aptly serves that purpose, as shown in this picture:

e_assist_colorblind adds stripes to highlight the difference between hot (red) and cold (green) colors, enabling the deuteranopia-afflicted people to immediately figure out, for example, whether they are looking at a shirt with two different colors even if it might seem otherwise.
Additionally, here are a couple of cool tricks: To control the color intensity of the stripes, append a numerical value to the parameter, for example,
e_assist_colorblind:30
To replace the red and green colors with prettier ones, append 'xray' to the parameter.

Let Your Images Speak for Themselves
Adding an alt description for images could be a labor-intensive job because the description must be clear, concise, and readable, especially for delivery to blind users through screen readers. Thanks to the advances in AI algorithms for media recognition and categorization over the last decade, third-party add-ons are now available for automating the generation of keywords at an impressive speed.
Examples include Amazon Rekognition Auto Tagging, Google Auto Tagging, Imagga Auto Tagging, all just a download away on Cloudinary. The process is intuitive—even for thousands of images.
See the Pen GRKLEMR by Maya Shavin (@mayashavin) on CodePen.
Enable Dark Or Light Mode
Dark mode is mandatory for users with light sensitivity, a widespread ailment in the modern age, in which many people are frequently online in front of computer screens.
A straightforward way to enable dark mode is to take advantage of the CSS invert() function with the filter property, which converts all the available colors within an app to the exact opposite colors, hence turning on or off dark or light mode. However, that fix is problematic because it applies to all the images, causing their colors to be inverted as well.
A much more superior solution rests with Cloudinary’s e_negate effect, which displays all the images in inverted color, retaining their original appearance in either dark or light mode.

Contrast Your Image and Text Colors
Contrasting image and text colors keeps the audience engaged. However, hardcoding to achieve that effect complicates matters for long-term maintenance, sometimes even negatively impacting site performance.
Instead of hardcoding, combine CSS with Cloudinary's transformation effect e_brightness_hsb and opacity control. By setting the appropriate percentage of brightness (and opacity) on the target’s background, you can apply the appropriate ratio of contrastivity between the background and the overlaid text. See these two examples:
Happily, replacing the text color requires only minimal tweaks in the codebase. Less code, more efficiency.
Make Your Videos Readable
Adding subtitles as an alternative or as a feature for prerecorded videos is required for compliance with accessibility levels A and AA. Subtitles in effect benefit everyone since 80 percent of videos are viewed with audio off.
Cloudinary’s Google AI Video Transcription Add-On, automates the process of generating transcripts for your and your audience’s videos. Another plus is that, with the Cloudinary Video Player, you can optimize the synchronization between the captions and your video according to user interactions.
Conclusion
Accessibility is a broad subject, achieving which for media is just a small, albeit significant, part. Even though optimizing your site's accessibility requires meticulous and painstaking effort, the tips described in this post promise to help you fulfill the essential requirements.
Think users, think site accessibility.


