Cloudinary Blog

Perform Face-Detection Transformation Techniques On-the-Fly

Perform Face-Detection Transformation Techniques On-the-Fly

With the decreasing price-performance ratio of computing, research efforts in face detection and face recognition algorithms are rapidly expanding and new techniques for both of these are achieving greater accuracy and reduced processing time.

Face detection is a technology that identifies whether and where human faces are located in digital images. It’s commonly used in cameras, security applications, graphic applications, and a variety of other web and mobile apps. It is also a prerequisite for face recognition, which uses a database and additional algorithms to match a detected face with a specific individual.

A large percentage of the images in most websites and apps include photos of people -- from profile pics to news articles to group selfies. These photos need to be displayed in sizes, shapes, and styles that match the site design. Performing automatic face cropping or otherwise programmatically modifying images that contain faces necessitates a reliable face detection technology. The reliability can be affected by the colors, or lack of colors in the image, the direction a person is facing, the tilt of the head, the size of a face, the complexity of the background, lighting, and more.

Cloudinary provides a complete image and video management solution for web and mobile app programmers. Our solution includes a built-in image face detection functionality and several face-detection features you can take advantage of in your own apps. In most cases, applying this functionality is just a question of adding a parameter or two to your image delivery URLs… and your own creativity, of-course.

Cloudinary recently updated its face detection technology. The new technology is now very efficient and precise, including many "difficult" scenarios such as side portraits, blurry faces, tricky lighting, and more.

For example, the people in these images are now easily detected despite low lighting, unusual shadows, black and white images, turned heads and closed eyes:

low-lighting face detected
 
face in shadow detected
side-facing, black and white faces detected


When you deliver an image URL that includes face-detection transformations, the faces in the original photo are detected on-the-fly, the requested transformations are performed in the cloud, and then the final image is delivered via CDN.

The rest of this blog will cover some of the many ways that developers can automatically transform proprietary and user-generated photos containing faces to fit the needs and design of a website or app.

Facing it head on

Perhaps one of the most common uses of face detection is for cropping. A large percentage of images, especially with user-generated content, contain photos of people.

Headshots are needed for profile pictures, chat heads, and more, but the original uploaded photo may include much more than just a face, and that face may not even be the central element in the photo. Group selfies are also popular, and rarely centered, so again, we need to be very careful that even if we crop the photo to a different aspect ratio, we don’t lose any of the crew.

In short, it’s critical in most situations that when we resize and crop uploaded photos, we keep our users’ faces up front and center. There are a variety of features you can use or combine to ensure this.

Gravity is the key

When cropping photos intended for profile pictures or other headshots, you will usually want to use face as your cropping gravity (g_face in URLs). This ensures that the detected face (or largest face if there is more than one) will be the center of the cropped photo, regardless of its initial location.

If in conjunction with face gravity, you use thumb as your crop method, you will get a crop that’s as tight as possible (given the cropping dimensions) to the detected face coordinates.

You can further adjust your thumbnail cropping by setting a zoom value, to zoom in or out from the detected face coordinates. And then of-course you can add any other transformations you want.

Original photo Original photo Cropped to a square using face detection Cropped to a square using face detection Cropped using face detection with thumbnail cropping Cropped using face detection
with thumbnail cropping
Face detection, thumbnail crop, zoomed out a bit Face detection, thumbnail crop,
zoomed out a bit
Same as previous with circle shape, shadow, and improve effect Same as previous with circle shape,
shadow, and improve effect

Here's what the delivery code looks like for that last photo:

Ruby:
Copy to clipboard
cl_image_tag("teen_facedown", :transformation=>[
  {:width=>200, :height=>200, :gravity=>"face", :zoom=>0.65, :radius=>"max", :effect=>"improve", :crop=>"thumb"},
  {:effect=>"shadow"}
  ])
PHP v1:
Copy to clipboard
cl_image_tag("teen_facedown", array("transformation"=>array(
  array("width"=>200, "height"=>200, "gravity"=>"face", "zoom"=>"0.65", "radius"=>"max", "effect"=>"improve", "crop"=>"thumb"),
  array("effect"=>"shadow")
  )))
PHP v2:
Copy to clipboard
(new ImageTag('teen_facedown'))
  ->resize(Resize::thumbnail()->width(200)->height(200)->zoom(0.65)->gravity(Gravity::focusOn(FocusOn::face())))
  ->roundCorners(RoundCorners::max())
  ->adjust(Adjust::improve())
  ->effect(Effect::shadow());
Python:
Copy to clipboard
CloudinaryImage("teen_facedown").image(transformation=[
  {'width': 200, 'height': 200, 'gravity': "face", 'zoom': "0.65", 'radius': "max", 'effect': "improve", 'crop': "thumb"},
  {'effect': "shadow"}
  ])
Node.js:
Copy to clipboard
cloudinary.image("teen_facedown", {transformation: [
  {width: 200, height: 200, gravity: "face", zoom: "0.65", radius: "max", effect: "improve", crop: "thumb"},
  {effect: "shadow"}
  ]})
Java:
Copy to clipboard
cloudinary.url().transformation(new Transformation()
  .width(200).height(200).gravity("face").zoom(0.65).radius("max").effect("improve").crop("thumb").chain()
  .effect("shadow")).imageTag("teen_facedown");
JS:
Copy to clipboard
cloudinary.imageTag('teen_facedown', {transformation: [
  {width: 200, height: 200, gravity: "face", zoom: "0.65", radius: "max", effect: "improve", crop: "thumb"},
  {effect: "shadow"}
  ]}).toHtml();
jQuery:
Copy to clipboard
$.cloudinary.image("teen_facedown", {transformation: [
  {width: 200, height: 200, gravity: "face", zoom: "0.65", radius: "max", effect: "improve", crop: "thumb"},
  {effect: "shadow"}
  ]})
React:
Copy to clipboard
<Image publicId="teen_facedown" >
  <Transformation width="200" height="200" gravity="face" zoom="0.65" radius="max" effect="improve" crop="thumb" />
  <Transformation effect="shadow" />
</Image>
Vue.js:
Copy to clipboard
<cld-image publicId="teen_facedown" >
  <cld-transformation width="200" height="200" gravity="face" zoom="0.65" radius="max" effect="improve" crop="thumb" />
  <cld-transformation effect="shadow" />
</cld-image>
Angular:
Copy to clipboard
<cl-image public-id="teen_facedown" >
  <cl-transformation width="200" height="200" gravity="face" zoom="0.65" radius="max" effect="improve" crop="thumb">
  </cl-transformation>
  <cl-transformation effect="shadow">
  </cl-transformation>
</cl-image>
.NET:
Copy to clipboard
cloudinary.Api.UrlImgUp.Transform(new Transformation()
  .Width(200).Height(200).Gravity("face").Zoom(0.65).Radius("max").Effect("improve").Crop("thumb").Chain()
  .Effect("shadow")).BuildImageTag("teen_facedown")
Android:
Copy to clipboard
MediaManager.get().url().transformation(new Transformation()
  .width(200).height(200).gravity("face").zoom(0.65).radius("max").effect("improve").crop("thumb").chain()
  .effect("shadow")).generate("teen_facedown");
iOS:
Copy to clipboard
imageView.cldSetImage(cloudinary.createUrl().setTransformation(CLDTransformation()
  .setWidth(200).setHeight(200).setGravity("face").setZoom(0.65).setRadius("max").setEffect("improve").setCrop("thumb").chain()
  .setEffect("shadow")).generate("teen_facedown")!, cloudinary: cloudinary)

Everything mentioned above works equally well for multiple faces. Just use faces gravity instead of face, and your cropping will be based on a rectangle that includes all detected faces.

All of this assumes you can reasonably expect that the uploaded image is going to contain one or multiple faces as the main subject.

Sometimes the main subject of an image isn't necessarily expected to be a person, but you still need to ensure you aren’t cutting off people or other important content of the image. In this case, you can take advantage of the auto gravity feature. With this automated cropping method, the most prominent elements of the picture determine the cropping coordinates. Unless otherwise specified, any detected faces get a high priority in this cropping decision, but other prominent elements are also included.

You can learn lots more about auto gravity in this blog article and this documentation.

Losing face

There may be situations where you'd like to keep the people in a photograph anonymous. In these cases, you can pixelate or blur all detected faces just by adding a single parameter to your image URL.

In the example below, the faces that Cloudinary detects in the concert audience are generally those that could likely be identified by a human viewer. All of these faces are automatically blurred before the image is delivered, using the blur_faces effect.

Ruby:
Copy to clipboard
cl_image_tag("concert_crowd", :effect=>"blur_faces:500")
PHP v1:
Copy to clipboard
cl_image_tag("concert_crowd", array("effect"=>"blur_faces:500"))
PHP v2:
Copy to clipboard
(new ImageTag('concert_crowd'))
  ->effect(Effect::blur()->strength(500)->region(Region::faces()));
Python:
Copy to clipboard
CloudinaryImage("concert_crowd").image(effect="blur_faces:500")
Node.js:
Copy to clipboard
cloudinary.image("concert_crowd", {effect: "blur_faces:500"})
Java:
Copy to clipboard
cloudinary.url().transformation(new Transformation().effect("blur_faces:500")).imageTag("concert_crowd");
JS:
Copy to clipboard
cloudinary.imageTag('concert_crowd', {effect: "blur_faces:500"}).toHtml();
jQuery:
Copy to clipboard
$.cloudinary.image("concert_crowd", {effect: "blur_faces:500"})
React:
Copy to clipboard
<Image publicId="concert_crowd" >
  <Transformation effect="blur_faces:500" />
</Image>
Vue.js:
Copy to clipboard
<cld-image publicId="concert_crowd" >
  <cld-transformation effect="blur_faces:500" />
</cld-image>
Angular:
Copy to clipboard
<cl-image public-id="concert_crowd" >
  <cl-transformation effect="blur_faces:500">
  </cl-transformation>
</cl-image>
.NET:
Copy to clipboard
cloudinary.Api.UrlImgUp.Transform(new Transformation().Effect("blur_faces:500")).BuildImageTag("concert_crowd")
Android:
Copy to clipboard
MediaManager.get().url().transformation(new Transformation().effect("blur_faces:500")).generate("concert_crowd");
iOS:
Copy to clipboard
imageView.cldSetImage(cloudinary.createUrl().setTransformation(CLDTransformation().setEffect("blur_faces:500")).generate("concert_crowd")!, cloudinary: cloudinary)
blurred faces

And here’s an example of an ice skating scene where a couple of childrens' faces are clearly visible. This time, we use the pixelate option to protect the kids’ identities:

Ruby:
Copy to clipboard
cl_image_tag("ice_skating.jpg", :effect=>"pixelate_faces:4", :width=>500, :crop=>"scale")
PHP v1:
Copy to clipboard
cl_image_tag("ice_skating.jpg", array("effect"=>"pixelate_faces:4", "width"=>500, "crop"=>"scale"))
PHP v2:
Copy to clipboard
(new ImageTag('ice_skating.jpg'))
  ->effect(Effect::pixelate()->squareSize(4)->region(Region::faces()->width(500)))
  ->resize(Resize::scale());
Python:
Copy to clipboard
CloudinaryImage("ice_skating.jpg").image(effect="pixelate_faces:4", width=500, crop="scale")
Node.js:
Copy to clipboard
cloudinary.image("ice_skating.jpg", {effect: "pixelate_faces:4", width: 500, crop: "scale"})
Java:
Copy to clipboard
cloudinary.url().transformation(new Transformation().effect("pixelate_faces:4").width(500).crop("scale")).imageTag("ice_skating.jpg");
JS:
Copy to clipboard
cloudinary.imageTag('ice_skating.jpg', {effect: "pixelate_faces:4", width: 500, crop: "scale"}).toHtml();
jQuery:
Copy to clipboard
$.cloudinary.image("ice_skating.jpg", {effect: "pixelate_faces:4", width: 500, crop: "scale"})
React:
Copy to clipboard
<Image publicId="ice_skating.jpg" >
  <Transformation effect="pixelate_faces:4" width="500" crop="scale" />
</Image>
Vue.js:
Copy to clipboard
<cld-image publicId="ice_skating.jpg" >
  <cld-transformation effect="pixelate_faces:4" width="500" crop="scale" />
</cld-image>
Angular:
Copy to clipboard
<cl-image public-id="ice_skating.jpg" >
  <cl-transformation effect="pixelate_faces:4" width="500" crop="scale">
  </cl-transformation>
</cl-image>
.NET:
Copy to clipboard
cloudinary.Api.UrlImgUp.Transform(new Transformation().Effect("pixelate_faces:4").Width(500).Crop("scale")).BuildImageTag("ice_skating.jpg")
Android:
Copy to clipboard
MediaManager.get().url().transformation(new Transformation().effect("pixelate_faces:4").width(500).crop("scale")).generate("ice_skating.jpg");
iOS:
Copy to clipboard
imageView.cldSetImage(cloudinary.createUrl().setTransformation(CLDTransformation().setEffect("pixelate_faces:4").setWidth(500).setCrop("scale")).generate("ice_skating.jpg")!, cloudinary: cloudinary)
pixelated faces

Tip: For cases like these, you may want to take advantage of one of the access control options to prevent users from accessing the non-blurred or non-pixelated versions of the image.

Saving face

There’s no such thing as a face detection technology that will detect 100% of the faces 100% of the time, so what if you notice that a particular face you need was not detected? No problem. You can always update the detected coordinates explicitly.

For example, when a user uploads an image to your site, you can retrieve and display the detected face coordinates and then enable your users to adjust the coordinates or add a new face via your UI. You can then pass the updated coordinates to Cloudinary via the Update method of the Admin API.

For your own images, you can also manually change the coordinates using the Media library UI.

In your face

Sometimes, just blurring or pixelating a face isn’t enough. Instead, you want to completely cover the face with another image. Or, maybe you just want to add a fun mask. Whatever the reason, it’s simple to add the same image to all faces in a photo.

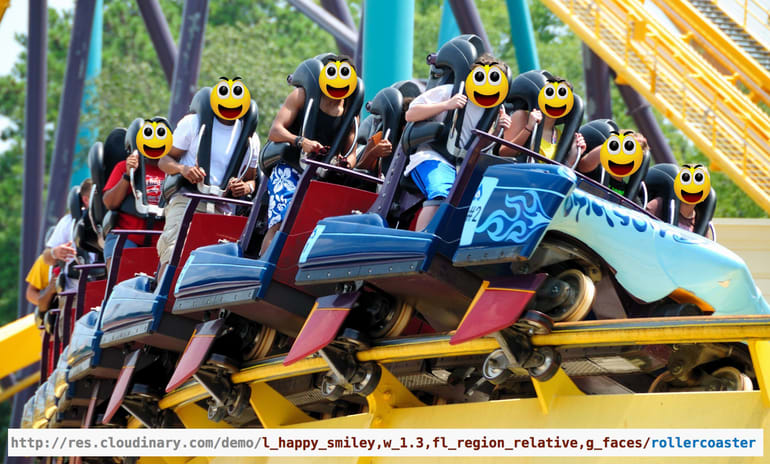
To do this, you take advantage of the region_relative flag and faces gravity when you specify the overlay image. That tells Cloudinary that you want the overlay to be placed on all faces, and that the specified size of each overlay is a percentage relative to the size of each detected face.

For example, here’s a quick way to get your family dressed up in costume:

Ruby:
Copy to clipboard
cl_image_tag("family_portrait.jpg", :gravity=>"faces", :overlay=>"spiderman_mask", :width=>1.1, :flags=>"region_relative")
PHP v1:
Copy to clipboard
cl_image_tag("family_portrait.jpg", array("gravity"=>"faces", "overlay"=>"spiderman_mask", "width"=>"1.1", "flags"=>"region_relative"))
PHP v2:
Copy to clipboard
(new ImageTag('family_portrait.jpg'))
  ->overlay(
      Overlay::source(Source::image('spiderman_mask')
        ->transformation((new ImageTransformation())
          ->resize(Resize::scale()->width(1.1)->regionRelative())))
      ->position((new Position())
        ->gravity(Gravity::focusOn(FocusOn::faces()))
  ));
Python:
Copy to clipboard
CloudinaryImage("family_portrait.jpg").image(gravity="faces", overlay="spiderman_mask", width="1.1", flags="region_relative")
Node.js:
Copy to clipboard
cloudinary.image("family_portrait.jpg", {gravity: "faces", overlay: "spiderman_mask", width: "1.1", flags: "region_relative"})
Java:
Copy to clipboard
cloudinary.url().transformation(new Transformation().gravity("faces").overlay(new Layer().publicId("spiderman_mask")).width(1.1).flags("region_relative")).imageTag("family_portrait.jpg");
JS:
Copy to clipboard
cloudinary.imageTag('family_portrait.jpg', {gravity: "faces", overlay: new cloudinary.Layer().publicId("spiderman_mask"), width: "1.1", flags: "region_relative"}).toHtml();
jQuery:
Copy to clipboard
$.cloudinary.image("family_portrait.jpg", {gravity: "faces", overlay: new cloudinary.Layer().publicId("spiderman_mask"), width: "1.1", flags: "region_relative"})
React:
Copy to clipboard
<Image publicId="family_portrait.jpg" >
  <Transformation gravity="faces" overlay="spiderman_mask" width="1.1" flags="region_relative" />
</Image>
Vue.js:
Copy to clipboard
<cld-image publicId="family_portrait.jpg" >
  <cld-transformation gravity="faces" :overlay="spiderman_mask" width="1.1" flags="region_relative" />
</cld-image>
Angular:
Copy to clipboard
<cl-image public-id="family_portrait.jpg" >
  <cl-transformation gravity="faces" overlay="spiderman_mask" width="1.1" flags="region_relative">
  </cl-transformation>
</cl-image>
.NET:
Copy to clipboard
cloudinary.Api.UrlImgUp.Transform(new Transformation().Gravity("faces").Overlay(new Layer().PublicId("spiderman_mask")).Width(1.1).Flags("region_relative")).BuildImageTag("family_portrait.jpg")
Android:
Copy to clipboard
MediaManager.get().url().transformation(new Transformation().gravity("faces").overlay(new Layer().publicId("spiderman_mask")).width(1.1).flags("region_relative")).generate("family_portrait.jpg");
iOS:
Copy to clipboard
imageView.cldSetImage(cloudinary.createUrl().setTransformation(CLDTransformation().setGravity("faces").setOverlay("spiderman_mask").setWidth(1.1).setFlags("region_relative")).generate("family_portrait.jpg")!, cloudinary: cloudinary)

Original photo spiderman mask overlay on faces

You probably already noticed that we gave anonymous (happy) faces to our roller coaster riders at the beginning of this article using the same technique.

And remember, the overlay you use doesn’t have to cover the whole face or even be centered. Below, we add a ranger hat to a man’s head using a relative y- coordinate to offset the location of the hat about 30% above the center of the face.

Ruby:
Copy to clipboard
cl_image_tag("smiling_man", :transformation=>[
  {:gravity=>"face", :zoom=>0.6, :crop=>"crop"},
  {:overlay=>"ranger_hat", :width=>1.1, :flags=>"region_relative", :gravity=>"face", :y=>-0.3}
  ])
PHP v1:
Copy to clipboard
cl_image_tag("smiling_man", array("transformation"=>array(
  array("gravity"=>"face", "zoom"=>"0.6", "crop"=>"crop"),
  array("overlay"=>"ranger_hat", "width"=>"1.1", "flags"=>"region_relative", "gravity"=>"face", "y"=>"-0.3")
  )))
PHP v2:
Copy to clipboard
(new ImageTag('smiling_man'))
  ->resize(Resize::crop()->zoom(0.6)->gravity(Gravity::focusOn(FocusOn::face())))
  ->overlay(
      Overlay::source(Source::image('ranger_hat')
        ->transformation((new ImageTransformation())
          ->resize(Resize::scale()->width(1.1)->regionRelative())))
      ->position((new Position())
        ->gravity(Gravity::focusOn(FocusOn::face()))
        ->offsetY(-0.3)
  ));
Python:
Copy to clipboard
CloudinaryImage("smiling_man").image(transformation=[
  {'gravity': "face", 'zoom': "0.6", 'crop': "crop"},
  {'overlay': "ranger_hat", 'width': "1.1", 'flags': "region_relative", 'gravity': "face", 'y': "-0.3"}
  ])
Node.js:
Copy to clipboard
cloudinary.image("smiling_man", {transformation: [
  {gravity: "face", zoom: "0.6", crop: "crop"},
  {overlay: "ranger_hat", width: "1.1", flags: "region_relative", gravity: "face", y: "-0.3"}
  ]})
Java:
Copy to clipboard
cloudinary.url().transformation(new Transformation()
  .gravity("face").zoom(0.6).crop("crop").chain()
  .overlay(new Layer().publicId("ranger_hat")).width(1.1).flags("region_relative").gravity("face").y(-0.3)).imageTag("smiling_man");
JS:
Copy to clipboard
cloudinary.imageTag('smiling_man', {transformation: [
  {gravity: "face", zoom: "0.6", crop: "crop"},
  {overlay: new cloudinary.Layer().publicId("ranger_hat"), width: "1.1", flags: "region_relative", gravity: "face", y: "-0.3"}
  ]}).toHtml();
jQuery:
Copy to clipboard
$.cloudinary.image("smiling_man", {transformation: [
  {gravity: "face", zoom: "0.6", crop: "crop"},
  {overlay: new cloudinary.Layer().publicId("ranger_hat"), width: "1.1", flags: "region_relative", gravity: "face", y: "-0.3"}
  ]})
React:
Copy to clipboard
<Image publicId="smiling_man" >
  <Transformation gravity="face" zoom="0.6" crop="crop" />
  <Transformation overlay="ranger_hat" width="1.1" flags="region_relative" gravity="face" y="-0.3" />
</Image>
Vue.js:
Copy to clipboard
<cld-image publicId="smiling_man" >
  <cld-transformation gravity="face" zoom="0.6" crop="crop" />
  <cld-transformation :overlay="ranger_hat" width="1.1" flags="region_relative" gravity="face" y="-0.3" />
</cld-image>
Angular:
Copy to clipboard
<cl-image public-id="smiling_man" >
  <cl-transformation gravity="face" zoom="0.6" crop="crop">
  </cl-transformation>
  <cl-transformation overlay="ranger_hat" width="1.1" flags="region_relative" gravity="face" y="-0.3">
  </cl-transformation>
</cl-image>
.NET:
Copy to clipboard
cloudinary.Api.UrlImgUp.Transform(new Transformation()
  .Gravity("face").Zoom(0.6).Crop("crop").Chain()
  .Overlay(new Layer().PublicId("ranger_hat")).Width(1.1).Flags("region_relative").Gravity("face").Y(-0.3)).BuildImageTag("smiling_man")
Android:
Copy to clipboard
MediaManager.get().url().transformation(new Transformation()
  .gravity("face").zoom(0.6).crop("crop").chain()
  .overlay(new Layer().publicId("ranger_hat")).width(1.1).flags("region_relative").gravity("face").y(-0.3)).generate("smiling_man");
iOS:
Copy to clipboard
imageView.cldSetImage(cloudinary.createUrl().setTransformation(CLDTransformation()
  .setGravity("face").setZoom(0.6).setCrop("crop").chain()
  .setOverlay("ranger_hat").setWidth(1.1).setFlags("region_relative").setGravity("face").setY(-0.3)).generate("smiling_man")!, cloudinary: cloudinary)
hat overlay

At face value

If you want to check the face detection status of uploaded images programmatically, you can request to return face coordinate data when you or your users upload images, or you can request them upon demand for already uploaded images using the explicit method of the upload API, or with the list details of a single resource functionality of the Admin API. The following shows an excerpt from the JSON response of an upload call where the faces parameter was set to true.

Copy to clipboard
{
  ...
  "faces":  [ [513, 19, 38, 52], [409, 26, 40, 54], [79, 31, 43, 59], [232, 32, 40, 54], [321, 33, 41, 57], [160, 37, 43, 59]
}

For example, you could use this data to calculate the ideal location for a text overlay so that it won’t cover any faces on a photo.

Two-faced

Cloudinary enables you to create programmatically complex transformations by adding conditions to your transformations. One of the things you can base your conditions on is face_count.

For example, you can’t always be sure that a profile picture will be of a person. Some people choose to upload family portraits, scenery, or other images to represent themselves. The following images use the identical conditional transformation, where thumbnail cropping is applied if one or more faces is found, but scaled cropping is used on images without faces. We’ve also added a shadow vs black border for the alternative conditions to highlight the differences.

(The code shown here is for the nice_couple on the left, but you can click the bridge picture to see that it uses the identical transformation URL except for the image name (public ID).)

Ruby:
Copy to clipboard
cl_image_tag("nice_couple", :transformation=>[
  {:if=>"fc_gte_1", :gravity=>"faces", :zoom=>0.5, :width=>200, :height=>200, :effect=>"shadow:10", :color=>"#acb2b9", :x=>7, :y=>7, :crop=>"thumb"},
  {:if=>"else", :width=>200, :height=>200, :border=>"3px_solid_black", :crop=>"scale"}
  ])
PHP v1:
Copy to clipboard
cl_image_tag("nice_couple", array("transformation"=>array(
  array("if"=>"fc_gte_1", "gravity"=>"faces", "zoom"=>"0.5", "width"=>200, "height"=>200, "effect"=>"shadow:10", "color"=>"#acb2b9", "x"=>7, "y"=>7, "crop"=>"thumb"),
  array("if"=>"else", "width"=>200, "height"=>200, "border"=>"3px_solid_black", "crop"=>"scale")
  )))
PHP v2:
Copy to clipboard
(new ImageTag('nice_couple'))
  ->conditional(
      Conditional::ifCondition('face_count >= 1', (new Transformation())
        ->effect(Effect::shadow()->strength(10)
          ->color(Color::rgb('acb2b9'))
          ->offsetX(7)->offsetY(7))
        ->resize(Resize::thumbnail()->width(200)->height(200)
          ->zoom(Expression::expression(0.5))
          ->gravity(Gravity::focusOn(FocusOn::faces()))))
      ->otherwise((new Transformation())
        ->border(Border::solid(3, Color::BLACK))
        ->resize(Resize::scale()->width(200)->height(200))
  ));
Python:
Copy to clipboard
CloudinaryImage("nice_couple").image(transformation=[
  {'if': "fc_gte_1", 'gravity': "faces", 'zoom': "0.5", 'width': 200, 'height': 200, 'effect': "shadow:10", 'color': "#acb2b9", 'x': 7, 'y': 7, 'crop': "thumb"},
  {'if': "else", 'width': 200, 'height': 200, 'border': "3px_solid_black", 'crop': "scale"}
  ])
Node.js:
Copy to clipboard
cloudinary.image("nice_couple", {transformation: [
  {if: "fc_gte_1", gravity: "faces", zoom: "0.5", width: 200, height: 200, effect: "shadow:10", color: "#acb2b9", x: 7, y: 7, crop: "thumb"},
  {if: "else", width: 200, height: 200, border: "3px_solid_black", crop: "scale"}
  ]})
Java:
Copy to clipboard
cloudinary.url().transformation(new Transformation()
  .if("fc_gte_1").gravity("faces").zoom(0.5).width(200).height(200).effect("shadow:10").color("#acb2b9").x(7).y(7).crop("thumb").chain()
  .if("else").width(200).height(200).border("3px_solid_black").crop("scale")).imageTag("nice_couple");
JS:
Copy to clipboard
cloudinary.imageTag('nice_couple', {transformation: [
  {if: "fc_gte_1", gravity: "faces", zoom: "0.5", width: 200, height: 200, effect: "shadow:10", color: "#acb2b9", x: 7, y: 7, crop: "thumb"},
  {if: "else", width: 200, height: 200, border: "3px_solid_black", crop: "scale"}
  ]}).toHtml();
jQuery:
Copy to clipboard
$.cloudinary.image("nice_couple", {transformation: [
  {if: "fc_gte_1", gravity: "faces", zoom: "0.5", width: 200, height: 200, effect: "shadow:10", color: "#acb2b9", x: 7, y: 7, crop: "thumb"},
  {if: "else", width: 200, height: 200, border: "3px_solid_black", crop: "scale"}
  ]})
React:
Copy to clipboard
<Image publicId="nice_couple" >
  <Transformation if="fc_gte_1" gravity="faces" zoom="0.5" width="200" height="200" effect="shadow:10" color="#acb2b9" x="7" y="7" crop="thumb" />
  <Transformation if="else" width="200" height="200" border="3px_solid_black" crop="scale" />
</Image>
Vue.js:
Copy to clipboard
<cld-image publicId="nice_couple" >
  <cld-transformation if="fc_gte_1" gravity="faces" zoom="0.5" width="200" height="200" effect="shadow:10" color="#acb2b9" x="7" y="7" crop="thumb" />
  <cld-transformation if="else" width="200" height="200" border="3px_solid_black" crop="scale" />
</cld-image>
Angular:
Copy to clipboard
<cl-image public-id="nice_couple" >
  <cl-transformation if="fc_gte_1" gravity="faces" zoom="0.5" width="200" height="200" effect="shadow:10" color="#acb2b9" x="7" y="7" crop="thumb">
  </cl-transformation>
  <cl-transformation if="else" width="200" height="200" border="3px_solid_black" crop="scale">
  </cl-transformation>
</cl-image>
.NET:
Copy to clipboard
cloudinary.Api.UrlImgUp.Transform(new Transformation()
  .If("fc_gte_1").Gravity("faces").Zoom(0.5).Width(200).Height(200).Effect("shadow:10").Color("#acb2b9").X(7).Y(7).Crop("thumb").Chain()
  .If("else").Width(200).Height(200).Border("3px_solid_black").Crop("scale")).BuildImageTag("nice_couple")
Android:
Copy to clipboard
MediaManager.get().url().transformation(new Transformation()
  .if("fc_gte_1").gravity("faces").zoom(0.5).width(200).height(200).effect("shadow:10").color("#acb2b9").x(7).y(7).crop("thumb").chain()
  .if("else").width(200).height(200).border("3px_solid_black").crop("scale")).generate("nice_couple");
iOS:
Copy to clipboard
imageView.cldSetImage(cloudinary.createUrl().setTransformation(CLDTransformation()
  .setIf("fc_gte_1").setGravity("faces").setZoom(0.5).setWidth(200).setHeight(200).setEffect("shadow:10").setColor("#acb2b9").setX(7).setY(7).setCrop("thumb").chain()
  .setIf("else").setWidth(200).setHeight(200).setBorder("3px_solid_black").setCrop("scale")).generate("nice_couple")!, cloudinary: cloudinary)

image with one or more faces image without faces

You can learn more about conditional transformations here.

Face to face

Just a reminder that in addition to applying all this cool stuff on images that you or your users directly upload, you can also use the same tricks with remotely fetched images, such as Facebook profile pictures.

For example, you can allow your users to select to use their Facebook profile photo as the basis for their account profile photo in your app and then apply resizing, rounding, artistic effects, or any other transformation to fit your site's art direction, while ensuring that the detected face of the fetched photo remains the main focus of the final photo.

Here we apply cropping and several other transformations to the Facebook profile photo from the Remembering JFK page:

Ruby:
Copy to clipboard
cl_image_tag("268587306614095", :type=>"facebook", :transformation=>[
  {:width=>200, :height=>200, :gravity=>"face", :zoom=>0.65, :radius=>"max", :effect=>"art:sizzle", :crop=>"thumb"},
  {:effect=>"shadow"}
  ])
PHP v1:
Copy to clipboard
cl_image_tag("268587306614095", array("type"=>"facebook", "transformation"=>array(
  array("width"=>200, "height"=>200, "gravity"=>"face", "zoom"=>"0.65", "radius"=>"max", "effect"=>"art:sizzle", "crop"=>"thumb"),
  array("effect"=>"shadow")
  )))
PHP v2:
Copy to clipboard
(new ImageTag('268587306614095'))
  ->resize(Resize::thumbnail()->width(200)->height(200)->zoom(0.65)->gravity(Gravity::focusOn(FocusOn::face())))
  ->roundCorners(RoundCorners::max())
  ->effect(Effect::artisticFilter(ArtisticFilter::sizzle()))
  ->effect(Effect::shadow())
  ->deliveryType('facebook');
Python:
Copy to clipboard
CloudinaryImage("268587306614095").image(type="facebook", transformation=[
  {'width': 200, 'height': 200, 'gravity': "face", 'zoom': "0.65", 'radius': "max", 'effect': "art:sizzle", 'crop': "thumb"},
  {'effect': "shadow"}
  ])
Node.js:
Copy to clipboard
cloudinary.image("268587306614095", {type: "facebook", transformation: [
  {width: 200, height: 200, gravity: "face", zoom: "0.65", radius: "max", effect: "art:sizzle", crop: "thumb"},
  {effect: "shadow"}
  ]})
Java:
Copy to clipboard
cloudinary.url().transformation(new Transformation()
  .width(200).height(200).gravity("face").zoom(0.65).radius("max").effect("art:sizzle").crop("thumb").chain()
  .effect("shadow")).type("facebook").imageTag("268587306614095");
JS:
Copy to clipboard
cloudinary.imageTag('268587306614095', {type: "facebook", transformation: [
  {width: 200, height: 200, gravity: "face", zoom: "0.65", radius: "max", effect: "art:sizzle", crop: "thumb"},
  {effect: "shadow"}
  ]}).toHtml();
jQuery:
Copy to clipboard
$.cloudinary.image("268587306614095", {type: "facebook", transformation: [
  {width: 200, height: 200, gravity: "face", zoom: "0.65", radius: "max", effect: "art:sizzle", crop: "thumb"},
  {effect: "shadow"}
  ]})
React:
Copy to clipboard
<Image publicId="268587306614095" type="facebook">
  <Transformation width="200" height="200" gravity="face" zoom="0.65" radius="max" effect="art:sizzle" crop="thumb" />
  <Transformation effect="shadow" />
</Image>
Vue.js:
Copy to clipboard
<cld-image publicId="268587306614095" type="facebook">
  <cld-transformation width="200" height="200" gravity="face" zoom="0.65" radius="max" effect="art:sizzle" crop="thumb" />
  <cld-transformation effect="shadow" />
</cld-image>
Angular:
Copy to clipboard
<cl-image public-id="268587306614095" type="facebook">
  <cl-transformation width="200" height="200" gravity="face" zoom="0.65" radius="max" effect="art:sizzle" crop="thumb">
  </cl-transformation>
  <cl-transformation effect="shadow">
  </cl-transformation>
</cl-image>
.NET:
Copy to clipboard
cloudinary.Api.UrlImgUp.Transform(new Transformation()
  .Width(200).Height(200).Gravity("face").Zoom(0.65).Radius("max").Effect("art:sizzle").Crop("thumb").Chain()
  .Effect("shadow")).Action("facebook").BuildImageTag("268587306614095")
Android:
Copy to clipboard
MediaManager.get().url().transformation(new Transformation()
  .width(200).height(200).gravity("face").zoom(0.65).radius("max").effect("art:sizzle").crop("thumb").chain()
  .effect("shadow")).type("facebook").generate("268587306614095");
iOS:
Copy to clipboard
imageView.cldSetImage(cloudinary.createUrl().setType( "facebook").setTransformation(CLDTransformation()
  .setWidth(200).setHeight(200).setGravity("face").setZoom(0.65).setRadius("max").setEffect("art:sizzle").setCrop("thumb").chain()
  .setEffect("shadow")).generate("268587306614095")!, cloudinary: cloudinary)

Original FB profile photo

Original Facebook profile photo
     Cropped to a circle using face detection Manipulated photo: face thumbnail
slight zoom, artistic filter,
rounding, shadow

You can do the same with images fetched from other sites, like Twitter, Google+, or from any image URL.

Face the facts

By now, the many potential uses for face detection techniques have probably become obvious to you, as plain as the nose on your face, you might say…. OK, I'm done with the painful face puns.

The fact is that almost every Website includes both local and user-generated content that centers around people. It’s essential that those people remain the focus of the displayed pictures regardless of how you resize, crop, add images and text overlays, etc.

Cloudinary’s face detection capabilities and updated mechanism enable you to accomplish all of these things programmatically, using simple transformation parameters, and with very reliable results.

Ready to see how far your creativity can take these face detection features? These features are available in all plans including the free plan, with no add-ins required. If you don’t have a Cloudinary account yet, you can sign up for a free one, and give it a go!

Recent Blog Posts

Our $2B Valuation

By
Blackstone Growth Invests in Cloudinary

When we started our journey in 2012, we were looking to improve our lives as developers by making it easier for us to handle the arduous tasks of handling images and videos in our code. That initial line of developer code has evolved into a full suite of media experience solutions driven by a mission that gradually revealed itself over the course of the past 10 years: help companies unleash the full potential of their media to create the most engaging visual experiences.

Read more
Direct-to-Consumer E-Commerce Requires Compelling Visual Experiences

When brands like you adopt a direct–to-consumer (DTC) e-commerce approach with no involvement of retailers or marketplaces, you gain direct and timely insight into evolving shopping behaviors. Accordingly, you can accommodate shoppers’ preferences by continually adjusting your product offering and interspersing the shopping journey with moments of excitement and intrigue. Opportunities abound for you to cultivate engaging customer relationships.

Read more
Automatically Translating Videos for an International Audience

No matter your business focus—public service, B2B integration, recruitment—multimedia, in particular video, is remarkably effective in communicating with the audience. Before, making video accessible to diverse viewers involved tasks galore, such as eliciting the service of production studios to manually dub, transcribe, and add subtitles. Those operations were costly and slow, especially for globally destined content.

Read more
Cloudinary Helps Minted Manage Its Image-Generation Pipeline at Scale

Shoppers return time and again to Minted’s global online community of independent artists and designers because they know they can count on unique, statement-making products of the highest quality there. Concurrently, the visual imagery on Minted.com must do justice to the designs into which the creators have poured their hearts and souls. For Minted’s VP of Engineering David Lien, “Because we are a premium brand, we need to ensure that every single one of our product images matches the selected configuration exactly. For example, if you pick an 18x24 art print on blue canvas, we will show that exact combination on the hero images in the PDF.”

Read more
Highlights on ImageCon 2021 and a Preview of ImageCon 2022

New year, same trend! Visual media will continue to play a monumental role in driving online conversions. To keep up with visual-experience trends and best practices, Cloudinary holds an annual conference called ImageCon, a one-of-a-kind event that helps attendees create the most engaging visual experiences possible.

Read more