I recently came across a tweet by organizer and developer advocate iChuloo by way of @JAMStackLagos on how to reduce the size of an image with only one line of code on Cloudinary.
Using @cloudinary in React and this sends the image size down by ~88% with no visible change in quality. Holy smokes!! pic.twitter.com/PT2b3785Lo
— William Imoh (@iChuloo) April 26, 2019
That tweet rang a bell. I then recalled that I’d used that exact codeline in at least two React projects in the past.
This article digs deeper, showing you how to compress image files, again with one line of code, in PHP, Java, or Python on environments or frameworks like React, Node, Vue, and Angular.
Image Compression
As a rule, compression of image files are either for storage or for delivery.
Image Storage
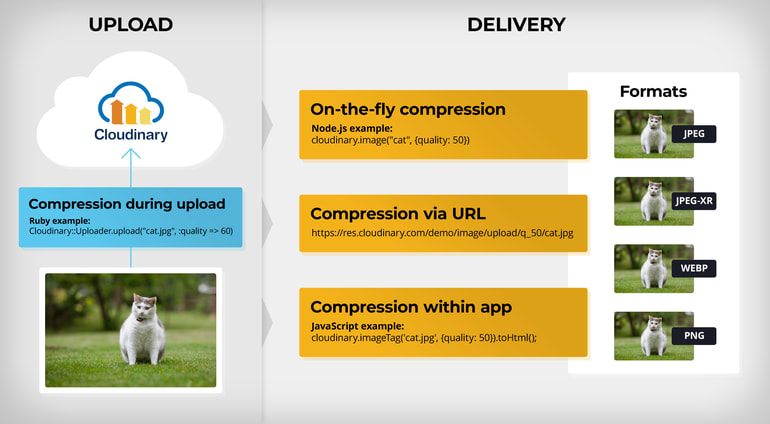
The compression of image files for cloud storage when requesting their upload to Cloudinary. Subsequently, Cloudinary applies to the files the transformations you specified before storing them. The examples below show the codeline in Ruby, Python, PHP, and Java. You can also code in a similar manner in other modern languages.
Ruby
Python
PHP
Java
cloudinary.url().transformation(new Transformation().quality(60)).imageTag("cat.jpg");
In the code above, quality is a compression parameter that specifies the image quality and size for storage. If you’re not sure what number to assign to quality, just type auto. Cloudinary then automatically adjusts the compression quality for your image by applying the optimal balance between the image’s file size and quality.
Image Delivery
In this context, you upload images straight to the cloud and then apply the quality compression parameter when delivering them to users. You can also serve images in the formats that pertain to the various web browsers and mobile devices.
You configure quality on a 0-100 scale. The higher the image quality, the larger the image size; the lower the image quality, the smaller the image size. To compress images on the fly, adjust their quality parameter. See the examples below.
Node.js
Java
cloudinary.url().transformation(new Transformation().quality(50)).imageTag("cat");
Python
Alternatively, simply add a q parameter to your image’s URL, for example:
Here, q stands for quality; 50 is your choice on a 0-100 scale.
Front-end developers can drop the components in their app out of the box, like this:
React.js
Vue.js
Angular
<cl-image public-id="cat.jpg" ><cl-transformation quality="50"></cl-transformation></cl-image>
JQuery
JavaScript
Here, cat is the name of the uploaded image, which is usually the public ID (publicId) on the Cloudinary storage platform.
Conclusion
Uploading without images optimization or compression wastes bandwidth. Plus, delivering them on your app invariably takes longer. Why not automate the compression process with Cloudinary’s effective and simple drop-in tools so that your visuals load fast?
Register for free and for more details, check out the following Cloudinary documentation:
Further Reading on Image Optimization
- Website image optimization and fast delivery with Cloudinary
- The complete guide to PHP image compression and optimization
- Vue.js Tutorial: Images Optimization for Web Apps
- Python Image Optimization and Manipulation
- Image Optimization in Ruby
- Image Optimization for WordPress
- Learn about the pros and cons of JPEG 2000
- Adopting the WebP Image Format for Android on Websites Or Native Apps
- 10 Website Image Mistakes that Slow Load Times
- Automatically Reduce Image Size Without Losing Quality
- Automate Placeholder Generation and Accelerate Page Loads
- 3 Ways to Do Progressive JPEG Encoding


