Cloudinary is a cloud-based, end-to-end solution for downloading, storing, editing, optimizing, and delivering images and videos. Note that editing means that you can transform images and videos, that is, resize and add numerous effects to them.
Images encoded in graphics interchange format (GIF) are called animated GIFs, which contain images or frames in a single file with a description from its own graphic-control extension. To convey animation, the frames appear in a specific order. With Cloudinary, you can also add various effects to the generated GIFs and deliver them by means of unique URLs.
Convert Video to Animated GIF
This tutorial shows you how to build an Android app in Android Studio through Cloudinary and then convert a video to animated GIF, ready for download.
App Flow
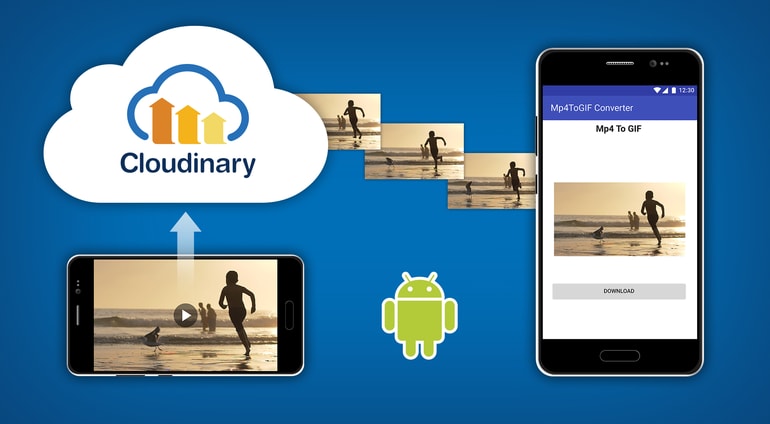
The process is seamless and simple:
- You select and load a video into the app, which then automatically uploads it to Cloudinary.
- Cloudinary processes the video and converts it to a GIF.
- Cloudinary displays it on screen for download.
Tip: You can take advantage of the same process to reversely convert a WebM file to an MP4 file.
As background reference, see this Cloudinary post on image loading and optimization with Cloudinary and Fresco .
Requirements
As a prerequisite, you must be conversant with the Android development and third-party libraries. You also need the following:
- A Cloudinary account
- The Cloudinary Android SDK
- Android Studio
- Glide, the library for asynchronous image loading
Demo App
These two short clips show how the demo app (called the app in the rest of this tutorial) works:
Here is the source code.
To try out the app on an Android device, download it first.
Setup of the Android Environment
Set up an environment with Android Studio by following this procedure .
Setup of Dependencies
Once you’ve set up your app in Android Studio or an IDE of your choice, install Cloudinary and Glide as dependencies in the build.gradle file of your app module by first adding this code:
implementation group: 'com.cloudinary', name: 'cloudinary-android', version: '1.22.0'
implementation 'com.squareup.picasso:picasso:2.5.2'
Next, click Sync to install the dependencies. Afterward, open the AndroidManifest.xml file and add the Cloudinary configurations to the application tag:
    <manifest xmlns:android="https://schemas.android.com/apk/res/android"
       package="com.example.ekene.imageboardcloudinary">

        <uses-permission android:name="android.permission.INTERNET"/>

        <application
            ...
            >
            <meta-data
                android:name="CLOUDINARY_URL"
                android:value="cloudinary://@myCloudName"/>
        </application>
    </manifest>
Replace myCloudName with your Cloudinary name, as displayed on your console. Note that the Internet permissions are already specified under users-permission in the above code.
App Layout
Now define the app layout with the following user-interface elements:
A bar that shows the progress of the upload process
A button that triggers the video upload
An ImageView object that renders the GIF created with Cloudinary
A button for downloading the GIF
Next, edit the activity_main.xml file to make it read like this:
Afterwards, initialize the view objects in the MainActivity.java file so you can refer to them. Make the file read as follows:
    package com.example.ekene.mp4togifconverter;
    import ...

    public class MainActivity extends AppCompatActivity {

        private Button uploadBtn;
        private ProgressBar progressBar;
        private int SELECT_VIDEO = 2;
        private ImageView img1;
        private DownloadManager downloadManager;
        private Button download_btn;
        private String gifUrl;

        @Override
        protected void onCreate(Bundle savedInstanceState) {
            super.onCreate(savedInstanceState);
            setContentView(R.layout.activity_main);

            progressBar = findViewById(R.id.progress_bar);
            MediaManager.init(this);
            img1 = findViewById(R.id.img1);
            uploadBtn = findViewById(R.id.uploadBtn);
            download_btn = findViewById(R.id.download_btn);
            download_btn.setVisibility(View.INVISIBLE);
            //...

            }
    }
Now define the button for uploads such that, on a click, it launches the gallery from which you can select a video for upload:
    package com.example.ekene.mp4togifconverter;
    import ...
    public class MainActivity extends AppCompatActivity {
        private Button uploadBtn;
        @Override
        protected void onCreate(Bundle savedInstanceState) {
            super.onCreate(savedInstanceState);
            setContentView(R.layout.activity_main);
            uploadBtn = findViewById(R.id.uploadBtn);
            uploadBtn.setOnClickListener(new View.OnClickListener() {
            @Override
            public void onClick(View view) {
                pickVideoFromGallery();

          }
        private void pickVideoFromGallery() {
            Intent GalleryIntent = new Intent();
            GalleryIntent.setType("video/*");
            GalleryIntent.setAction(Intent.ACTION_GET_CONTENT);
            startActivityForResult(Intent.createChooser(GalleryIntent,
            "select video"), SELECT_VIDEO);
        }
    });
    //...
    }
Subsequently, as soon as you select a video, Cloudinary calls the onActivityResult method, which in turn triggers an upload to Cloudinary. To facilitate uploads, create an UploadRequest method and dispatch it within the onActivityResult method, as described in the next section.
Meantime, to enable network requests, open the AndroidManifest.xml file and add this code for internet permissions just above the Application tag:
Cloudinary Uploads
Cloudinary offers two types of uploads:
Signed uploads, which require an authentication signature from a backend. For these uploads, your images and videos are signed with the API and secret key in the console. Because those signatures are risky on the client side, which can be easily decompiled, a back-end is mandatory for security.
Unsigned uploads, which do not require signatures and are thus less secure than signed ones. These uploads are controlled by an upload preset, which defines the options that apply to the images that are uploaded with the preset.
This app features unsigned uploads. To enable them on the console, click Settings on your dashboard, select the Upload tab, scroll down to Upload presets, and enable Unsigned. Cloudinary then generates a preset with a random string as its name. Copy the name and set it aside for use late.

For more details on creating Android apps with unsigned uploads, see this Cloudinary post.
To enable the upload of a selected video to Cloudinary, initialize the Cloudinary MediaManager class onCreate method in the MainActivity class, as shown here:
    package com.example.ekene.mp4togifconverter;
    import ...
    public class MainActivity extends AppCompatActivity {
        @Override
        protected void onCreate(Bundle savedInstanceState) {
            super.onCreate(savedInstanceState);
            setContentView(R.layout.activity_main);
            //initialize MediaManager
            MediaManager.init(this);
        }
Next, call the onActivityResult() method in MainActivity and set it up.
As background, here are the methods in MainActivity this app has adopted so far and their relationships to onActivityResult:
onCreate— Becomes active when the app starts. The XML file in use earlier is the default layout of the activity. You also added a listener to the button, which, on a click, causes the app to call the second method,pickVideoFromGallery(see below).pickVideoFromGallery— Launches the user’s gallery for video selection. This process generates a unique request code in theSELECT_VIDEOvariable. Because a response follows a video section, thestartActivityForResult()method renders the response on theonActivityForResult()method. If the selection succeeds, so does the response, and theselectedVideovariable in turn holdsURIof the selected video for upload. Finally, Culinary calls theonActivityForResult()method (see below). If the selection fails, the process ends.onActivityForResult()— Checks if the response fromstartActivityForResult()succeeded. On a video selection,resultCodeis equal toActivity.RESULT_OK; otherwise, toActivity.RESULT_CANCELLED. A success results in an upload request to Cloudinary withMediaManager, like this:
    @Override
    protected void onActivityResult(int requestCode, int resultCode, final Intent data) {
        if (requestCode == SELECT_VIDEO && resultCode == RESULT_OK) {
            Uri selectedVideo = data.getData();
            //...
            }
        }
Now create an upload request by adding MediaManager to onActivityResult and build UploadRequest in Cloudinary with the following five methods:
upload()— Takes inuriof the selected video for uploads.unsigned()– Takes inpreset namefrom your console.option()– Takes inresource_typeof the upload:
    @Override
    protected void onActivityResult(int requestCode, int resultCode, final Intent data) {
        if (requestCode == SELECT_VIDEO && resultCode == RESULT_OK) {
            Uri selectedVideo = data.getData();
            MediaManager.get()
                    .upload(selectedVideo)
                    .unsigned("preset_name")
                    .option("resource_type", "video")
                    .callback(...)
                   //...
                   }
     }
callback()— Takes in a newUploadCallbackmethod, which implements several other callback methods that track the progress of the upload.onStart()— Defines what happens when upload starts:
    .callback(new UploadCallback() {
                        @Override
                        public void onStart(String requestId) {
                            progressBar.setVisibility(View.VISIBLE);
                            Toast.makeText(MainActivity.this,
                            "Upload has started ...", Toast.LENGTH_SHORT).show();
                        }
                        //...
The above code makes progressBar visible and sets Toast, which displays the message “Upload has started”
-
onProgress()— Defines what happens as the upload progresses, that is, has started but not yet completed. Leave it blank in this app:
onSuccess()— Defines what happens if the video upload succeeds. In this app, you generate the GIF from the uploaded video and pass it to theImageViewobject with Glide, where the conversion occurs.
Conversion
After upload to Cloudinary, the video is assigned a unique ID by Cloudinary. You refer to the ID when editing the video. Here, since you have already uploaded the video, all you need to do is append .gif to its unique ID: (publicId+".gif");. Easy as pie!
To learn more about animated GIFs and the related best practices, see the Cloudinary post Evolution of <img>.
Next, pass the converted GIF to the MediaManager’s generate() method, which then returns a URL for the GIF. Subsequently, pass the URL to the load() method of your Glide object and call the asGif() method to render it on screen as a GIF, like this:
    .callback(new UploadCallback() {
                        @Override
    public void onSuccess(String requestId, Map resultData) {

        Toast.makeText(MainActivity.this, "Uploaded Succesfully",
        Toast.LENGTH_SHORT).show();
        progressBar.setVisibility(View.GONE);
        uploadBtn.setVisibility(View.INVISIBLE);

        String publicId = resultData.get("public_id").toString();

        gifUrl = MediaManager.get().url().resourceType("video")
                .transformation(new Transformation().videoSampling("25")
                .delay("200").height(200).effect("loop:10").crop("scale"))
                .format("gif").generate(publicId);

        Glide.with(getApplicationContext()).asGif().load(gifUrl).into(img1);
        download_btn.setVisibility(View.VISIBLE);

    }
                          //...
      }
Access the URL of the uploaded video by calling resultData.get("url"). To access the video ID, call resultData.get("public_id"). Refer to that ID when you manipulate the video and generate a GIF, whose resulting URL you then store in a string variable.
Afterwards, load the GIF with Glide into the ImageView object by means of these two methods:
onError()— Defines what happens if an error occurs during the upload process. For this app, create aToastmethod for the error message, like this:
    .callback(new UploadCallback() {
                        @Override
                        public void onError(String requestId, ErrorInfo error) {
                            Toast.makeText(MainActivity.this,
                            "Upload Error", Toast.LENGTH_SHORT).show();
                            Log.v("ERROR!!", error.getDescription());
                        }
                        //...
dispatch()— Defines when and how each upload request runs.
You have now set up the onActivityForResult() method. When it receives a response from pickVideoFromGallery(), it creates an upload request to Cloudinary with the URI of the selected video. Once the upload succeeds, onActivityForResult() converts the video to a GIF and renders it on the ImageView object, which you defined earlier. That is a more robust process than that performed by the conventional Android video editor.
Try it out: run the app to test the upload, conversion, and rendering process.
In case of errors, have a look at the source code. Long code lines can be overwhelming sometimes.
GIF Downloads
Finally, set up the download_btn method for downloading converted GIFs. Actually, you’ve already initialized download_btn in the MainActivity file, as follows:
    package com.example.ekene.mp4togifconverter;
    import ...
    public class MainActivity extends AppCompatActivity {
        private Button download_btn;
        @Override
        protected void onCreate(Bundle savedInstanceState) {
            super.onCreate(savedInstanceState);
            setContentView(R.layout.activity_main);
            download_btn = findViewById(R.id.download_btn);
            download_btn.setVisibility(View.INVISIBLE);

            download_btn.setOnClickListener(new View.OnClickListener() {
                @Override
                public void onClick(View view) {

                    downloadManager = (DownloadManager)getSystemService(
                    Context.DOWNLOAD_SERVICE);
                    Uri uri = Uri.parse(gifUrl);
                    DownloadManager.Request request = new DownloadManager.Request(uri);
                    request.setNotificationVisibility(
                    DownloadManager.Request.VISIBILITY_VISIBLE_NOTIFY_COMPLETED);
                    Long reference = downloadManager.enqueue(request);
                }
            });
            //...
      }
You’re now all set. On a click of the download button, download_btn parses the URI of the GIF to the Android Download Manager, which in turn enqueues a download request, displaying the notifications, as appropriate, as the process progresses.
Conclusion
After familiarizing yourself with this tutorial, you can leverage Cloudinary’s superb capabilities for transforming and optimizing images and videos into more appealing, compact visuals and for generating GIFs from videos on the fly. For more details, see our documentation.
Problems with the tutorial? Describe them under Comments below; I’ll respond as soon as I can.
Want to Learn More About Video Optimization?
- Optimizing Video with Cloudinary and the HTML5 Video Player
- ExoPlayer Android Tutorial: Easy Video Delivery and Editing
- How to Generate Waveform Images From Audio Files
- Auto Generate Subtitles Based on Video Transcript
- Automated Generation of Intelligent Video Previews on Cloudinary’s Dynamic Video Platform
- Converting Android Videos to Animated GIF Images With Cloudinary: A Tutorial
- Tips for Retaining Audience Through Engaging Videos
- Product Videos 101: What Makes Them Great?


