When it comes to quality versus quantity, you’ll often hear people say, “It’s the quality that counts, not the quantity”. While that’s true in many situations, there are also cases where you want both quality and quantity. You may have thousands of images on your website and you want them all to look great. This is especially important if your website allows users to upload their own content, for example, to sell their own products or services. You don't want their poor quality images to reflect badly on your brand.
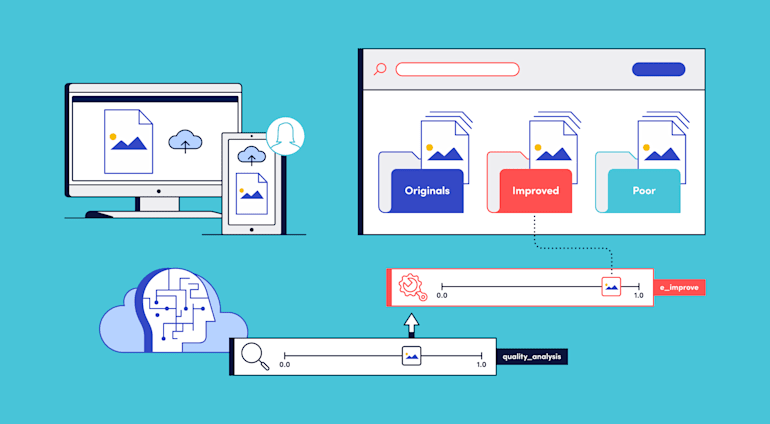
Manually checking that each image lives up to your quality standards is incredibly time consuming, so more companies are looking towards automation as a solution. Cloudinary’s extended image quality analysis feature can help you to automate and accelerate the process of determining which images aren't up to par.
Tell Me More
You can have Cloudinary analyze your existing images and/or new images as they're being uploaded. The response to a request for quality analysis includes a variety of scores (each ranging from 0.0 to 1.0) for different aspects of the image, together with an overall weighted quality score. Take this photo as an example, shown together with its quality analysis scores:
 | "quality_analysis": { "jpeg_quality": 0.68, "jpeg_chroma": 0.25, "focus": 0.71, "noise": 1.0, "contrast": 0.83, "exposure": 1.0, "saturation": 1.0, "lighting": 0.98, "pixel_score": 0.5, "color_score": 0.9, "dct": 0.29, "blockiness": 0.84, "chroma_subsampling": 0.15, "resolution": 0.92 }, "quality_score": 0.68 |
Defining Quality
Broadly speaking, the scores can be divided into pixel quality evaluations (that contribute to the pixel_score) and color quality evaluations (that contribute to the color_score). Images with low pixel scores look better when downscaled, so this score might not be so important to you if the display size is small compared to the overall resolution. In contrast, changing the scale of images with low color scores doesn't affect their perceived quality. Here's a quick explanation of each of the scores:
![]()
The following scores contribute to the overall pixel_score:
- jpeg_quality: A JPEG image with low
jpeg_qualityshows more compression artifacts, especially obvious when an image is upscaled, or zoomed in. jpeg_chroma: Indicates how many chroma pixels per pixel there are in a JPEG file, based on chroma subsampling. This score doesn't significantly impact the overall
pixel_scoresince 4:2:0 is often fine. Thejpeg_chromascore can be:- 1.0 for 4:4:4 chroma subsampling
- 0.5 for 4:2:2 chroma subsampling
- 0.25 for 4:2:0 chroma subsampling
focus: How blurry the whole image is. If an object in the image is in focus then the score is high. If nothing is in focus, the score is low.
noise: How much sensor (camera) noise there appears to be. Lower scores indicate more noise.
dct: A measure of DCT-like artifacts, for example, ringing. The
dctscore is low if the image has been JPEG-compressed. It's similar tojpeg_qualityexcept that it's still relevant even if the image's current format isn't a JPEG, or if a low-quality JPEG was re-saved as a high-quality JPEG.blockiness: A low
blockinessscore indicates noticeable blockiness from block-based compression.chroma_subsampling: A measure of whether the image looks like it has been chroma subsampled. This is similar to
jpeg_chromabut is valid for formats other than JPEG, so for example, a lossy WebP or a 4:2:0 JPEG saved again as PNG will still have a low score forchroma_subsampling. This score doesn't significantly impact the overallpixel_scoresince 4:2:0 is often fine.
The following scores contribute to the overall color_score:
contrast: Whether the image uses the full range from dark colors to bright colors. Dull images give low
contrastscores.exposure: The
exposurescore is low if the image is over- or under-exposed.saturation: A measure of how vivid the colors are. A low
saturationscore doesn't necessarily mean the quality is bad, as it could be artistically black and white, so this score doesn't significantly impact the overallcolor_score.lighting: Low
lightingscores may be due to a white balance issue or a color bias.
See How It's Done
Before we go any further, you should know that this functionality is currently in Beta, so you need to request to take part in the trial to activate it on your account.
After the feature is activated, you can request for the image to be analyzed by setting the quality_analysis parameter to true in your upload or explicit calls. Here’s how it’s done in an upload call:
You can also use an upload preset with the quality analysis setting enabled, as demonstrated in this CodePen example (the upload preset is called docs_quality_analysis). Try uploading any image below, and see its quality scores in the response:
See the Pen Return Extended Quality Analysis on Upload by Cloudinary (@Cloudinary) on CodePen.
If you request the analysis as part of an upload, the main scores are indexed, so you’ll also be able to search on quality_score, quality_analysis.pixel_score and quality_analysis.color_score when you later want to find images that meet a certain quality threshold.
For example, to find all images that have a pixel_score greater than 0.8, use the search API expression: quality_analysis.pixel_score>0.8. To have the quality scores returned in the result (in any search), set with_field to quality_analysis:
Room for Improvement
The great thing about Cloudinary is that it not only tells you when your images can be improved, but it can also automatically improve them for you!
Particularly good for user-generated content, the improve effect (e_improve in URLs) re-touches images using a fully automated image improvement filter for adjusting image colors, contrast and lighting.
Simply by adding the improve effect to the image’s URL, you’ll notice a big difference in visual quality, as well as in the scores:
 Original Image |  With e_improve |
"quality_analysis": { "jpeg_quality": 0.68, "jpeg_chroma": 0.25, "focus": 0.71, "noise": 1.0, "contrast": 0.83, "exposure": 1.0, "saturation": 1.0, "lighting": 0.98, "pixel_score": 0.5, "color_score": 0.9, "dct": 0.29, "blockiness": 0.84, "chroma_subsampling": 0.15, "resolution": 0.92 }, "quality_score": 0.68 | "quality_analysis": { "jpeg_quality": 0.76, "jpeg_chroma": 0.25, "focus": 1.0, "noise": 1.0, "contrast": 1.0, "exposure": 1.0, "saturation": 1.0, "lighting": 1.0, "pixel_score": 0.81, "color_score": 1.0, "dct": 0.68, "blockiness": 0.71, "chroma_subsampling": 0.16, "resolution": 0.92 }, "quality_score": 0.87 |
For this image, the improve effect has increased the color_score to 1.0 and boosted the pixel_score to 0.81 (note that the improved image was saved and re-uploaded to obtain the new scores).
If you look at the image size in bytes though, you’ll notice that’s also increased. The original image is 233 KB, but the improved one is 526 KB. You can reduce this by using another of Cloudinary’s features: automatic quality (q_auto in URLs). Automatic quality takes into account the trade-off between file size and quality. It gives you the smallest file size with the least impact to visual quality. Applying automatic quality in this case takes the size back down to 242 KB. Here's how the scores are affected:
 | "quality_analysis": { "jpeg_quality": 0.68, "jpeg_chroma": 0.25, "focus": 1.0, "noise": 1.0, "contrast": 1.0, "exposure": 1.0, "saturation": 1.0, "lighting": 1.0, "pixel_score": 0.74, "color_score": 1.0, "dct": 0.56, "blockiness": 0.72, "chroma_subsampling": 0.16, "resolution": 0.92 }, "quality_score": 0.84 |
The overall quality_score is slightly reduced, due to the added compression, however the color_score remains at 1.0.
There are other, more specific improvements you could make to your images too. For example, you can adjust the contrast, color bias or sharpen your image. Check out our extensive range of effects and feel free to experiment!
Taking Action
Knowing the quality of your images up front can help you to automate your workflow. For example, you can combine quality analysis with the eval feature to run functions that:
- Tag poor quality images
- Sort images into different folders based on specific scores
- Request manual moderation for images that don't score highly enough in certain areas
- Apply an incoming transformation to improve the quality of your images, before they’re even stored in your DAM.
Here’s an example script that uses the CLI to upload all JPEGs in a folder, requesting quality_analysis, and, based on the scores, asks Cloudinary to do the following:
- If the
focusis less than 0.5:- Request manual moderation on the image
- Else if the
quality_scoreis less than 0.8:- Apply the transformation
e_improve/q_auto - Apply the tag
improved - Place the file in the folder
improved_quality
- Apply the transformation
- Otherwise:
- Apply the tag
perfect - Place the file in the folder
excellent_quality
- Apply the tag
#!/bin/bash

for image in *.jpg

do

cld upload "$image" quality_analysis=true -O eval 'if (resource_info.quality_analysis.focus < 0.5){upload_options["moderation"]="manual";}else if (resource_info.quality_score < 0.8){upload_options["transformation"]="e_improve/q_auto";upload_options["tags"]="improved";upload_options["folder"]="improved_quality";}else{upload_options["folder"]="excellent_quality";upload_options["tags"]="perfect";}'

done
Quality in Abundance
Cloudinary’s extended quality analysis feature gives you the means to focus on different quality aspects of your images without the need to look at each individually. You can process thousands of images, automatically ear-marking those that don’t live up to your quality requirements, then decide whether or not you can improve them, or reject them. You can even give your users a facility to improve their photos as they upload them. Quality analysis is just one of Cloudinary's image analysis features. Others include accessibility analysis, semantic data extraction and moderation. The abundant possibilities that Cloudinary offers means that, just like your brand, your website will always be top quality!


