Image formats, which are standards for digital images, can be uncompressed, compressed, raster based, or vector based. You determine the DNA of your images with the formats you adopt, each of which offering different capabilities. For example, rasters generate images with pixels; vectors, with vectors or proportional formulas. PNGs can display logos without background; JPEGs always come with backgrounds. This article explains the main properties of the various image formats, including their basic concepts and pros and cons.
By carefully selecting your image format, you can optimize performance, ensure compatibility with user devices, optimization for storage, compliance with delivery requirements, and optimum image quality.
This article covers the following topics:
- Raster Versus Vector
- Traditional Image Formats
- Scalable Vector Graphics (SVG): Pros and Cons
- Tagged Image File Format (TIFF): Pros and Cons
- Portable Network Graphics (PNG): Pros and Cons
- Graphics Interchange Format (GIF): Pros and Cons
- Progressive and Nonprogressive JPEGs
- Next-Generation Image Formats
- Other Next-Generation Image Formats
- Automated Image-Format Conversion with Cloudinary
- Additional Resources
Raster Versus Vector
Raster and vector are the two primary distinctions of image formats .
Raster Images
Rasters, which are collections of blocks or pixels that form an image, have defined resolutions, depending on the number of pixels. If Raster images are stretched beyond the dimensions supported by their resolution, they lose quality and clarity because of insufficient pixels to naturally fill the dimension.
Vector Images
Vector images are made of vectors or proportional formulas that define the display of colors or shades. Because the display of vector images is not based on predefined pixel counts, you can scale those images to any size with no loss in clarity and quality.
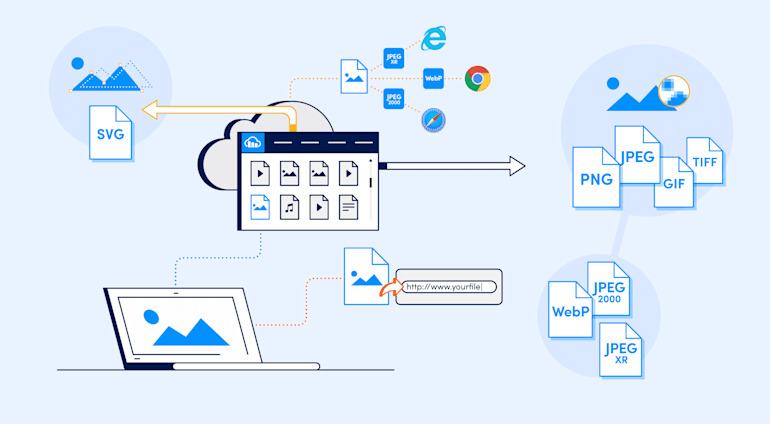
Traditional Image Formats
Even though image formats abound, those described in this article are the most common ones. The graphic below shows the formats in the raster and vector categories in order of popularity—formats that are typically widely supported or that offer capabilities not available in other formats.

Scalable Vector Graphics (SVG): Pros and Cons
XML-defined Scalable Vector Graphics (SVGs), which tend to be lightweight, support animation and interactivity, hence ideal for websites.
Pros
- Because SVGs are not size dependent, they can scale responsively and render equally well on all displays.
- Since SVGs are written in code, you can easily animate whole SVGs or parts of them.
- You can programmatically transform SVG images with JavaScript or CSS by editing their elements, classes, or tags.
- SVGs are compatible with popular editing tools, including Affinity, Sketch, and Photoshop.
Cons
- SVGs cannot recreate photo-quality details and do not translate 3D scenes or objects well.
- Older browsers often do not support SVGs.
- A steep learning curve is involved to interpret and modify SVG code.
Tagged Image File Format (TIFF): Pros and Cons
Tagged Image File Format (TIFF) images are rasters that are typically used to ensure compatibility between applications and internal file sharing. Apps that frequently leverage TIFF formats include those for desktop publishing and optical character recognition (OCR); also image editors, word processors, and scanners.
Pros
- You can store TIFFs and their metadata in a single file, such as compressed JPEG and PackBits images, as well as metadata for applied compression, data arrangement, and headers.
- You can render TIFFs with any color coding, such as RGB full, Cyan Magenta Yellow Black (CMYK), or grayscale.
- You can store TIFF files as lossless images, ideal for master copies or archives.
Cons
- TIFFs are large (typically 100 MB or more) and are generally not compressed.
- TIFFs’ large size makes it more challenging to store and upload or serve files, which translates to slow page loads.
- TIFF is not supported by any browser.
Portable Network Graphics (PNG): Pros and Cons
Portable Network Graphics (PNGs) are rasters with an open-source format, often replacing GIFs and JPEGs.
Pros
- PNGs enable lossless compression, preserving the quality and metadata no matter how many times you encode or decode them.
- Because PNGs support a wide color depth, i.e., 24-bit RGB, 32-bit RGBA, and grayscale palettes, the images are ideal for photographs. *Transparency works even in compressed PNGs.
Cons
- Due to their lossless compression, PNGs are larger than JPEGs.
- CMYK does not work in PNGs, making them not suitable for printing. However, unless you’re selling images for printing, feel free to display PNGs on websites.
Graphics Interchange Format (GIF): Pros and Cons
You can create still images or animations with Graphics Interchange Format (GIF) images. As a rule, you generate only short animations with GIFs since their still-image quality lags behind the other alternatives.
Pros
- GIF animations are smaller than those of other image formats. When deployed on websites, GIFs load fast and save bandwidth.
- GIFs support transparent backgrounds.
- GIFs’ lossless-compression feature prevents quality loss.
Cons
- GIFs only support a limited color palette (256 colors), which could produce an undesirable pixelated look for images and animations.
- You cannot edit coded GIF animation files. To incorporate changes, you must remake the entire image.
- GIF animations originate from multiple still images, rendering them individually. As a result, animations might look jerky or stilted. Also, poor Internet connections could cause stills to load slowly.
- GIF supports only binary transparency, hence no semitransparency or anti-aliasing around the edges between the opaque and transparent modes.
Progressive and Nonprogressive JPEGs
The Joint Photographic Experts Group (JPEG) format is probably the most well-known. JPEGs come in two types: progressive and nonprogressive (or normal). Nonprogressive JPEGs were developed first. When rendered, nonprogressive JPEGs load from top to bottom, meaning that, on slow connections, you see only part of the image until loading is complete.
Progressive JPEGs, the newer version, deliver a better user experience when rendered because they start by loading the whole image at a lower resolution. As loading proceeds, the image becomes sharper.
Pros of Progressive JPEGs
- Users are served full-image previews from the beginning.
- Progressive JPEGs tend to be smaller than nonprogressive ones due to more efficient compression.
Cons of Progressive JPEGs
- It could be difficult to tell when progressive JPEGs have finished loading. Users might attribute that to poor site quality because of the blurry images.
- Progressive JPEGs’ file-size benefits do not apply to small images, such as thumbnails. In those cases, progressive rendering isn’t worth the trouble.
- Progressive JPEGs take more memory and CPU resources to encode and decode since they must scan images multiple times.
For more details, see the article Progressive JPEGs and Green Martians.
Next-Generation Image Formats
The advent of image and web technologies have led to the development of new or next-generation formats, which typically deliver better quality and compression than the traditional ones, resulting in lower bandwidth requirements and faster loading. Examples are WebP and JPEG 2000.
Another major factor that influences the adoption of next-generation formats is Google’s preferential treatment of sites that use them. According to Google Lighthouse benchmarks, which is part of the search-ranking algorithm, sites with older-format images are assigned lower scores.
WebPs and Animated WebPs
WebP is a Google-created format that preserves image quality with a higher compression rate. Both lossy and lossless compressions work in WebPs, displaying well in most modern browsers.
Pros
- WebPs tend to be significantly smaller than the traditional formats of comparable quality—a benefit that applies to both lossless (compared to PNGs) and lossy (compared to JPEGs) files.
- WebPs support transparency, hence ideal for branding and logos.
Additionally, a few special traits of animated WebPs trump the capabilities of GIFs, as follows:
- Animated WebPs support more colors: 24-bit RGB with an 8-bit channel compared to 8-bit color with a 1-bit channel.
- You can combine compression types in a single animation, which makes it easier to create animations from videos.
- Animated WebP sizes are 19-64% smaller than that of GIFs.
Cons
- Decoding WebPs takes longer compared to other formats and is more CPU intensive.
- WebPs do not display in Internet Explorer, Safari, and older browsers.
- WordPress, one of the most popular site frameworks, does not natively support WebPs. You need a plugin to work with WebPs in WorldPress.
WebP animations lag behind GIFs, which are almost universally supported, but that’s by far not true for WebP. Adding WebP support to browsers requires additional libraries and decoders. That means more code in the browser and a greater risk of security attacks.
JPEG 2000
JPEG 2000 is an updated version of JPEG with enhanced techniques for lossless compression. You can adopt JPEG 2000 for both images and videos.
Pros
- JPEG 2000 supports progressive decoding for an improved user experience.
- Both lossy and lossless compressions work seamlessly in JPEG 2000 in a single code stream.
- Transparency is a JPEG 2000 feature.
Cons
- JPEG 2000s are not backward compatible with JPEG, which means that you need two different decoders for the images of both formats
- Encoding JPEG 2000s is CPU and memory intensive, making that format a poor choice for older or low-resource devices.
For more details, see the article The Great JPEG 2000 Debate: Analyzing the Pros and Cons to Widespread Adoption.
Other Next-Generation Image Formats
A few other formats are available and worth considering for your images.
AV1 Image File Format (AVIF)
The AV1 Image File Format (AVIF) is the image version of the popular video-file format AV1, an open-source format that serves as an alternative of the proprietary High Efficiency Video Coding (HEVC) format. Compatible with high-dynamic-range imaging (HDR), AVIF supports highly efficient lossy and lossless compressions, resulting in files that are up to 10 times smaller than JPEGs.
AVIF supports up to 10 bits of color depth and monochrome channels, viable for both images and videos. A downside is that AVIF is not widely supported. Currently, it works or will soon work on Chrome and Firefox browsers.
f_avif to your URL. If your URL already contains f_auto, you’re all set—no need for other edits. However, to leverage Cloudinary and AVIF with f_auto, contact Customer Support to enable it.JPEG XL
JPEG XL, a format in development, is targeted to deliver significantly higher compression efficiency over JPEG. Based on the Free Lossy Image Format (FUIF) and Pik format. JPEG XL aims at enabling files to be up to one third the size of traditional JPEGs.
JPEG XL is scheduled to become an international standard in 2021, after which lossless conversion of TIFFs, GIFs, PNGs, and JPEGs to JPEG XL will become a reality.
Automated Image-Format Conversion with Cloudinary
Cloudinary is a cloud-based service for managing images and videos that offers a generous free-forever subscription plan. With Cloudinary, you can upload images, apply built-in effects, filters, and transformations, and deliver the images to users. Among the transformations Cloudinary offers is automatic image-format conversion.
You can convert images to any image format and even automate the selection of the best format for each user with only one line of code in Cloudinary. To do that, either modify the image URL (once the image is hosted on Cloudinary) or leverage the platform’s convenient SDKs, which serve all popular programming languages.
Below we describe how to automate image conversion with Cloudinary. See the Cloudinary Cookbook for more details.
Automatic Format Selection
To simplify format selection, Cloudinary offers you a way in which you can automate image delivery in the best format to your users based on their device specifications. All you need to do is set the fetch_format parameter, defined as auto, which selects the appropriate format.
Once the format is set, Cloudinary delivers images as follows:
- Chrome users receive WebPs.
- IE users receive JPEG XRs.
- Safari users receive JPEG 2000s.
- For images with unsupported formats, Cloudinary delivers the format as denoted by the file extension.
For example, the URL below delivers the preferred next-generation format according to the browser. If that format does not display in the browser, Cloudinary delivers a PNG image.

Image Conversion
Cloudinary also offers ways for converting the format of your images through the format parameter or with a tweak of the image’s file extension—either dynamically or during upload. Currently, Cloudinary supports all standard formats and the next-generation formats WebP, JPEG XR, and Windows Media Photo (WDP).
For example, the following URL delivers an image in its original format, which is JPEG:

To replace the format with the file-extension approach, edit the URL to the one below. Cloudinary then uploads the image as a GIF.

You can combine altered formats with other transformations. For example, to create transparency for sidebar images, edit the URL to read like this:

You can also control your image's quality in combination with other changes through the quality (q in URLs) parameter, as in this example:

When f_auto is used together with automatic quality (q_auto), the PNG format may be selected when the automatic quality algorithm decides that it better fits the specific image. This allows delivering better looking and economical image files.
Additional Resources
The Cloudinary site contains many informative articles on image formats. Below are a few examples.
The Great JPEG 2000 Debate: Analyzing the Pros and Cons to Widespread Adoption
The many image formats available can obliviate less popular ones. Hence, formats that are not well supported or that offer no significant advantages over others are seldom adopted.
Even though JPEG is not top ranked, it remains viable. The article The Great JPEG 2000 Debate: Analyzing the Pros and Cons to Widespread Adoption describes the JPEG 2000 format, its features, limitations, and differences from other formats.
Progressive JPEGs and Green Martians
When loading images, you want to balance between quality and performance. With progressive decoding techniques, you can ensure that users aren’t stuck waiting for images that are only half visible.
The article Progressive JPEGs and Green Martians recounts the capabilities of progressive JPEGs, the advantages and disadvantages of progressive decoding, and the procedure for optimizing decoding.
Animated WebP: How to Convert Animated GIF to WebP and Save up to 90% Bandwidth
Short, animated GIF images are becoming a standard for catching attention and spiffing up websites. Nonetheless, the format has disadvantages, and many site owners are considering a switch to WebP.
The article Animated WebP: How to Convert Animated GIF to WebP and Save up to 90% Bandwidth shows you how to convert GIFs to WebPs, resize and crop GIFs, and deliver animated WebPs through automation.
JPEG Image Optimization Without Compromising Quality With JPEGmini and Cloudinary
JPEGmini is an online service that downsizes JPEGs with no quality loss. With both Cloudinary and JPEGmini, you can optimize images and boost site performance.
The article JPEG Image Optimization Without Compromising Quality With JPEGmini and Cloudinary describes how to optimize JPEGs, perform complex image transformations, and secure URLs.
Verification of WebP Browser Support for Dynamically Delivering Images
WebP offers significant advantages over traditional formats. Cloudinary enables you to serve that format whenever feasible.
The article Check for WebP Browser Support to Dynamically Deliver Images elaborates on WebP’s benefits, the tradeoffs of size and quality, the procedures for checking for browser support, for adopting WebP for semitransparent and lossless images, and for dynamically generating WebP images.
The WebP Image Format for Android on Websites Or Native Apps
Google-developed WebP, an obvious choice for Android sites or apps, has a smaller file size. WebP images load fast without sacrificing quality.
The article Adopting the WebP Image Format for Android on Websites Or Native Apps talks about the benefits of WebP for Android and steps you through the process of using WebP in mobile apps and converting and transforming WebP images with Cloudinary.
Optimization of Animated GIFs With Lossy Compression
Even though WebP is replacing GIF on many sites, GIF is compatible with all browsers whereas WebP is not.
The article Optimizing Animated GIFs With Lossy Compression shows you how to optimize GIFs to make their performance comparable to WebPs’ and to apply lossy compression. Also described are the caveats of converting GIFs to WebPs and Cloudinary’s options for transforming GIFs.
Guides on Performance Testing
We have authored in-depth guides on three topics that relate to performance testing.
Image Optimization
Images and videos take up most of the page-load time on most websites. To make your website load faster and improve user experience and engagement, be sure to reduce the file size of images without hurting quality.
See these top articles in our Image Optimization Guide:
- PHP Image Compression, Resize, and Optimization
- Python Image Optimization and Transformation
- CDN for Images - Optimize and Deliver Images Faster
Video Optimization
Learn how to optimize video content for higher performance and improved user experience, by using the latest compression and streaming technology, and automatically adjusting videos to user requirements.
See top articles in our Video Optimization Guide:
- Tips for Retaining Audience Through Engaging Videos
- Product Videos 101: What Makes Them Great?
- Automated Generation of Intelligent Video Previews on Cloudinary’s Dynamic Video Platform
Web Performance
Learn how to build websites and web applications with rich content including videos and images, which also perform well and satisfy users.
Web Performance: Trends and Insights from 4 Top Performance Experts


