Many of you who work with the Cloudinary platform have a media-associated workflow for moderation of images, dispatch of notifications with certain data or headers, implementation of activities through add-ons, etc. For most of those cases, Cloudinary would suggest that you take advantage of our webhook notifications and build the workflow with an infrastructure like AWS Lambda. This post describes how to do that with Cloudinary’s MediaFlows a beta product that helps tackle management and operational tasks related to visual media.

What exactly is MediaFlows, you wonder? Here's the official description:
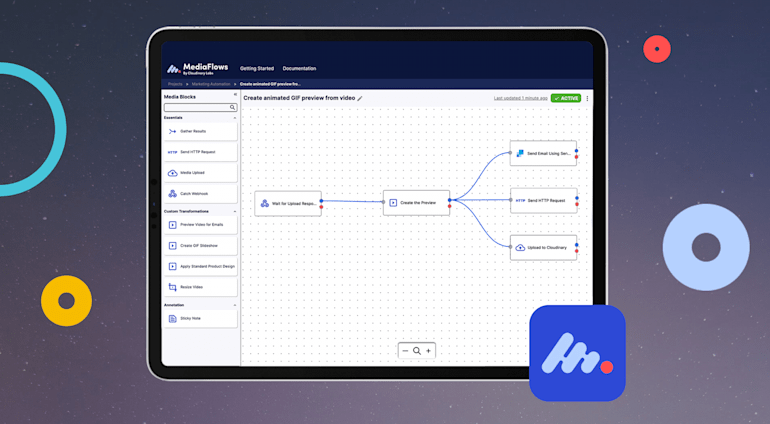
MediaFlows connects Cloudinary’s APIs and services with a visual interface. Developers and marketers can design, deploy, and automate custom media applications and processes in minutes, not days.
Based on drag-and-drop, MediaFlows automates the process of receiving notifications and acting on the changes to your media resources on Cloudinary. The simple use case below typifies a MediaFlows process:
- You upload images to Cloudinary.
- You move the images to a designated folder with a preset, which also enables manual moderation.
- The moderators review the images and approve or reject the media.
- Cloudinary automatically moves the approved images to a folder called Approved.
Below is a tutorial that shows you how to create workflows with Cloudinary’s MediaFlows.
Step 1: Upload Images to Cloudinary

First, ensure that uploaded images to Cloudinary land in a certain folder, marked for moderation. Do the following:
- Create an upload preset in which to specify a folder called
toBeModeratedas the target. - Set up this parameter:
Auto Moderation: manual. - Name the preset
moderate.

You can browse the settings of the preset with the Admin API.
 $ cld admin upload_preset moderate

{
  "name": "moderate",
  "unsigned": false,
  "settings": {
    "overwrite": true,
    "use_filename": true,
    "unique_filename": false,
    "type": "upload",
    "moderation": "manual",
    "folder": "toBeModerated"
  }
}
Step 2: Create the MediaFlow
Now create a MediaFlows account and link it to your Cloudinary account, as follows.
Sign Up With MediaFlows
- Go to
mediaflows.cloudinary.com/, click the Sign In button, and create a new account with Gmail or GitHub. (For now, those are the only ways for setting up MediaFlows accounts.) - Create a project called Moderation.
- Click Connect with Cloudinary to map the MediaFlow account to one on Cloudinary. When prompted, log in to Cloudinary.

Build Your Workflow
You can now use MediaFlows to build a workflow. Follow these two steps:

Set Up Notifications
At the outset, create a basic flow by clicking Start from basic.

A dialog box titled Catch Webhook is displayed, denoting that you will be notified of changes in your Cloudinary account. For details, double-click the dialog box. Note down the URL for a later step.
Check for Approval and Move the Image
This step is the core of the MediaFlows setup: You’ll verify if the notification is for an image that has been approved and, if so, have MediaFlows move the image to a folder you specify.
The notification on an approval reads like this:
{
  "asset_id": "9f377ced45037da942fbd1883c27b98d",
  "moderation_status": "approved",
  "url": "http://res.cloudinary.com/dbmataac4/image/upload/v1633466870/toBeModerated/aaa4.jpg",
  "version": 1633466870,
  "moderation_updated_at": "2021-10-05T20:47:55Z",
  "etag": "982dc96b643b044c55a1d8be8c2d0e29",
  "moderation_kind": "manual",
  "secure_url": "https://res.cloudinary.com/dbmataac4/image/upload/v1633466870/toBeModerated/aaa4.jpg",
  "public_id": "toBeModerated/aaa4",
  "notification_type": "moderation",
  "uploaded_at": "2021-10-05T20:47:50Z"
}
The important fields for approval are—
public_id, which identifies the asset for moving. Additionally, you can pinpoint the asset with this ID in the folder and check the asset’s details.notification_type, which bears the valuemoderationin this context.moderation_status, which bears the valueapprovedin this context.
Suppose you want the workflow to proceed with these two tasks:
- Move the to-be-approved images to a folder named
toBeModerated. - Move the approved images to a folder named
Approved.
To add the logic, do the following:
Add a new block called MediaFlows Function and join Catch Webhook to it, as illustrated in this diagram:

Double-click the MediaFlows block, in which is a text field for JavaScript code. Click the
{}button on the bottom left for an option for selecting the dynamic value and passing along the entire JSON format from the previous step. This video shows the process:
Here, the webhook block is passing the information as {{event.data[event.mf.previous_node_id]}} with these specifics:
{{event.data[event.mf.previous_node_id].notification_type}}: the notification type.{{event.data[event.mf.previous_node_id].moderation_status}}: the notification status.{{event.data[event.mf.previous_node_id].public_id}}: the public ID of the object, i.e., the image, video, or RAW file.
Now write the logic (see below) in the code template as shown. The code performs three steps:
- Check if the notification is for an approval.
- Extract the path if the to-be-moderated image is in the folder.
- Move the image, assuming that it’s been approved, to the
Approvedfolder.
module.exports = function (event, cloudinary, callback) {
  // Get the notification type and status.
  const notificationType = {{event.data[event.mf.previous_node_id].notification_type}}
  const notificationStatus = {{event.data[event.mf.previous_node_id].moderation_status}}

  // If the asset is in moderation and approved, proceed.
  if (notificationType === 'moderation' && notificationStatus === 'approved') {
    // Get the current public ID.
    const fromId = {{event.data[event.mf.previous_node_id].public_id}}
    // Build a new public ID.
    const pathComponents = fromId.split('/')
    if (pathComponents.length === 2 && pathComponents[0] === 'toBeModerated') {
      const toId = pathComponents[0] + '/' + 'approved' + '/' + pathComponents[1]
      // Issue the rename command.
      cloudinary.v2.uploader.rename(fromId, toId, {
        type: 'upload',
        resource_type: 'image'
      })
        .then(res => {
          // Pass along the status for the next step.
          callback(null, { remame: { status: 'success' } })
        })
        .catch(err => {
          JSON.stringify(err)
        })
    }
  }
}
cloudinary object. When you first link your Cloudinary account, this information is collected by MediaFlows and made available as part of the cloudinary object. Hence, you can build your code like you would with the Node.js SDK.Send a Confirmation (Optional)
Finally, if you desire, send a message to your systems after an image has been renamed. For example, you can update your database to show that an image has been moderated or monitor the status though your logging and reporting platform. To do so, add a Send HTTP Request element and connect it to the MediaFlows Function element. Double-click the object and specify the values of these two parameters:
Request Method:GETorPOST.Request URL: Your notification endpoint. For this tutorial, enter the freewebhook.siteURL.
Watch this video for the steps:
Step 3: Link MediFlows to Your Cloudinary Account
As a final touch, enable your Cloudinary account to send notifications to the MediaFlows endpoint, as shown here:

Recall that you received the notification URL after completing the step Set Up Notifications above. Copy that URL., which in this tutorial is https://hooks.mediaflows.cloudinary.com/v1/********, and do the following:
- Click the Settings icon in your Cloudinary account and then the Upload tab near the top.
- Fill in the text field Notification URL with the URL from MediaFlows.

Test
Finally, test the integration. Follow the steps in the video below.
The Many MediaFlows Capabilities
With MediaFlows, you can customize workflows, sequence operations like image moderation, removal of background, and maybe extraction of tests from images. All those complex tasks can be accomplished only through orchestration with AWS Lambda or other external systems. This chart summarizes the workflow you just created:

MediaFlows seamlessly brings this infrastructure closer to you with only minimal coding on your part and no maintenance. What's more, you can share with the Cloudinary community your workflows so that others can leverage and learn from your handiwork.
I look forward to seeing cool, automated creations from you that capitalize on MediaFlows.


