Resizing images with JavaScript (JS) creates nifty effects, many of which you cannot do in Cascading Style Sheets (CSS). However, even though you can automate a zoom effect with JS to enable users to zoom in and out of images, limitations abound.
This article shows you how to resize images in JavaScript for a zoom effect and do the same much faster and more effectively in Cloudinary, with which you can also apply many other appealing effects. Examples are scaling with percentage values and scaling widths of up to 140 percent of the original. Be assured that you’ll be impressed.
Here are the topics:
- Resizing images for a zoom effort with JS
- Automating resizing with JS during image uploads
- Resizing and rescaling images effectively and speedily with Cloudinary
- Learning more about Cloudinary
- Checking out the details of CSS image transformations
Resizing Images for a Zoom Effect With JS
Resizing images with JS is particularly useful for creating online product galleries, in which users can zoom in or out of images according to the maximum settings you specify with only one click.
The resizing task takes two functions, which you can either insert directly into your HTML source with <script> tags or into a standalone JS file. Those functions work for any <img> tag that you label with the ID zoom_img. See this full demo of the code.
The two functions are as follows:
zoomin(), which creates a zoom-in action for scaling up the image size by 100 pixels until the maximum defined size (1000 px.) is reached.zoomout(), which creates a zoom-out action for scaling down the image by 100 pixels until the minimum defined size (50 px.) is reached.
To enable users to call those functions, create an interface (see below) with buttons for the image. Add them above or below the image element in your HTML file.
<button type="button" onclick="zoomin()"><img src="/examples/images/zoom-in.png"> Zoom In</button>

<button type="button" onclick="zoomout()"><img src="/examples/images/zoom-out.png"> Zoom Out</button>
For more details on resizing images with CSS, see Image Resizing: Manually With CSS and Automatically With Cloudinary.
Automating Resizing With JS During Image Uploads
Automating the resizing task is ideal for enabling users to resize images in JavaScript or for resizing them with a built-in mechanism before being stored away. An example of the code in this section is on CodePen.
To start, build the HTML framework into which to load, preview, and transform your images. The following code creates an input to accept images, a button to enable resizing, and two placeholders for your original and resized images.
<input id="imageFile" name="imageFile" type="file" class="imageFile" accept="image/*"/>
<input type="button" value="Resize Image"
onclick="resizeImage()"/>
<br/>
<img src="" id="preview">
<img src="" id="output">
Next, create a function to accept the images:
$(document).ready(function() {
  $("#imageFile").change(function(event) {
    var files = event.target.files;
    var file = files[0];

    if (file) {
      var reader = new FileReader();
      reader.onload = function(e) {
        document.getElementById("preview").src = e.target.result;
      };
      reader.readAsDataURL(file);
    }
  });
});
Finally, create a resizing function (see below) within which to load the image into the file reader, set the image to be resized, create a canvas for resizing, and output the resized image. Note the boldfaced comments for each of the steps.
function resizeImage() {
 var filesToUploads = document.getElementById("imageFile").files;
  var file = filesToUploads[0];
    if (file) {
      var reader = new FileReader();

// Set the image for the FileReader
      reader.onload = function (e) {
        var img = document.createElement("img");
        img.src = e.target.result;

// Create your canvas
        var canvas = document.createElement("canvas");
        var ctx = canvas.getContext("2d");
        ctx.drawImage(img, 0, 0);

        var MAX_WIDTH = 500;
        var MAX_HEIGHT = 500;
        var width = img.width;
        var height = img.height;

// Add the resizing logic
        if (width > height) {
          if (width > MAX_WIDTH) {
            height *= MAX_WIDTH / width;
            width = MAX_WIDTH;
          }
        } else {
          if (height > MAX_HEIGHT) {
            width *= MAX_HEIGHT / height;
            height = MAX_HEIGHT;
          }
        }

//Specify the resizing result
        canvas.width = width;
        canvas.height = height;
        var ctx = canvas.getContext("2d");
        ctx.drawImage(img, 0, 0, width, height);

        dataurl = canvas.toDataURL(file.type);
        document.getElementById("output").src = dataurl;
      };
      reader.readAsDataURL(file);
    }
  }
Resizing and Rescaling Images Effectively and Speedily With Cloudinary
A cloud-based service for managing images and videos, Cloudinary offers a generous free-forever subscription plan. While on that platform, you can upload your images, apply built-in effects, filters, and modifications, including automated image rotations that are difficult or impossible to produce with CSS and JS.
Also with Cloudinary, you can easily transform images programmatically with SDKs or URL parameters. Cloudinary applies changes dynamically, leaving your original images intact. That means you can modify images on the fly as your site design evolves and as you support more devices and screen sizes—a huge convenience and time saver.
Below are three faster and easier ways in which to resize images in JavaScript with Cloudinary. All you need to do is add parameters to the URL.
Automating Smart Cropping
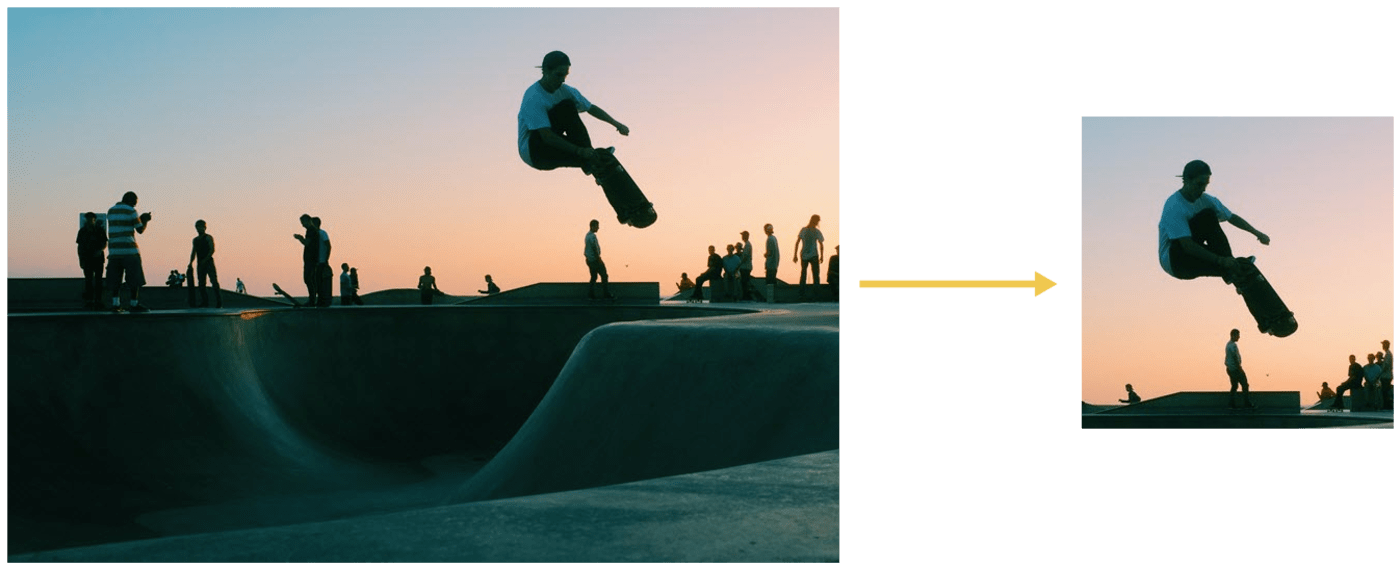
With Cloudinary, you can automatically crop images to the right size through content-aware AI. During the process, you can automatically select faces, individual features, or areas of interest by applying the gravity filter (g).
The g_auto settings in this example automatically crop the most interesting area, as determined by AI:

cloudinary.imageTag('veducate/skater_2_-_800.jpg', {width: 300, height: 300, gravity: "auto", crop: "crop"}).toHtml();
You can also specify areas to preserve with smart cropping. A use case is to ensure that the model doesn’t take center stage in product images. This example specifies the backpack as the area of focus:
 g_auto:classic
 g_auto:backpack
cloudinary.imageTag('veducate/spencer-backman-482079-unsplash.jpg', {width: 175, height: 175, gravity: "auto:backpack", crop: "thumb"}).toHtml();
Creating Photo Collages
Photo collages are fun. By combining the overlay (o) and crop (c) parameters, you can collect images in any order and embellish them with text or filters.
The example below adds images to the collage with the desired size (w and h attributes), position (x and y attributes), crop mode (c attribute), and angle of rotation (`av attribute).
cl_image_tag("yellow_tulip.jpg", :transformation=>[
  {:width=>220, :height=>140, :crop=>"fill"},
  {:overlay=>"brown_sheep", :width=>220, :height=>140, :x=>220, :crop=>"fill"},
  {:overlay=>"horses", :width=>220, :height=>140, :y=>140, :x=>-110, :crop=>"fill"},
  {:overlay=>"white_chicken", :width=>220, :height=>140, :y=>70, :x=>110, :crop=>"fill"},
  {:overlay=>"butterfly.png", :height=>200, :x=>-10, :angle=>10}
  ])
cl_image_tag("yellow_tulip.jpg", array("transformation"=>array(
  array("width"=>220, "height"=>140, "crop"=>"fill"),
  array("overlay"=>"brown_sheep", "width"=>220, "height"=>140, "x"=>220, "crop"=>"fill"),
  array("overlay"=>"horses", "width"=>220, "height"=>140, "y"=>140, "x"=>-110, "crop"=>"fill"),
  array("overlay"=>"white_chicken", "width"=>220, "height"=>140, "y"=>70, "x"=>110, "crop"=>"fill"),
  array("overlay"=>"butterfly.png", "height"=>200, "x"=>-10, "angle"=>10)
  )))
(new ImageTag('yellow_tulip.jpg'))
  ->resize(Resize::fill()->width(220)->height(140))
  ->overlay(
      Overlay::source(Source::image('brown_sheep')
        ->transformation((new ImageTransformation())
          ->resize(Resize::fill()->width(220)->height(140))))
      ->position((new Position())
        ->offsetX(220)))
    ->overlay(
        Overlay::source(Source::image('horses')
          ->transformation((new ImageTransformation())
            ->resize(Resize::fill()->width(220)->height(140))))
        ->position((new Position())
          ->offsetX(-110)->offsetY(140)))
          ->overlay(
              Overlay::source(Source::image('white_chicken')
                ->transformation((new ImageTransformation())
                  ->resize(Resize::fill()->width(220)->height(140))))
              ->position((new Position())
                ->offsetX(110)->offsetY(70)))
            ->overlay(
                Overlay::source(Source::image('butterfly')
                  ->format(Format::png())
                  ->transformation((new ImageTransformation())
                    ->rotate(Rotate::byAngle(10))
                    ->resize(Resize::scale()->height(200))))
                ->position((new Position())
                  ->offsetX(-10)


            ));
CloudinaryImage("yellow_tulip.jpg").image(transformation=[
  {'width': 220, 'height': 140, 'crop': "fill"},
  {'overlay': "brown_sheep", 'width': 220, 'height': 140, 'x': 220, 'crop': "fill"},
  {'overlay': "horses", 'width': 220, 'height': 140, 'y': 140, 'x': -110, 'crop': "fill"},
  {'overlay': "white_chicken", 'width': 220, 'height': 140, 'y': 70, 'x': 110, 'crop': "fill"},
  {'overlay': "butterfly.png", 'height': 200, 'x': -10, 'angle': 10}
  ])
cloudinary.image("yellow_tulip.jpg", {transformation: [
  {width: 220, height: 140, crop: "fill"},
  {overlay: "brown_sheep", width: 220, height: 140, x: 220, crop: "fill"},
  {overlay: "horses", width: 220, height: 140, y: 140, x: -110, crop: "fill"},
  {overlay: "white_chicken", width: 220, height: 140, y: 70, x: 110, crop: "fill"},
  {overlay: "butterfly.png", height: 200, x: -10, angle: 10}
  ]})
cloudinary.url().transformation(new Transformation()
  .width(220).height(140).crop("fill").chain()
  .overlay(new Layer().publicId("brown_sheep")).width(220).height(140).x(220).crop("fill").chain()
  .overlay(new Layer().publicId("horses")).width(220).height(140).y(140).x(-110).crop("fill").chain()
  .overlay(new Layer().publicId("white_chicken")).width(220).height(140).y(70).x(110).crop("fill").chain()
  .overlay(new Layer().publicId("butterfly.png")).height(200).x(-10).angle(10)).imageTag("yellow_tulip.jpg");
cloudinary.imageTag('yellow_tulip.jpg', {transformation: [
  {width: 220, height: 140, crop: "fill"},
  {overlay: new cloudinary.Layer().publicId("brown_sheep"), width: 220, height: 140, x: 220, crop: "fill"},
  {overlay: new cloudinary.Layer().publicId("horses"), width: 220, height: 140, y: 140, x: -110, crop: "fill"},
  {overlay: new cloudinary.Layer().publicId("white_chicken"), width: 220, height: 140, y: 70, x: 110, crop: "fill"},
  {overlay: new cloudinary.Layer().publicId("butterfly.png"), height: 200, x: -10, angle: 10}
  ]}).toHtml();
$.cloudinary.image("yellow_tulip.jpg", {transformation: [
  {width: 220, height: 140, crop: "fill"},
  {overlay: new cloudinary.Layer().publicId("brown_sheep"), width: 220, height: 140, x: 220, crop: "fill"},
  {overlay: new cloudinary.Layer().publicId("horses"), width: 220, height: 140, y: 140, x: -110, crop: "fill"},
  {overlay: new cloudinary.Layer().publicId("white_chicken"), width: 220, height: 140, y: 70, x: 110, crop: "fill"},
  {overlay: new cloudinary.Layer().publicId("butterfly.png"), height: 200, x: -10, angle: 10}
  ]})
<Image publicId="yellow_tulip.jpg" >
  <Transformation width="220" height="140" crop="fill" />
  <Transformation overlay="brown_sheep" width="220" height="140" x="220" crop="fill" />
  <Transformation overlay="horses" width="220" height="140" y="140" x="-110" crop="fill" />
  <Transformation overlay="white_chicken" width="220" height="140" y="70" x="110" crop="fill" />
  <Transformation overlay="butterfly.png" height="200" x="-10" angle="10" />
</Image>
<cld-image publicId="yellow_tulip.jpg" >
  <cld-transformation width="220" height="140" crop="fill" />
  <cld-transformation :overlay="brown_sheep" width="220" height="140" x="220" crop="fill" />
  <cld-transformation :overlay="horses" width="220" height="140" y="140" x="-110" crop="fill" />
  <cld-transformation :overlay="white_chicken" width="220" height="140" y="70" x="110" crop="fill" />
  <cld-transformation :overlay="butterfly.png" height="200" x="-10" angle="10" />
</cld-image>
<cl-image public-id="yellow_tulip.jpg" >
  <cl-transformation width="220" height="140" crop="fill">
  </cl-transformation>
  <cl-transformation overlay="brown_sheep" width="220" height="140" x="220" crop="fill">
  </cl-transformation>
  <cl-transformation overlay="horses" width="220" height="140" y="140" x="-110" crop="fill">
  </cl-transformation>
  <cl-transformation overlay="white_chicken" width="220" height="140" y="70" x="110" crop="fill">
  </cl-transformation>
  <cl-transformation overlay="butterfly.png" height="200" x="-10" angle="10">
  </cl-transformation>
</cl-image>
cloudinary.Api.UrlImgUp.Transform(new Transformation()
  .Width(220).Height(140).Crop("fill").Chain()
  .Overlay(new Layer().PublicId("brown_sheep")).Width(220).Height(140).X(220).Crop("fill").Chain()
  .Overlay(new Layer().PublicId("horses")).Width(220).Height(140).Y(140).X(-110).Crop("fill").Chain()
  .Overlay(new Layer().PublicId("white_chicken")).Width(220).Height(140).Y(70).X(110).Crop("fill").Chain()
  .Overlay(new Layer().PublicId("butterfly.png")).Height(200).X(-10).Angle(10)).BuildImageTag("yellow_tulip.jpg")
MediaManager.get().url().transformation(new Transformation()
  .width(220).height(140).crop("fill").chain()
  .overlay(new Layer().publicId("brown_sheep")).width(220).height(140).x(220).crop("fill").chain()
  .overlay(new Layer().publicId("horses")).width(220).height(140).y(140).x(-110).crop("fill").chain()
  .overlay(new Layer().publicId("white_chicken")).width(220).height(140).y(70).x(110).crop("fill").chain()
  .overlay(new Layer().publicId("butterfly.png")).height(200).x(-10).angle(10)).generate("yellow_tulip.jpg");
imageView.cldSetImage(cloudinary.createUrl().setTransformation(CLDTransformation()
  .setWidth(220).setHeight(140).setCrop("fill").chain()
  .setOverlay("brown_sheep").setWidth(220).setHeight(140).setX(220).setCrop("fill").chain()
  .setOverlay("horses").setWidth(220).setHeight(140).setY(140).setX(-110).setCrop("fill").chain()
  .setOverlay("white_chicken").setWidth(220).setHeight(140).setY(70).setX(110).setCrop("fill").chain()
  .setOverlay("butterfly.png").setHeight(200).setX(-10).setAngle(10)).generate("yellow_tulip.jpg")!, cloudinary: cloudinary)

cloudinary.imageTag('yellow_tulip.jpg', {transformation: [
  {width: 220, height: 140, crop: "fill"},
  {overlay: new cloudinary.Layer().publicId("brown_sheep"), width: 220, height: 140, crop: "fill", x: 220},
  {overlay: new cloudinary.Layer().publicId("horses"), width: 220, height: 140, crop: "fill", y: 140, x: -110},
  {overlay: new cloudinary.Layer().publicId("white_chicken"), width: 220, height: 140, crop: "fill", y: 70, x: 110},
  {overlay: new cloudinary.Layer().publicId("butterfly"), height: 200, x: -10, angle: 10}
  ]}).toHtml();
Cropping With Custom Shapes
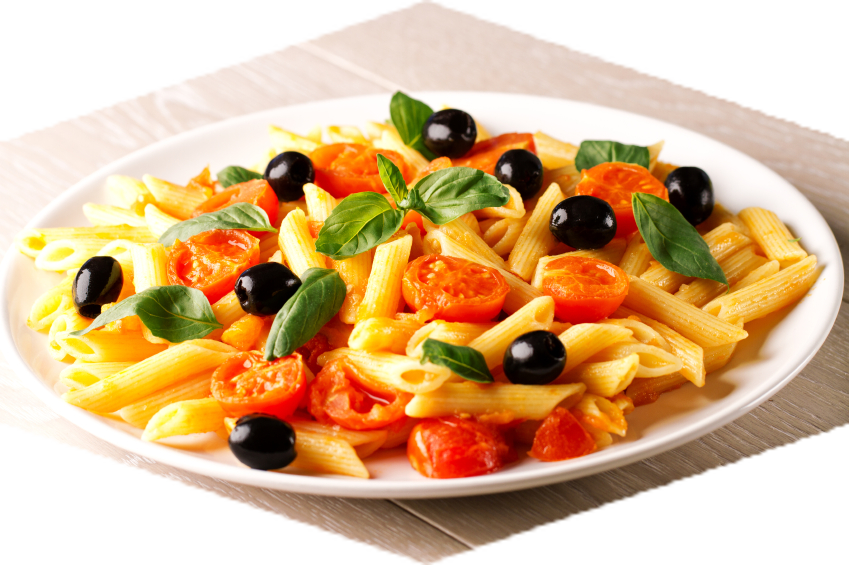
By cropping images into custom shapes, you can fit them in any space. Simply apply the overlay parameter as a mask and the flag (f in the URL) parameter.
To set things up, specify the final image size, define the mask and the related function, and specify the source image, like this:

cloudinary.imageTag('pasta.png', {transformation: [
  {width: 173, height: "200", crop: “fill”},
  {overlay: new cloudinary.Layer().publicId("hexagon_sample"), flags: “cutter”},
  ]}).toHtml();
Adding the relative parameter matches the mask to the proportions you desire, as in this example:

cloudinary.imageTag('pasta.png', {transformation: [
  {overlay: new cloudinary.Layer().publicId("hexagon_sample"), flags: “cutter:relative”, width: 1.0, height: 1.0}
  ]}).toHtml();
Learning More About Cloudinary
Besides the capability for image resizing, Cloudinary offers a multitude of robust tools for web developers, including the following:
- Automated image uploads. You can upload images at scale anywhere from a browser, mobile app, or application back-end directly to the cloud.
- Generous image storage. Cloudinary accords you up to 25 GB free managed, secure, and cloud-based storage space with multiregion backup, revision history, and disaster recovery.
- Seamless asset management. You can efficiently manage your image library on Cloudinary by performing tasks like searching, organizing, and tagging files; controlling access; and monitoring usage and performance.
- Effective image transformation. You can transform, enhance, transcode, crop, scale, and enhance images with a URL-based API or with SDKs that support all popular programming languages.
- Automated image optimization. Cloudinary automatically selects the optimal quality and encoding settings for images, adapts the settings to any resolution or pixel density, and scales or crops images to focus on the important regions.
- Responsive images. Cloudinary automatically scales images in an art-directed manner, cropping them to fit different resolutions and viewports.
- Reliable and fast image delivery. Cloudinary delivers images through Content Delivery Networks (CDNs)—Akamai, Fastly, and CloudFront—with no integration or management on your part.
Do give Cloudinary a try. To start, sign up for a free account.
Checking Out the Details of CSS Image Transformations
Want to learn more about CSS image transformations? These articles are an excellent resource:
- Working With CSS Images
- CSS Image Overlay: Overlaying Text and Images for Visual Effect
- Image Resizing: Manually With CSS and Automatically With Cloudinary
- CSS Image Effects: Five Simple Examples and a Quick Animation Guide
- Creating Image-Filter Effects With CSS and Riveting Transformations
- Rotating Images in JavaScript: Three Quick Tutorials
- Cool Tricks for Resizing Images in JavaScript


