The advent of web development since 25 years ago has given birth to an abundance of online services that help developers build apps efficiently and smoothly. Gravatar is a shining example of such a service. Built by WordPress, Gravatar generates globally recognized avatars. Fun fact: 80 percent of Gravatar users first came across that service when reading a WordPress blog.
This is how it works: after uploading an image and creating your public profile on Gravatar, next time you log in to a Gravatar-enabled site or platform, that image and profile will automatically follow you there through Gravatar’s association of your email address with a hash and an avatar.
This post describes how to build a replica of Gravatar with more image-oriented features. You’ll likely find it eye opening and fun.
Gravatar Features
Gravatar creates URLs according to the hashed value of email addresses, after which user avatars become accessible in the syntax https://www.gravatar.com/avatar/<hash>, e.g.:
https://www.gravatar.com/avatar/205e460b479e2e5b48aec07710c08d50
Here’s one wrapped in an <img> tag:
You can specify the size for the image by adding the s parameter, e.g.:
https://www.gravatar.com/avatar/205e460b479e2e5b48aec07710c08d50?s=200
Absent the s parameter in the URL, Gravatar returns an 80x80 image by default.
You as developers can do the following with Gravatar:
- Display a default image if the hash is invalid or if the user has no avatar attached to his or her email address.
- Display a
404error message if no image is attached to the hash. - Display a simple, cartoon-style silhouette by adding
d=mpto the URL. - Return a generated robot with various colors and faces by adding
_d=robohashto the URL. - Combine query parameters.
- Add the
r=orrating=parameter to the URL so that your users can denote whether their images are appropriate for certain audiences. Below are your value choices. Specify one to request images up to and including that rating.g:Contains no offensive content, hence suitable for all audiences.pg:Might contain rude gestures, provocatively dressed individuals, the lesser swear words, or mild violence.r:Might contain harsh profanity, intense violence, nudity, or hard-drug use.x:Might contain hard-core sexual imagery or extremely disturbing violence.
Clavatar: Your Own Enhanced Gravatar Service
Let’s call the enhanced Gravator service Clavatar, with which you can do the following:
- Return a 100x100 image by default if the hash is invalid or if the user has no avatar attached to his or her email address.
- Request for one of the following versions of an image by adding the related parameter to the URL:
- Any size with the size (
s) parameter, e.g.,s=400orsize=400. - A cartoonized version with
d=cp. - A black-and white version with
d=bw. - An artistic version with
d=hk. - A compressed and optimized version with
q=auto. - The best format with
f=auto. This version ensures the most suitable format for whichever browser is delivering the image. - A rounded-corners version (like the thumbnail on all platforms) with
rc=y. - A color-bordered version with
b=<color>, e.g.,b=red.
- Any size with the size (
- Rotate the image with
r=<angle>, e.g.,r=40. The angle’s value must be between 1 and 100.
Development Process
The development process for Clavatar comprises three major steps.
Set Up a Lumen Project
Install Composer and PHP on your development or production machine and then run this command:
Go to the
clavatardirectory and rename theenv.examplefile to.env.Run the project with the command
php -S localhost:8000 -t public.
Your Lumen project is now up and running.
Set Up the Mechanics for Database Access, Facades, and User Registration
1. Create a database called clavatar in your local MySQL server.
2. Uncomment these two lines in the bootstrap/app.php file to make available the Laravel Eloquent Object Relation Mapping (ORM) and Laravel facades for building the Clavatar capabilities:
// $app->withFacades();
// $app->withEloquent();
3. Create a user migration file with this command line:
php artisan make:migration create_users_table ```
4. Add the following code to the file:
    <?php

use Illuminate\Database\Migrations\Migration;
use Illuminate\Database\Schema\Blueprint;
use Illuminate\Support\Facades\Schema;

class CreateUsersTable extends Migration
{
    /**
     * Run the migrations.
     *
     * @return void
     */
    public function up()
    {
        Schema::create('users', function (Blueprint $table) {
            $table->id();
            $table->string('name');
            $table->string('email')->unique();
            $table->string('password');
            $table->string('hash')->nullable();
            $table->string('avatar_id')->nullable();
            $table->timestamps();
        });
    }

    /**
     * Reverse the migrations.
     *
     * @return void
     */
    public function down()
    {
        Schema::dropIfExists('users');
    }
}
5. Run php artisan migrate to run the migration.
6. Create a user controller with this command from the console:
7. Add the following method for creating users to the UserController.php file:
<?php

namespace App\Http\Controllers;

use App\Models\User;
use Illuminate\Http\Request;
use Illuminate\Support\Facades\Hash;
use Illuminate\Support\Facades\Auth;
use Carbon\Carbon;

class UserController extends Controller
{
public function createUser(Request $request)
    {
        $name     = $request->get('name');
        $email      = $request->get('email');
        $password = Hash::make($request->get('password'));

        $credentials = $request->only('email');

        $user = User::where('email', $email)->exists();

        if($user) {
            return response()->json([
                'status' => false,
                'message' => 'User already exists. Please try with another email.'
            ], 401);
        }

        $user = new User;
        $user->name      = $name;
        $user->email     = $email;
        $user->password  = $password;
        $user->hash      = md5(strtolower(trim($email)));
        $user->save();

        return response()->json([
                'status' => true,
                'message' => 'User created successfully'
            ], 201);
    }
 }
The code above signs up users with their names, email addresses, and passwords. For each user, the code hashes the related email address with the MD5 function, as Gravatar does, saving the hash as a unique user identifier.
8. Add the following endpoint to the routes/web.php file:
9. Add a user by invoking the API endpoint on Postman or Insomnia:

Associate Images With User Accounts
Next, build the feature that enables users to attach an image to their Clavatar accounts.
- Build a user-login process.
- Obtain a bearer token.
- Enable image uploads by users after authentication by middleware that verifies the bearer token.
To enable image uploads by users, do the following:
1. Install the Cloudinary PHP Library, version 2.0.0-Beta from your console:
With that library, you can perform these tasks on the back end: * Upload images synchronously and asynchronously. * Compress and optimize images through transformations. * Store and back-up images and other media files. * Deliver media files instantly.
2. Go to your Cloudinary dashboard and, under Account Details, copy the value of the API environment variable, which looks like this:
CLOUDINARY_URL=cloudinary://xxxxxxx:xxxxxxxx@unicodeveloper
Paste it in the .env file of your project.
3. In your console, create an AvatarController.php file:
Add the following uploadImage function to that file:
<?php

namespace App\Http\Controllers;

use App\Models\User;
use Cloudinary\Cloudinary;
use Cloudinary\Transformation\Resize;
use Cloudinary\Transformation\Effect;
use Cloudinary\Transformation\Format;
use Cloudinary\Transformation\Quality;
use Cloudinary\Transformation\RoundCorners;
use Cloudinary\Transformation\ArtisticFilter;
use Cloudinary\Transformation\Border;
use Cloudinary\Transformation\Argument\Color;

use Illuminate\Http\Request;

class AvatarController extends Controller
{
    protected $cloudinary;

    public function __construct()
    {
        $this->cloudinary = new Cloudinary(env('CLOUDINARY_URL'));
    }

    public function uploadImage(Request $request)
    {
        $image  = $request->file('image');
        $userId = $request->get('user_id');

        $uploadedImage = $this->cloudinary->uploadApi()->upload($image->getRealPath());

        if($uploadedImage) {

            User::where('id', $userId)->update(['avatar_id' => $uploadedImage['public_id']]);

            return response()->json([
                'status' => true,
                'message' => 'Upload successful'
            ], 200);
        }

        return response()->json([
            'status' => false,
            'message' => 'Upload failed. Please try again'
        ], 500);
    }
}
The above code did the following:
1. Imported the Cloudinary class.
2. Instantiated the Cloudinary class in the constructor, creating an object that connects with your Cloudinary account.
3. Added a function that accepts the user ID (user_id) and an image (image), uploads the image to Cloudinary, and updates your database with the image name returned from Cloudinary.
$uploadedImage = $this->cloudinary->uploadApi()->upload($image->getRealPath()); // Uploads image to Cloudinary

User::where('id', $userId)->update(['avatar_id' => $uploadedImage['public_id']]); // Updates your DB with the name of the image, which is the public ID (`public_id`).
Here’s an example of Cloudinary’s response after an upload:
Array
(
  [public_id] => c87hg9xfxrd4itiim3t0
  [version] => 1571218607
  [signature] => f8645b000be7d717599affc89a068157e4748276
  [width] => 864
  [height] => 576
  [format] => jpg
  [resource_type] => image
  [created_at] => 2017-06-23T13:59:18Z
  [bytes] => 120253
  [type] => upload
  [url] => http://res.cloudinary.com/demo/image/upload/v1571218607/c87hg9xfxrd4itiim3t0.jpg
  [secure_url] => https://res.cloudinary.com/demo/image/upload/v1571218607/c87hg9xfxrd4itiim3t0.jpg
)
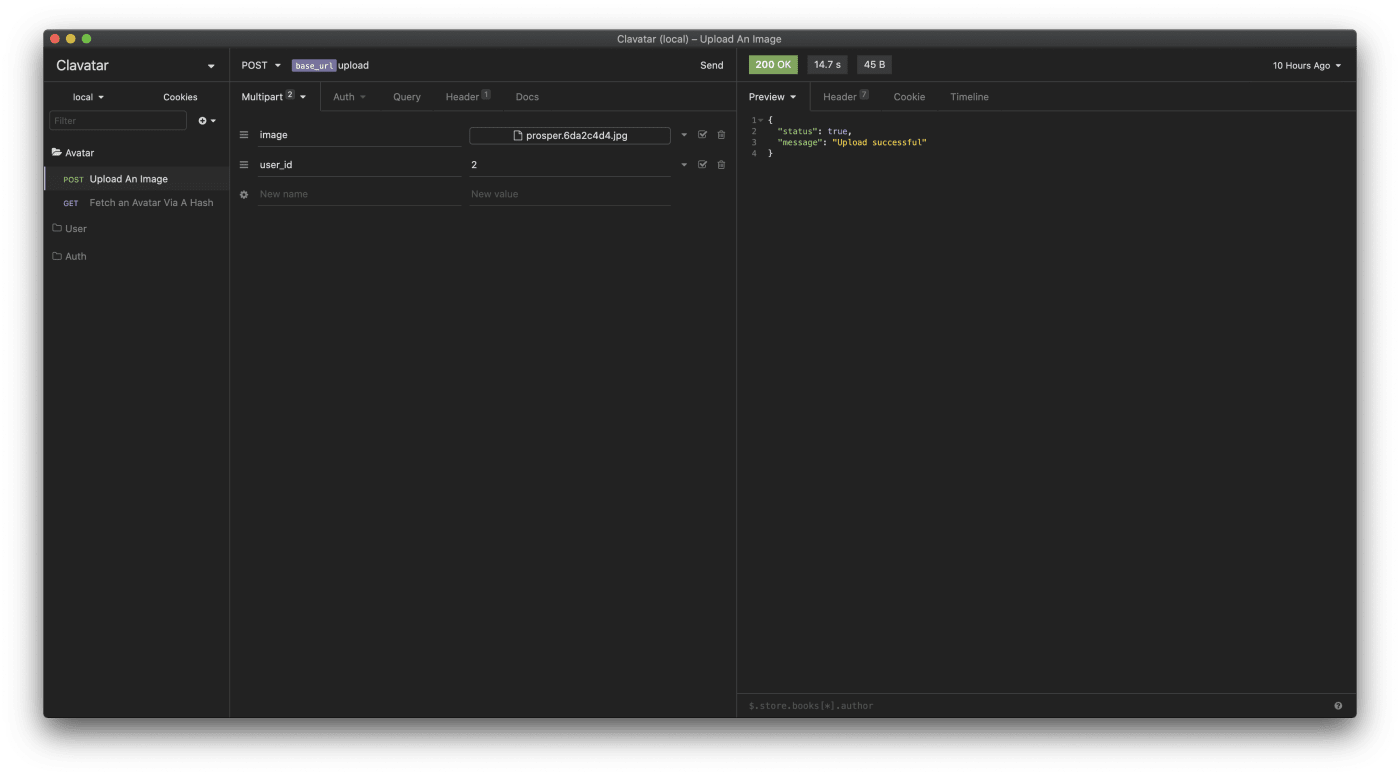
4. Add the Upload API endpoint to routes/web.php:
As a test, upload an image (for example, the one specified by the URL below) with Postman or Insomnia:

Finally, verify the following:
- The image you just uploaded is in your Cloudinary account’s Media Library.
- The
avatar_idvalue in your database is the same as the image’spublic_idvalue.
You’ve now associated an image with a user.
Part 2 describes how to make Clavatar work like Gravatar and to develop Clavatar’s capabilities of enabling requests for various versions of the images related to user accounts. Stay tuned.


