It’s a common challenge in many mobile and web applications: how do you allow users to upload their own images, while automatically adapting these images to a fixed graphic design?
A classic example is a user uploading a profile picture, but instead of providing a headshot (which is what we really need from them), they upload a picture of their entire body with additional objects in the background. Obviously this image will need to be cropped to the size of the profile picture, while focusing on the user’s face.
One way to achieve this is to allow the user to crop the image themselves as part of the upload process. But even so, there is usually a need to use the image in several different contexts, in different sizes and positions, and the user’s cropping can’t help us produce all these different versions.
A more advanced approach is face detection - there are new software tools and APIs that can recognize the face in the image, and crop the image automatically, focusing on the human face. Actually, face-detection based cropping is one of the more popular features of Cloudinary’s cloud-based image management solution and API.
But now we’d like to take it one step forward: What if you want to automatically crop thousands of images, focusing on an object that is not a human face? For example, eCommerce products, food, animals, or anything else that is more difficult to detect algorithmically.
Take these three images of food plates - many images like these are uploaded by users of food sites, such as Cloudinary customers Yummi, Cibando and EatWith:
The website needs to automatically generate large, small and thumbnail versions of these photos, smartly cropped to show the main portion of the food plates. There's definitely a need for smart cropping based on the most appealing part of a photo, no matter what kind of photo it is. This is an even bigger technical challenge than cropping based on face detection.
And that’s exactly what Imagga have done with their smart cropping technology - they built a system that can detect the most appealing part of any image and focus on it automatically. We have integrated Imagga into Cloudinary’s image management solution, and you can try it out as part of our free tier.
Read on to see how Cloudinary makes it possible to automatically crop complex images to focus on the most appealing part of the photo, and automatically generate beautiful thumbnails, with just one line of code.
Photo scaling and smart thumbnail generation
Let's continue the example of the food site which uses Cloudinary and Imagga to automatically generate thumbnails of plates of food. The site’s graphic design requires thumbnails of 200x90. Again, here are the demo images we showed above:
Cloudinary has a crop mode called fill, which allows you to crop an image to certain dimensions, while automatically filling the space with the result of the crop. You can specify a gravity which tells Cloudinary in which direction the focus of the crop should be.
Here is a dynamic URL and code which crops one of the images above using fill mode, and sets gravity to north:
The code above generates a dynamic URL, and when users access this URL, the image is transformed and delivered on the fly. You can create this URL directly, or use Cloudinary’s client libraries to do the same thing with one line of code, in all popular languages and frameworks including PHP, Ruby on Rails and Node.js. Click on the tabs in the code samples in this article to view the code in your language or framework of choice.
The results are:
As you can see the results are still far from optimal. Especially the photo of the soup does not show the soup plate at all… We can try the center gravity as well. This time, the results are better, but still not good enough.
The photos below were generated using the south gravity. Again, this is not good enough for a professional food site.
Thankfully, we have the Imagga Add-on. By setting the crop parameter in the URL to imagga_scale and specifying dimensions of 200x90, better-looking thumbnails are dynamically generated:
The images above, generated by Imagga’s smart cropping technology, are automatically focused on the most important part of the original image.
Note: In the URL we showed above, which resulted in the Imagga transformation, there was a special signature before the image transformation parameters - /s--MwkAA0qt--/. This code is required by Cloudinary to activate the Imagga add on. To see how to add it to the URL, see the documentation. You can also use Imagga in Cloudinary without this signature by performing Eager Transformations.
Smart cropping - focusing on what’s interesting in user images
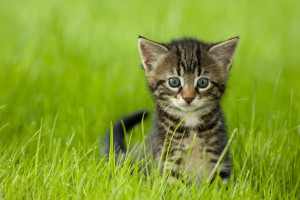
User-uploaded photos often have a main object which is the most relevant, and a background which is less interesting and in many cases should not be shown on the site. For example, in the following photo the main object is the kitten, and there is a green grass surrounding the kitten.

While the photo with the green background is very nice, when displaying the highlights of a photo album or a certain news feed, you might wish to emphasize the kitten itself.
By setting the crop parameter in the URL to imagga_crop without specifying width or height, the Imagga add-on smartly crops the image to keep the relevant part visible, while removing less relevant elements.
The following URL and sample code can be used to embed an HTML image tag with this photo automatically cropped by Imagga:

While the original image is 850x565, the cropped version is 462x441. In the image above we also scaled it down to a width of 200 pixels to better fit in this post.
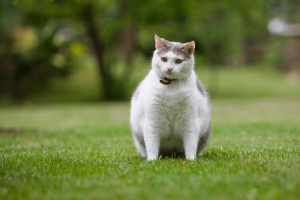
Another example, this time of a fat cat. We have the same issue in this photo: a blurred green background surrounding the cat.

Adding c_imagga_crop to the URL automatically crops the photo to focus on the cat, using the Imagga Add-on.

It’s cropped - now what?
Of course, smart cropping is usually not the end of the story, there are usually additional transformations you’ll need to perform to exactly fit the look and feel of the site.
So - while we’re at it, let’s take the same code we used above to tell Cloudinary to smartly crop the photo, and modify it slightly to perform even more effects. Here's a simple example: let’s say our graphic design requires the cat be resized to 200x200 pixels, with white space padding and a border around it.
We can do this simply by using the pad crop mode:

Here’s the same code with a few more parameters tacked on that make the image circular, add a green border, increase color saturation, apply a sharpen effect, and add a logo watermark, while modifying its brightness and size. All these image transformations are done on the fly by Cloudinary when a user first accesses the image.
cl_image_tag("fat_cat.jpg", :sign_url=>true, :transformation=>[
  {:crop=>"imagga_crop"},
  {:width=>200, :crop=>"scale"},
  {:border=>"5px_solid_rgb:19340b", :radius=>"max"},
  {:effect=>"saturation:100"},
  {:effect=>"sharpen"},
  {:effect=>"brightness:-90", :flags=>"relative", :overlay=>"cloudinary_icon", :opacity=>25, :width=>0.4, :crop=>"scale"}
  ])
cl_image_tag("fat_cat.jpg", array("sign_url"=>true, "transformation"=>array(
  array("crop"=>"imagga_crop"),
  array("width"=>200, "crop"=>"scale"),
  array("border"=>"5px_solid_rgb:19340b", "radius"=>"max"),
  array("effect"=>"saturation:100"),
  array("effect"=>"sharpen"),
  array("effect"=>"brightness:-90", "flags"=>"relative", "overlay"=>"cloudinary_icon", "opacity"=>25, "width"=>"0.4", "crop"=>"scale")
  )))
(new ImageTag('fat_cat.jpg'))
  ->resize(Resize::imaggaCrop())
  ->resize(Resize::scale()->width(200))
  ->border(Border::solid(5, Color::rgb('19340b'))
    ->roundCorners(RoundCorners::max()))
  ->adjust(Adjust::saturation()->level(100))
  ->adjust(Adjust::sharpen())
  ->overlay(
      Overlay::source(Source::image('cloudinary_icon')
        ->transformation((new ImageTransformation())
          ->resize(Resize::scale()->width(0.4)->relative())
          ->adjust(Adjust::opacity(25))
          ->adjust(Adjust::brightness()->level(-90)))))
    ->signUrl(true);
CloudinaryImage("fat_cat.jpg").image(sign_url=True, transformation=[
  {'crop': "imagga_crop"},
  {'width': 200, 'crop': "scale"},
  {'border': "5px_solid_rgb:19340b", 'radius': "max"},
  {'effect': "saturation:100"},
  {'effect': "sharpen"},
  {'effect': "brightness:-90", 'flags': "relative", 'overlay': "cloudinary_icon", 'opacity': 25, 'width': "0.4", 'crop': "scale"}
  ])
cloudinary.image("fat_cat.jpg", {sign_url: true, transformation: [
  {crop: "imagga_crop"},
  {width: 200, crop: "scale"},
  {border: "5px_solid_rgb:19340b", radius: "max"},
  {effect: "saturation:100"},
  {effect: "sharpen"},
  {effect: "brightness:-90", flags: "relative", overlay: "cloudinary_icon", opacity: 25, width: "0.4", crop: "scale"}
  ]})
cloudinary.url().transformation(new Transformation()
  .crop("imagga_crop").chain()
  .width(200).crop("scale").chain()
  .border("5px_solid_rgb:19340b").radius("max").chain()
  .effect("saturation:100").chain()
  .effect("sharpen").chain()
  .effect("brightness:-90").flags("relative").overlay(new Layer().publicId("cloudinary_icon")).opacity(25).width(0.4).crop("scale")).signed(true).imageTag("fat_cat.jpg");
cloudinary.imageTag('fat_cat.jpg', {signUrl: true, transformation: [
  {crop: "imagga_crop"},
  {width: 200, crop: "scale"},
  {border: "5px_solid_rgb:19340b", radius: "max"},
  {effect: "saturation:100"},
  {effect: "sharpen"},
  {effect: "brightness:-90", flags: "relative", overlay: new cloudinary.Layer().publicId("cloudinary_icon"), opacity: 25, width: "0.4", crop: "scale"}
  ]}).toHtml();
$.cloudinary.image("fat_cat.jpg", {transformation: [
  {crop: "imagga_crop"},
  {width: 200, crop: "scale"},
  {border: "5px_solid_rgb:19340b", radius: "max"},
  {effect: "saturation:100"},
  {effect: "sharpen"},
  {effect: "brightness:-90", flags: "relative", overlay: new cloudinary.Layer().publicId("cloudinary_icon"), opacity: 25, width: "0.4", crop: "scale"}
  ]})
<Image publicId="fat_cat.jpg" signUrl="true">
  <Transformation crop="imagga_crop" />
  <Transformation width="200" crop="scale" />
  <Transformation border="5px_solid_rgb:19340b" radius="max" />
  <Transformation effect="saturation:100" />
  <Transformation effect="sharpen" />
  <Transformation effect="brightness:-90" flags="relative" overlay="cloudinary_icon" opacity="25" width="0.4" crop="scale" />
</Image>
<cld-image publicId="fat_cat.jpg" signUrl="true">
  <cld-transformation crop="imagga_crop" />
  <cld-transformation width="200" crop="scale" />
  <cld-transformation border="5px_solid_rgb:19340b" radius="max" />
  <cld-transformation effect="saturation:100" />
  <cld-transformation effect="sharpen" />
  <cld-transformation effect="brightness:-90" flags="relative" :overlay="cloudinary_icon" opacity="25" width="0.4" crop="scale" />
</cld-image>
<cl-image public-id="fat_cat.jpg" sign-url="true">
  <cl-transformation crop="imagga_crop">
  </cl-transformation>
  <cl-transformation width="200" crop="scale">
  </cl-transformation>
  <cl-transformation border="5px_solid_rgb:19340b" radius="max">
  </cl-transformation>
  <cl-transformation effect="saturation:100">
  </cl-transformation>
  <cl-transformation effect="sharpen">
  </cl-transformation>
  <cl-transformation effect="brightness:-90" flags="relative" overlay="cloudinary_icon" opacity="25" width="0.4" crop="scale">
  </cl-transformation>
</cl-image>
cloudinary.Api.UrlImgUp.Transform(new Transformation()
  .Crop("imagga_crop").Chain()
  .Width(200).Crop("scale").Chain()
  .Border("5px_solid_rgb:19340b").Radius("max").Chain()
  .Effect("saturation:100").Chain()
  .Effect("sharpen").Chain()
  .Effect("brightness:-90").Flags("relative").Overlay(new Layer().PublicId("cloudinary_icon")).Opacity(25).Width(0.4).Crop("scale")).Signed(true).BuildImageTag("fat_cat.jpg")
MediaManager.get().url().transformation(new Transformation()
  .crop("imagga_crop").chain()
  .width(200).crop("scale").chain()
  .border("5px_solid_rgb:19340b").radius("max").chain()
  .effect("saturation:100").chain()
  .effect("sharpen").chain()
  .effect("brightness:-90").flags("relative").overlay(new Layer().publicId("cloudinary_icon")).opacity(25).width(0.4).crop("scale")).signed(true).generate("fat_cat.jpg");
imageView.cldSetImage(cloudinary.createUrl().setTransformation(CLDTransformation()
  .setCrop("imagga_crop").chain()
  .setWidth(200).setCrop("scale").chain()
  .setBorder("5px_solid_rgb:19340b").setRadius("max").chain()
  .setEffect("saturation:100").chain()
  .setEffect("sharpen").chain()
  .setEffect("brightness:-90").setFlags("relative").setOverlay("cloudinary_icon").setOpacity(25).setWidth(0.4).setCrop("scale")).generate("fat_cat.jpg", signUrl: true)!, cloudinary: cloudinary)
One last illustration: Apply the same image transformation without smartly cropping the original photo. Quite a difference, isn't it?
cl_image_tag("fat_cat.jpg", :transformation=>[
  {:width=>200, :crop=>"scale"},
  {:border=>"5px_solid_rgb:19340b", :radius=>"max"},
  {:effect=>"saturation:100"},
  {:effect=>"sharpen"},
  {:effect=>"brightness:-90", :flags=>"relative", :overlay=>"cloudinary_icon", :opacity=>25, :width=>0.4, :crop=>"scale"}
  ])
cl_image_tag("fat_cat.jpg", array("transformation"=>array(
  array("width"=>200, "crop"=>"scale"),
  array("border"=>"5px_solid_rgb:19340b", "radius"=>"max"),
  array("effect"=>"saturation:100"),
  array("effect"=>"sharpen"),
  array("effect"=>"brightness:-90", "flags"=>"relative", "overlay"=>"cloudinary_icon", "opacity"=>25, "width"=>"0.4", "crop"=>"scale")
  )))
(new ImageTag('fat_cat.jpg'))
  ->resize(Resize::scale()->width(200))
  ->border(Border::solid(5, Color::rgb('19340b'))
    ->roundCorners(RoundCorners::max()))
  ->adjust(Adjust::saturation()->level(100))
  ->adjust(Adjust::sharpen())
  ->overlay(
      Overlay::source(Source::image('cloudinary_icon')
        ->transformation((new ImageTransformation())
          ->resize(Resize::scale()->width(0.4)->relative())
          ->adjust(Adjust::opacity(25))
          ->adjust(Adjust::brightness()->level(-90))
  )));
CloudinaryImage("fat_cat.jpg").image(transformation=[
  {'width': 200, 'crop': "scale"},
  {'border': "5px_solid_rgb:19340b", 'radius': "max"},
  {'effect': "saturation:100"},
  {'effect': "sharpen"},
  {'effect': "brightness:-90", 'flags': "relative", 'overlay': "cloudinary_icon", 'opacity': 25, 'width': "0.4", 'crop': "scale"}
  ])
cloudinary.image("fat_cat.jpg", {transformation: [
  {width: 200, crop: "scale"},
  {border: "5px_solid_rgb:19340b", radius: "max"},
  {effect: "saturation:100"},
  {effect: "sharpen"},
  {effect: "brightness:-90", flags: "relative", overlay: "cloudinary_icon", opacity: 25, width: "0.4", crop: "scale"}
  ]})
cloudinary.url().transformation(new Transformation()
  .width(200).crop("scale").chain()
  .border("5px_solid_rgb:19340b").radius("max").chain()
  .effect("saturation:100").chain()
  .effect("sharpen").chain()
  .effect("brightness:-90").flags("relative").overlay(new Layer().publicId("cloudinary_icon")).opacity(25).width(0.4).crop("scale")).imageTag("fat_cat.jpg");
cloudinary.imageTag('fat_cat.jpg', {transformation: [
  {width: 200, crop: "scale"},
  {border: "5px_solid_rgb:19340b", radius: "max"},
  {effect: "saturation:100"},
  {effect: "sharpen"},
  {effect: "brightness:-90", flags: "relative", overlay: new cloudinary.Layer().publicId("cloudinary_icon"), opacity: 25, width: "0.4", crop: "scale"}
  ]}).toHtml();
$.cloudinary.image("fat_cat.jpg", {transformation: [
  {width: 200, crop: "scale"},
  {border: "5px_solid_rgb:19340b", radius: "max"},
  {effect: "saturation:100"},
  {effect: "sharpen"},
  {effect: "brightness:-90", flags: "relative", overlay: new cloudinary.Layer().publicId("cloudinary_icon"), opacity: 25, width: "0.4", crop: "scale"}
  ]})
<Image publicId="fat_cat.jpg" >
  <Transformation width="200" crop="scale" />
  <Transformation border="5px_solid_rgb:19340b" radius="max" />
  <Transformation effect="saturation:100" />
  <Transformation effect="sharpen" />
  <Transformation effect="brightness:-90" flags="relative" overlay="cloudinary_icon" opacity="25" width="0.4" crop="scale" />
</Image>
<cld-image publicId="fat_cat.jpg" >
  <cld-transformation width="200" crop="scale" />
  <cld-transformation border="5px_solid_rgb:19340b" radius="max" />
  <cld-transformation effect="saturation:100" />
  <cld-transformation effect="sharpen" />
  <cld-transformation effect="brightness:-90" flags="relative" :overlay="cloudinary_icon" opacity="25" width="0.4" crop="scale" />
</cld-image>
<cl-image public-id="fat_cat.jpg" >
  <cl-transformation width="200" crop="scale">
  </cl-transformation>
  <cl-transformation border="5px_solid_rgb:19340b" radius="max">
  </cl-transformation>
  <cl-transformation effect="saturation:100">
  </cl-transformation>
  <cl-transformation effect="sharpen">
  </cl-transformation>
  <cl-transformation effect="brightness:-90" flags="relative" overlay="cloudinary_icon" opacity="25" width="0.4" crop="scale">
  </cl-transformation>
</cl-image>
cloudinary.Api.UrlImgUp.Transform(new Transformation()
  .Width(200).Crop("scale").Chain()
  .Border("5px_solid_rgb:19340b").Radius("max").Chain()
  .Effect("saturation:100").Chain()
  .Effect("sharpen").Chain()
  .Effect("brightness:-90").Flags("relative").Overlay(new Layer().PublicId("cloudinary_icon")).Opacity(25).Width(0.4).Crop("scale")).BuildImageTag("fat_cat.jpg")
MediaManager.get().url().transformation(new Transformation()
  .width(200).crop("scale").chain()
  .border("5px_solid_rgb:19340b").radius("max").chain()
  .effect("saturation:100").chain()
  .effect("sharpen").chain()
  .effect("brightness:-90").flags("relative").overlay(new Layer().publicId("cloudinary_icon")).opacity(25).width(0.4).crop("scale")).generate("fat_cat.jpg");
imageView.cldSetImage(cloudinary.createUrl().setTransformation(CLDTransformation()
  .setWidth(200).setCrop("scale").chain()
  .setBorder("5px_solid_rgb:19340b").setRadius("max").chain()
  .setEffect("saturation:100").chain()
  .setEffect("sharpen").chain()
  .setEffect("brightness:-90").setFlags("relative").setOverlay("cloudinary_icon").setOpacity(25).setWidth(0.4).setCrop("scale")).generate("fat_cat.jpg")!, cloudinary: cloudinary)
A final note - when you use the above URLs to generate images on-the-fly in Cloudinary, both the source and the resulting images are stored in the cloud, delivered to users using a fast CDN with advanced caching, and automatically optimized to reduce file size. So when you use Cloudinary to perform these smart image transformations, you also get optimal storage and delivery of images to users around the world.
Summary
Smart cropping is a must for any website or mobile application that involves user-uploaded images. Cloudinary's face-detection based cropping, together with Imagga's smart cropping, allows you to perform this cropping automatically with only a single line of code - and while making sure that images are stored and delivered in an optimal manner.
Want to try it out for yourself? Sign up for a free Cloudinary account and also grab the Imagga Crop and Scale Add-on. Additional documentation of the Imagga Add-on is available here.
We would be happy to hear any feedback or suggestion you may have.


