One of the main optimization challenges for website and mobile developers is how to display sufficiently high quality images to their visitors while minimizing the image file size. A smaller image file size can lead to faster load times, reduced bandwidth costs and an improved user experience. The problem is that reducing the file size too much may lead to a lower image quality and could harm visitor satisfaction. Delivering an optimized image with just the right balance between size and quality can be quite tricky.
Some formats such as WebP and JPEG-XR are more efficient than the standard JPEG format for delivering web images, but they are not supported by all browsers: JPEG-XR is supported only in Internet Explorer/Edge browsers, while WebP is currently supported only in Chrome/Opera browsers and Android devices. The result is that the best image to deliver to your visitor depends on which browser they are using.
Cloudinary has the ability to automatically detect which browser is requesting the image and then select the most efficient image format to deliver. Just add the fetch_format parameter and set its value to auto (f_auto in URLs).
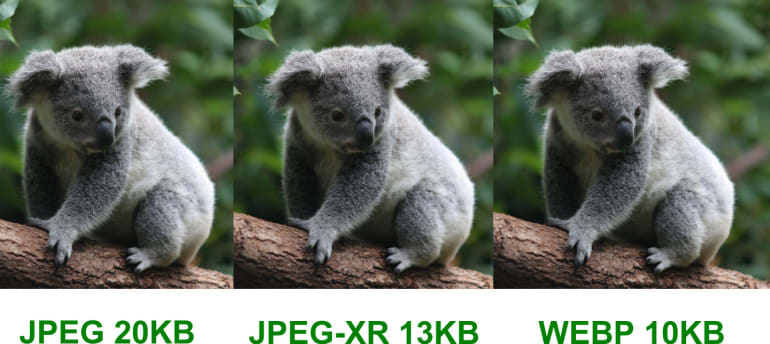
The example below displays two sample images. The image on the left uses a URL without Cloudinary's f_auto flag and is therefore delivered in JPEG format across all browsers (while being scaled on-the-fly to 300px width with its aspect ratio retained). The image on the right includes f_auto in its delivery URL and so is delivered as WebP (9.8 KB - a saving of 51%) if you are using a Chrome or Opera browser, as a JPEG-XR (12.6 KB - a saving of 37%) to Internet Explorer, Edge, and Android browsers, and as a JPEG (20 KB) in all other cases.


Ruby:
cl_image_tag("pond_reflect.jpg", :width=>300, :fetch_format=>:auto, :crop=>"scale")
PHP v1:
cl_image_tag("pond_reflect.jpg", array("width"=>300, "fetch_format"=>"auto", "crop"=>"scale"))
PHP v2:
(new ImageTag('pond_reflect.jpg'))
  ->resize(Resize::scale()->width(300))
  ->delivery(Delivery::format(Format::auto()));
Python:
CloudinaryImage("pond_reflect.jpg").image(width=300, fetch_format="auto", crop="scale")
Node.js:
cloudinary.image("pond_reflect.jpg", {width: 300, fetch_format: "auto", crop: "scale"})
Java:
cloudinary.url().transformation(new Transformation().width(300).fetchFormat("auto").crop("scale")).imageTag("pond_reflect.jpg");
JS:
cloudinary.imageTag('pond_reflect.jpg', {width: 300, fetchFormat: "auto", crop: "scale"}).toHtml();
jQuery:
$.cloudinary.image("pond_reflect.jpg", {width: 300, fetch_format: "auto", crop: "scale"})
React:
<Image publicId="pond_reflect.jpg" >
  <Transformation width="300" fetchFormat="auto" crop="scale" />
</Image>
Vue.js:
<cld-image publicId="pond_reflect.jpg" >
  <cld-transformation width="300" fetchFormat="auto" crop="scale" />
</cld-image>
Angular:
<cl-image public-id="pond_reflect.jpg" >
  <cl-transformation width="300" fetch-format="auto" crop="scale">
  </cl-transformation>
</cl-image>
.NET:
cloudinary.Api.UrlImgUp.Transform(new Transformation().Width(300).FetchFormat("auto").Crop("scale")).BuildImageTag("pond_reflect.jpg")
Android:
MediaManager.get().url().transformation(new Transformation().width(300).fetchFormat("auto").crop("scale")).generate("pond_reflect.jpg");
iOS:
imageView.cldSetImage(cloudinary.createUrl().setTransformation(CLDTransformation().setWidth(300).setFetchFormat("auto").setCrop("scale")).generate("pond_reflect.jpg")!, cloudinary: cloudinary)
The example above demonstrates automatic format selection for images that were uploaded to Cloudinary first, either using our upload API from your server code or directly from your visitor's browsers or mobile apps.
In addition to direct uploads, Cloudinary also supports fetching images via their public URLs, transforming these on-the-fly and delivering the resulting images optimized via a CDN. This means, for example, that you can easily integrate Cloudinary with your website without modifying your infrastructure and code. Simply prefix your image URLs with Cloudinary's fetch URL.
With Cloudinary's automatic format feature, you can also dynamically convert and deliver remote images and improve your site's performance.
For example, the following URL delivers a picture of Dwayne Johnson from a remote Wikimedia Commons HTTP URL. The remote image is fetched by Cloudinary, stored persistently in the cloud, dynamically converted to WebP or JPEG-XR as required by the user's browser and delivered optimized and cached through a high-end CDN.
Ruby:
cl_image_tag("https://upload.wikimedia.org/wikipedia/commons/6/68/Dwayne_Johnson_at_the_2009_Tribeca_Film_Festival.jpg", :width=>300, :fetch_format=>:auto, :crop=>"scale", :type=>"fetch")
PHP v1:
cl_image_tag("https://upload.wikimedia.org/wikipedia/commons/6/68/Dwayne_Johnson_at_the_2009_Tribeca_Film_Festival.jpg", array("width"=>300, "fetch_format"=>"auto", "crop"=>"scale", "type"=>"fetch"))
PHP v2:
(new ImageTag('https://upload.wikimedia.org/wikipedia/commons/6/68/Dwayne_Johnson_at_the_2009_Tribeca_Film_Festival.jpg'))
  ->resize(Resize::scale()->width(300))
  ->delivery(Delivery::format(Format::auto()))
  ->deliveryType('fetch');
Python:
CloudinaryImage("https://upload.wikimedia.org/wikipedia/commons/6/68/Dwayne_Johnson_at_the_2009_Tribeca_Film_Festival.jpg").image(width=300, fetch_format="auto", crop="scale", type="fetch")
Node.js:
cloudinary.image("https://upload.wikimedia.org/wikipedia/commons/6/68/Dwayne_Johnson_at_the_2009_Tribeca_Film_Festival.jpg", {width: 300, fetch_format: "auto", crop: "scale", type: "fetch"})
Java:
cloudinary.url().transformation(new Transformation().width(300).fetchFormat("auto").crop("scale")).type("fetch").imageTag("https://upload.wikimedia.org/wikipedia/commons/6/68/Dwayne_Johnson_at_the_2009_Tribeca_Film_Festival.jpg");
JS:
cloudinary.imageTag('https://upload.wikimedia.org/wikipedia/commons/6/68/Dwayne_Johnson_at_the_2009_Tribeca_Film_Festival.jpg', {width: 300, fetchFormat: "auto", crop: "scale", type: "fetch"}).toHtml();
jQuery:
$.cloudinary.image("https://upload.wikimedia.org/wikipedia/commons/6/68/Dwayne_Johnson_at_the_2009_Tribeca_Film_Festival.jpg", {width: 300, fetch_format: "auto", crop: "scale", type: "fetch"})
React:
<Image publicId="https://upload.wikimedia.org/wikipedia/commons/6/68/Dwayne_Johnson_at_the_2009_Tribeca_Film_Festival.jpg" type="fetch">
  <Transformation width="300" fetchFormat="auto" crop="scale" />
</Image>
Vue.js:
<cld-image publicId="https://upload.wikimedia.org/wikipedia/commons/6/68/Dwayne_Johnson_at_the_2009_Tribeca_Film_Festival.jpg" type="fetch">
  <cld-transformation width="300" fetchFormat="auto" crop="scale" />
</cld-image>
Angular:
<cl-image public-id="https://upload.wikimedia.org/wikipedia/commons/6/68/Dwayne_Johnson_at_the_2009_Tribeca_Film_Festival.jpg" type="fetch">
  <cl-transformation width="300" fetch-format="auto" crop="scale">
  </cl-transformation>
</cl-image>
.NET:
cloudinary.Api.UrlImgUp.Transform(new Transformation().Width(300).FetchFormat("auto").Crop("scale")).Action("fetch").BuildImageTag("https://upload.wikimedia.org/wikipedia/commons/6/68/Dwayne_Johnson_at_the_2009_Tribeca_Film_Festival.jpg")
Android:
MediaManager.get().url().transformation(new Transformation().width(300).fetchFormat("auto").crop("scale")).type("fetch").generate("https://upload.wikimedia.org/wikipedia/commons/6/68/Dwayne_Johnson_at_the_2009_Tribeca_Film_Festival.jpg");
iOS:
imageView.cldSetImage(cloudinary.createUrl().setType( "fetch").setTransformation(CLDTransformation().setWidth(300).setFetchFormat("auto").setCrop("scale")).generate("https://upload.wikimedia.org/wikipedia/commons/6/68/Dwayne_Johnson_at_the_2009_Tribeca_Film_Festival.jpg")!, cloudinary: cloudinary)

Cloudinary's dynamic format selection feature can be further enhanced by using it together with Cloudinary's automatic quality selection feature. Including the quality parameter and setting its value to auto (q_auto in URLs) tells Cloudinary to automatically determine the optimum quality setting for an image based on its format and contents, that results in the smallest file size while maintaining visual quality. When you add f_auto together with q_auto in the delivery URL, the Cloudinary algorithm also checks if a different image format gives a smaller file size while maintaining the visual quality.
For example, the canyons image scaled down to a width of 400 pixels and delivered with both automatic quality selection and automatic format selection (q_auto and f_auto), will be delivered as WebP (20.2KB - a saving of 45%) to Chrome browsers, JPEG-XR (24.3KB - a saving of 34%) to Internet-Explorer/Edge browsers, and JPEG (36.6KB) to all other browsers:
Ruby:
cl_image_tag("canyons.jpg", :width=>400, :quality=>"auto", :fetch_format=>:auto, :crop=>"scale")
PHP v1:
cl_image_tag("canyons.jpg", array("width"=>400, "quality"=>"auto", "fetch_format"=>"auto", "crop"=>"scale"))
PHP v2:
(new ImageTag('canyons.jpg'))
  ->resize(Resize::scale()->width(400))
  ->delivery(Delivery::format(Format::auto()))
  ->delivery(Delivery::quality(Quality::auto()));
Python:
CloudinaryImage("canyons.jpg").image(width=400, quality="auto", fetch_format="auto", crop="scale")
Node.js:
cloudinary.image("canyons.jpg", {width: 400, quality: "auto", fetch_format: "auto", crop: "scale"})
Java:
cloudinary.url().transformation(new Transformation().width(400).quality("auto").fetchFormat("auto").crop("scale")).imageTag("canyons.jpg");
JS:
cloudinary.imageTag('canyons.jpg', {width: 400, quality: "auto", fetchFormat: "auto", crop: "scale"}).toHtml();
jQuery:
$.cloudinary.image("canyons.jpg", {width: 400, quality: "auto", fetch_format: "auto", crop: "scale"})
React:
<Image publicId="canyons.jpg" >
  <Transformation width="400" quality="auto" fetchFormat="auto" crop="scale" />
</Image>
Vue.js:
<cld-image publicId="canyons.jpg" >
  <cld-transformation width="400" quality="auto" fetchFormat="auto" crop="scale" />
</cld-image>
Angular:
<cl-image public-id="canyons.jpg" >
  <cl-transformation width="400" quality="auto" fetch-format="auto" crop="scale">
  </cl-transformation>
</cl-image>
.NET:
cloudinary.Api.UrlImgUp.Transform(new Transformation().Width(400).Quality("auto").FetchFormat("auto").Crop("scale")).BuildImageTag("canyons.jpg")
Android:
MediaManager.get().url().transformation(new Transformation().width(400).quality("auto").fetchFormat("auto").crop("scale")).generate("canyons.jpg");
iOS:
imageView.cldSetImage(cloudinary.createUrl().setTransformation(CLDTransformation().setWidth(400).setQuality("auto").setFetchFormat("auto").setCrop("scale")).generate("canyons.jpg")!, cloudinary: cloudinary)

Furthermore, when using f_auto and q_auto together, not only is the visitor's browser taken into account when deciding on the best image format, but also the image contents. For example, the Cloudinary algorithm might determine that the PNG format is a better fit for specific images that contain content such as drawings. For some images, even the PNG8 format can be automatically selected for providing great looking results with a very efficient file size.
For example, the following URL dynamically generates a 400 pixels wide version of a drawing only using automatic image quality selection (q_auto without f_auto).
Ruby:
cl_image_tag("cloud_castle.jpg", :width=>400, :quality=>"auto", :crop=>"scale")
PHP v1:
cl_image_tag("cloud_castle.jpg", array("width"=>400, "quality"=>"auto", "crop"=>"scale"))
PHP v2:
(new ImageTag('cloud_castle.jpg'))
  ->resize(Resize::scale()->width(400))
  ->delivery(Delivery::quality(Quality::auto()));
Python:
CloudinaryImage("cloud_castle.jpg").image(width=400, quality="auto", crop="scale")
Node.js:
cloudinary.image("cloud_castle.jpg", {width: 400, quality: "auto", crop: "scale"})
Java:
cloudinary.url().transformation(new Transformation().width(400).quality("auto").crop("scale")).imageTag("cloud_castle.jpg");
JS:
cloudinary.imageTag('cloud_castle.jpg', {width: 400, quality: "auto", crop: "scale"}).toHtml();
jQuery:
$.cloudinary.image("cloud_castle.jpg", {width: 400, quality: "auto", crop: "scale"})
React:
<Image publicId="cloud_castle.jpg" >
  <Transformation width="400" quality="auto" crop="scale" />
</Image>
Vue.js:
<cld-image publicId="cloud_castle.jpg" >
  <cld-transformation width="400" quality="auto" crop="scale" />
</cld-image>
Angular:
<cl-image public-id="cloud_castle.jpg" >
  <cl-transformation width="400" quality="auto" crop="scale">
  </cl-transformation>
</cl-image>
.NET:
cloudinary.Api.UrlImgUp.Transform(new Transformation().Width(400).Quality("auto").Crop("scale")).BuildImageTag("cloud_castle.jpg")
Android:
MediaManager.get().url().transformation(new Transformation().width(400).quality("auto").crop("scale")).generate("cloud_castle.jpg");
iOS:
imageView.cldSetImage(cloudinary.createUrl().setTransformation(CLDTransformation().setWidth(400).setQuality("auto").setCrop("scale")).generate("cloud_castle.jpg")!, cloudinary: cloudinary)

The result is a JPEG image (20.4KB) where, if you look carefully, you can see that the lossy nature of the JPEG format resulted in some visual artifacts. In the next example with the same drawing, we will combine both q_auto and f_auto:
Ruby:
cl_image_tag("cloud_castle.jpg", :width=>400, :quality=>"auto", :fetch_format=>:auto, :crop=>"scale")
PHP v1:
cl_image_tag("cloud_castle.jpg", array("width"=>400, "quality"=>"auto", "fetch_format"=>"auto", "crop"=>"scale"))
PHP v2:
(new ImageTag('cloud_castle.jpg'))
  ->resize(Resize::scale()->width(400))
  ->delivery(Delivery::format(Format::auto()))
  ->delivery(Delivery::quality(Quality::auto()));
Python:
CloudinaryImage("cloud_castle.jpg").image(width=400, quality="auto", fetch_format="auto", crop="scale")
Node.js:
cloudinary.image("cloud_castle.jpg", {width: 400, quality: "auto", fetch_format: "auto", crop: "scale"})
Java:
cloudinary.url().transformation(new Transformation().width(400).quality("auto").fetchFormat("auto").crop("scale")).imageTag("cloud_castle.jpg");
JS:
cloudinary.imageTag('cloud_castle.jpg', {width: 400, quality: "auto", fetchFormat: "auto", crop: "scale"}).toHtml();
jQuery:
$.cloudinary.image("cloud_castle.jpg", {width: 400, quality: "auto", fetch_format: "auto", crop: "scale"})
React:
<Image publicId="cloud_castle.jpg" >
  <Transformation width="400" quality="auto" fetchFormat="auto" crop="scale" />
</Image>
Vue.js:
<cld-image publicId="cloud_castle.jpg" >
  <cld-transformation width="400" quality="auto" fetchFormat="auto" crop="scale" />
</cld-image>
Angular:
<cl-image public-id="cloud_castle.jpg" >
  <cl-transformation width="400" quality="auto" fetch-format="auto" crop="scale">
  </cl-transformation>
</cl-image>
.NET:
cloudinary.Api.UrlImgUp.Transform(new Transformation().Width(400).Quality("auto").FetchFormat("auto").Crop("scale")).BuildImageTag("cloud_castle.jpg")
Android:
MediaManager.get().url().transformation(new Transformation().width(400).quality("auto").fetchFormat("auto").crop("scale")).generate("cloud_castle.jpg");
iOS:
imageView.cldSetImage(cloudinary.createUrl().setTransformation(CLDTransformation().setWidth(400).setQuality("auto").setFetchFormat("auto").setCrop("scale")).generate("cloud_castle.jpg")!, cloudinary: cloudinary)

In this case, the algorithm decided to encode the image using the PNG8 format. The image looks better, has no artifacts, and weighs even less - just 16.5KB
Delivering an image in the best format can be easily automated with Cloudinary's format selection algorithm. The feature can also be combined with automatic quality selection for a powerful and dynamic solution that delivers all your images using minimal bandwidth and maximum visual quality.
For more details, see the automatic format selection documentation.
All image transformation and delivery features discussed here are available with no extra charge for all Cloudinary's plans, including the free plan.