Update - April 2016: The add-on described in this post is no longer available since ReKognition terminated their services. However, all features described here are still available via a different and even better add-on by Microsoft. See Facial attribute detection with Microsoft's Face API and the Advanced facial attributes detection add-on documentation.
Red eye often happens due to the use of flash in low light conditions as the light hits the eye very quickly and into the retina. It then bounces off of the back of the eye and emits a red color due to the blood vessels there. Although more professional modern cameras and flashes generally prevent this from happening, red eye may still occur with simpler, smaller cameras (including smartphones). There are various software solutions for red eye removal available on mobile devices and desktops, some of which require manual processing to get good results.
Obviously, it would be much faster and more convenient if this process were fully automatic, especially when dealing with a bulk of images that is uploaded by your web or mobile application’s users.
Cloudinary allows developers to automate red eye removal for websites and web applications. This especially comes in handy for social networks where users want their uploaded pictures to look as good as possible when they are shared among their family and friends.
Cloudinary's rich transformation capabilities allow you to further enhance users’ uploaded photos with options such as face detection-based cropping, resizing and rotating, increasing color saturation and more. With this new capability incorporated into Cloudinary’s image lifecycle management, developers can automate red eye removal by setting the effect parameter within Cloudinary's dynamic transformation URLs to redeye. This enables smart red eye removal algorithms to be automatically applied on-the-fly to uploaded images.
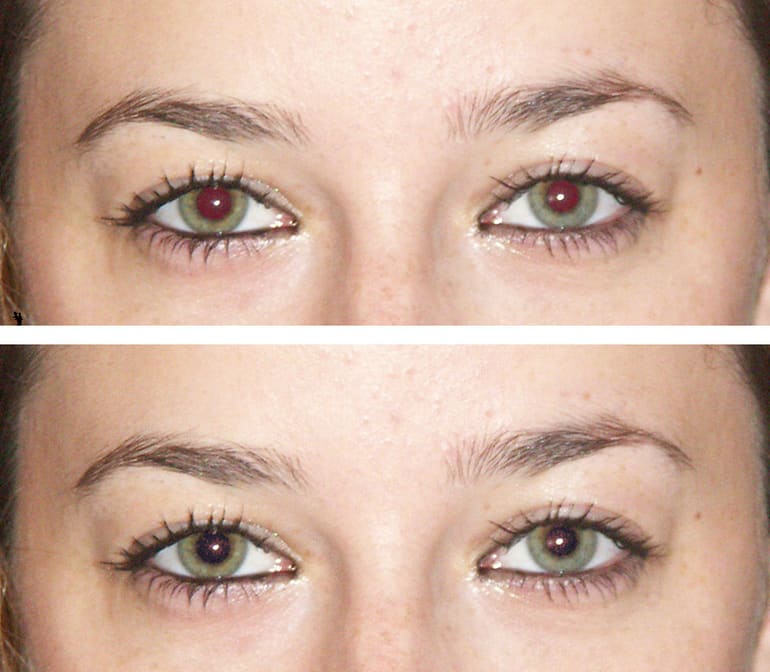
In the example below, the image on the left shows a scaled down version of an original image with red eyes and the image on the right shows a scaled down version of the original image with Cloudinary’s red eye removal feature dynamically applied.
Ruby:
cl_image_tag("itaib_redeye_msjmif.jpg", :effect=>"redeye")
PHP v1:
cl_image_tag("itaib_redeye_msjmif.jpg", array("effect"=>"redeye"))
PHP v2:
(new ImageTag('itaib_redeye_msjmif.jpg'))
  ->effect(Effect::redEye());
Python:
CloudinaryImage("itaib_redeye_msjmif.jpg").image(effect="redeye")
Node.js:
cloudinary.image("itaib_redeye_msjmif.jpg", {effect: "redeye"})
Java:
cloudinary.url().transformation(new Transformation().effect("redeye")).imageTag("itaib_redeye_msjmif.jpg");
JS:
cloudinary.imageTag('itaib_redeye_msjmif.jpg', {effect: "redeye"}).toHtml();
jQuery:
$.cloudinary.image("itaib_redeye_msjmif.jpg", {effect: "redeye"})
React:
<Image publicId="itaib_redeye_msjmif.jpg" >
  <Transformation effect="redeye" />
</Image>
Vue.js:
<cld-image publicId="itaib_redeye_msjmif.jpg" >
  <cld-transformation effect="redeye" />
</cld-image>
Angular:
<cl-image public-id="itaib_redeye_msjmif.jpg" >
  <cl-transformation effect="redeye">
  </cl-transformation>
</cl-image>
.NET:
cloudinary.Api.UrlImgUp.Transform(new Transformation().Effect("redeye")).BuildImageTag("itaib_redeye_msjmif.jpg")
Android:
MediaManager.get().url().transformation(new Transformation().effect("redeye")).generate("itaib_redeye_msjmif.jpg");
iOS:
imageView.cldSetImage(cloudinary.createUrl().setTransformation(CLDTransformation().setEffect("redeye")).generate("itaib_redeye_msjmif.jpg")!, cloudinary: cloudinary)


Here we used the same images as above (before red eye removal and after) to generate face detection based thumbnails. This, as well as red eye removal, can be done by embedding a dynamic transformation URL and code (as shown below) from various development frameworks into your web page.
Ruby:
cl_image_tag("itaib_redeye_msjmif.jpg", :transformation=>[
  {:effect=>"redeye"},
  {:gravity=>"face", :width=>200, :height=>200, :radius=>"max", :crop=>"thumb"}
  ])
PHP v1:
cl_image_tag("itaib_redeye_msjmif.jpg", array("transformation"=>array(
  array("effect"=>"redeye"),
  array("gravity"=>"face", "width"=>200, "height"=>200, "radius"=>"max", "crop"=>"thumb")
  )))
PHP v2:
(new ImageTag('itaib_redeye_msjmif.jpg'))
  ->effect(Effect::redEye())
  ->resize(Resize::thumbnail()->width(200)->height(200)->gravity(Gravity::focusOn(FocusOn::face())))
  ->roundCorners(RoundCorners::max());
Python:
CloudinaryImage("itaib_redeye_msjmif.jpg").image(transformation=[
  {'effect': "redeye"},
  {'gravity': "face", 'width': 200, 'height': 200, 'radius': "max", 'crop': "thumb"}
  ])
Node.js:
cloudinary.image("itaib_redeye_msjmif.jpg", {transformation: [
  {effect: "redeye"},
  {gravity: "face", width: 200, height: 200, radius: "max", crop: "thumb"}
  ]})
Java:
cloudinary.url().transformation(new Transformation()
  .effect("redeye").chain()
  .gravity("face").width(200).height(200).radius("max").crop("thumb")).imageTag("itaib_redeye_msjmif.jpg");
JS:
cloudinary.imageTag('itaib_redeye_msjmif.jpg', {transformation: [
  {effect: "redeye"},
  {gravity: "face", width: 200, height: 200, radius: "max", crop: "thumb"}
  ]}).toHtml();
jQuery:
$.cloudinary.image("itaib_redeye_msjmif.jpg", {transformation: [
  {effect: "redeye"},
  {gravity: "face", width: 200, height: 200, radius: "max", crop: "thumb"}
  ]})
React:
<Image publicId="itaib_redeye_msjmif.jpg" >
  <Transformation effect="redeye" />
  <Transformation gravity="face" width="200" height="200" radius="max" crop="thumb" />
</Image>
Vue.js:
<cld-image publicId="itaib_redeye_msjmif.jpg" >
  <cld-transformation effect="redeye" />
  <cld-transformation gravity="face" width="200" height="200" radius="max" crop="thumb" />
</cld-image>
Angular:
<cl-image public-id="itaib_redeye_msjmif.jpg" >
  <cl-transformation effect="redeye">
  </cl-transformation>
  <cl-transformation gravity="face" width="200" height="200" radius="max" crop="thumb">
  </cl-transformation>
</cl-image>
.NET:
cloudinary.Api.UrlImgUp.Transform(new Transformation()
  .Effect("redeye").Chain()
  .Gravity("face").Width(200).Height(200).Radius("max").Crop("thumb")).BuildImageTag("itaib_redeye_msjmif.jpg")
Android:
MediaManager.get().url().transformation(new Transformation()
  .effect("redeye").chain()
  .gravity("face").width(200).height(200).radius("max").crop("thumb")).generate("itaib_redeye_msjmif.jpg");
iOS:
imageView.cldSetImage(cloudinary.createUrl().setTransformation(CLDTransformation()
  .setEffect("redeye").chain()
  .setGravity("face").setWidth(200).setHeight(200).setRadius("max").setCrop("thumb")).generate("itaib_redeye_msjmif.jpg")!, cloudinary: cloudinary)


In order to get even higher quality results, you can use Cloudinary’s ReKognition face attribute detection add-on for eye detection. Together with this add-on and the red eye removal effect, Cloudinary can automatically detect where eyes are located in a photo and apply the red eye removal algorithm in a more precise way. In order to do this, set the effect parameter of Cloudinary’s dynamic transformation URLs to rek_redeye. Cloudinary's SDKs allow you to easily generate transformation and delivery URLs in various development frameworks. Below is a sample dynamic transformation URL and code to generate an HTML image tag that can be adjusted for various popular frameworks such as Ruby on Rails, PHP, Node.js, and more.
Following the examples above that simply underwent dynamic red eye removal, below is an original uploaded image that was cropped and underwent accurate red eye removal using Cloudinary’s ReKognition face attribute detection add-on.
Ruby:
cl_image_tag("tali_redeye_rvem1u.jpg", :effect=>"rek_redeye")
PHP v1:
cl_image_tag("tali_redeye_rvem1u.jpg", array("effect"=>"rek_redeye"))
PHP v2:
This code example is not currently available.
Python:
CloudinaryImage("tali_redeye_rvem1u.jpg").image(effect="rek_redeye")
Node.js:
cloudinary.image("tali_redeye_rvem1u.jpg", {effect: "rek_redeye"})
Java:
cloudinary.url().transformation(new Transformation().effect("rek_redeye")).imageTag("tali_redeye_rvem1u.jpg");
JS:
cloudinary.imageTag('tali_redeye_rvem1u.jpg', {effect: "rek_redeye"}).toHtml();
jQuery:
$.cloudinary.image("tali_redeye_rvem1u.jpg", {effect: "rek_redeye"})
React:
<Image publicId="tali_redeye_rvem1u.jpg" >
  <Transformation effect="rek_redeye" />
</Image>
Vue.js:
<cld-image publicId="tali_redeye_rvem1u.jpg" >
  <cld-transformation effect="rek_redeye" />
</cld-image>
Angular:
<cl-image public-id="tali_redeye_rvem1u.jpg" >
  <cl-transformation effect="rek_redeye">
  </cl-transformation>
</cl-image>
.NET:
cloudinary.Api.UrlImgUp.Transform(new Transformation().Effect("rek_redeye")).BuildImageTag("tali_redeye_rvem1u.jpg")
Android:
MediaManager.get().url().transformation(new Transformation().effect("rek_redeye")).generate("tali_redeye_rvem1u.jpg");
iOS:
imageView.cldSetImage(cloudinary.createUrl().setTransformation(CLDTransformation().setEffect("rek_redeye")).generate("tali_redeye_rvem1u.jpg")!, cloudinary: cloudinary)


Cloudinary’s advanced image transformation capabilities improve photo quality without any added effort on your side, and are fully integrated into Cloudinary's image management lifecycle. Simply add the parameters outlined above to an image’s CDN delivered URL and apply further effects, if desired, to adjust sharpness, color balance and more. The red eye removal feature is available with all of Cloudinary’s plans, including the free tier. You can use the ReKognition add-on eye detection effect by subscribing to the add-on itself. If you don't have a Cloudinary account yet, sign up for a free account here.
Update - April 2016: The add-on described in this post is no longer available since ReKognition terminated their services. However, all features described here are still available via a different and even better add-on by Microsoft. See Facial attribute detection with Microsoft's Face API and the Advanced facial attributes detection add-on documentation.