Update - December 2015: The add-on described in this post is no longer available since ReKognition terminated their services. However, all features described here are still available via a different and even better add-on: Advanced Facial Attributes Detection
Face Detection is a great feature that enables the automatic modification of images according to the detected faces within an image, making it simple to intelligently crop, position, resize and transform your images appropriately.
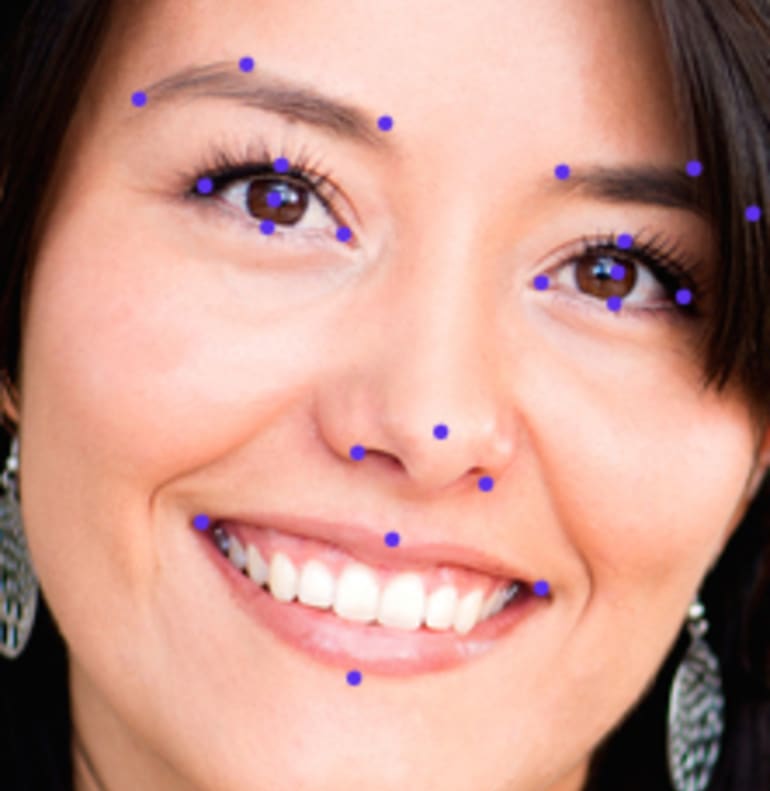
Facial Attribute Detection takes the process even further and extracts meaningful advanced data about the face(s) in the image, including the exact location of facial features. This allows you even greater control over your image categorization, and to automatically use these details to smartly crop, position, rotate and overlay images based on the detected facial features.
Facial Attribute Detection lets you know more than just the location of a person's facial features. How are they posed in 3 dimensions? Is the person wearing glasses? Do they have their eyes closed? Mouth open? Have a mustache or beard? What is the person's race, age and gender? What emotion are they displaying? Are they smiling? How beautiful are they? Retrieving this information makes it a simple matter to automatically categorize and tag your collection of images.
All of this is made possible with the ReKognition add-on, which has been directly integrated within Cloudinary’s infrastructure, further extending Cloudinary’s built-in face detection to a robust Facial Attribute Detection feature. By simply setting the detection parameter to rekognition_face when calling Cloudinary's upload API, ReKognition is utilized to automatically extract detailed face attributes from the uploaded image.
Ruby:
Cloudinary::Uploader.upload("woman.jpg",
              :detection => "rekognition_face")
PHP:
\Cloudinary\Uploader::upload("woman.jpg",
              array(
               "detection" => "rekognition_face"));
Python:
cloudinary.uploader.upload("woman.jpg",
              detection = "rekognition_face")
Node.js:
cloudinary.uploader.upload("woman.jpg",
              function(result) {console.log(result); }, { detection: "rekognition_face" });
Java:
cloudinary.uploader().upload("woman.jpg",
              Cloudinary.asMap("detection", "rekognition_face"));

The example JSON snippet displayed from the example image above contains the result returned from the face ReKognition request, which includes very detailed information regarding the face that was automatically detected in the image.
{"rekognition_face":
 "status": "complete",
  "data": [
    {
      "boundingbox": {
        "tl": {"x": 231.45, "y": 102.52},
        "size": {"width": 240.77, "height": 240.77 }},
      "confidence": 1,
      "eye_left": {"x":309.6, "y": 190.1},
      "eye_right": {"x": 407.9, "y": 213.6},
      "nose": {"x": 199.1, "y": 204.0},
      …
      …
      …
      "smile": 0.96,
      "glasses": 0.01,
      "sunglasses": 0.04,
      "beard": 0,
      "mustache": 0,
      "eye_closed": 0,
      "mouth_open_wide": 0.73,
      "beauty": 0.63531,
      "sex": 1
    }
  ]
}
You can also use Cloudinary's Admin API to apply ReKognition face detection to already uploaded images (based on their public IDs), and the face attributes that were previously extracted are also available using the Admin API's show resource details method.
Based on the position of facial attributes detected by the ReKognition add-on, Cloudinary can crop your images to focus on the detected facial features, while providing a large set of image transformation and cropping options when using a Cloudinary delivery URL or calling Cloudinary's image API.
To focus an automatic crop on the detected faces, simply set the crop parameter to thumb, fill or crop and the gravity parameter to rek_faces (set gravity to rek_face for focusing on the single largest detected face in the image). The resulting images are dynamically generated on-the-fly and the result is delivered via a fast CDN.

The following code sample generates a 150x150 thumbnail of the nice_coupleimage shown above, using multiple face detection based cropping.
Ruby:
cl_image_tag("nice_couple.jpg", :gravity=>"rek_faces", :width=>150, :height=>150, :crop=>"thumb")
PHP v1:
cl_image_tag("nice_couple.jpg", array("gravity"=>"rek_faces", "width"=>150, "height"=>150, "crop"=>"thumb"))
PHP v2:
(new ImageTag('nice_couple.jpg'))
  ->resize(Resize::thumbnail()->width(150)->height(150)
    ->gravity(Gravity::focusOn(FocusOn::rekFaces())));
Python:
CloudinaryImage("nice_couple.jpg").image(gravity="rek_faces", width=150, height=150, crop="thumb")
Node.js:
cloudinary.image("nice_couple.jpg", {gravity: "rek_faces", width: 150, height: 150, crop: "thumb"})
Java:
cloudinary.url().transformation(new Transformation().gravity("rek_faces").width(150).height(150).crop("thumb")).imageTag("nice_couple.jpg");
JS:
cloudinary.imageTag('nice_couple.jpg', {gravity: "rek_faces", width: 150, height: 150, crop: "thumb"}).toHtml();
jQuery:
$.cloudinary.image("nice_couple.jpg", {gravity: "rek_faces", width: 150, height: 150, crop: "thumb"})
React:
<Image publicId="nice_couple.jpg" >
  <Transformation gravity="rek_faces" width="150" height="150" crop="thumb" />
</Image>
Vue.js:
<cld-image publicId="nice_couple.jpg" >
  <cld-transformation gravity="rek_faces" width="150" height="150" crop="thumb" />
</cld-image>
Angular:
<cl-image public-id="nice_couple.jpg" >
  <cl-transformation gravity="rek_faces" width="150" height="150" crop="thumb">
  </cl-transformation>
</cl-image>
.NET:
cloudinary.Api.UrlImgUp.Transform(new Transformation().Gravity("rek_faces").Width(150).Height(150).Crop("thumb")).BuildImageTag("nice_couple.jpg")
Android:
MediaManager.get().url().transformation(new Transformation().gravity("rek_faces").width(150).height(150).crop("thumb")).generate("nice_couple.jpg");
iOS:
imageView.cldSetImage(cloudinary.createUrl().setTransformation(CLDTransformation().setGravity("rek_faces").setWidth(150).setHeight(150).setCrop("thumb")).generate("nice_couple.jpg")!, cloudinary: cloudinary)

Cloudinary can also dynamically crop your images based on the position of detected eyes. Simply set the gravity parameter to rek_eyes (g_rek_eyes for URLs) to center the image on the detected eyes. The example below delivers a 200x60 thumbnail centered on the eyes:
Ruby:
cl_image_tag("woman.jpg", :gravity=>"rek_eyes", :width=>200, :height=>60, :crop=>"thumb")
PHP v1:
cl_image_tag("woman.jpg", array("gravity"=>"rek_eyes", "width"=>200, "height"=>60, "crop"=>"thumb"))
PHP v2:
(new ImageTag('woman.jpg'))
  ->resize(Resize::thumbnail()->width(200)->height(60)
    ->gravity(Gravity::focusOn(FocusOn::rekEyes())));
Python:
CloudinaryImage("woman.jpg").image(gravity="rek_eyes", width=200, height=60, crop="thumb")
Node.js:
cloudinary.image("woman.jpg", {gravity: "rek_eyes", width: 200, height: 60, crop: "thumb"})
Java:
cloudinary.url().transformation(new Transformation().gravity("rek_eyes").width(200).height(60).crop("thumb")).imageTag("woman.jpg");
JS:
cloudinary.imageTag('woman.jpg', {gravity: "rek_eyes", width: 200, height: 60, crop: "thumb"}).toHtml();
jQuery:
$.cloudinary.image("woman.jpg", {gravity: "rek_eyes", width: 200, height: 60, crop: "thumb"})
React:
<Image publicId="woman.jpg" >
  <Transformation gravity="rek_eyes" width="200" height="60" crop="thumb" />
</Image>
Vue.js:
<cld-image publicId="woman.jpg" >
  <cld-transformation gravity="rek_eyes" width="200" height="60" crop="thumb" />
</cld-image>
Angular:
<cl-image public-id="woman.jpg" >
  <cl-transformation gravity="rek_eyes" width="200" height="60" crop="thumb">
  </cl-transformation>
</cl-image>
.NET:
cloudinary.Api.UrlImgUp.Transform(new Transformation().Gravity("rek_eyes").Width(200).Height(60).Crop("thumb")).BuildImageTag("woman.jpg")
Android:
MediaManager.get().url().transformation(new Transformation().gravity("rek_eyes").width(200).height(60).crop("thumb")).generate("woman.jpg");
iOS:
imageView.cldSetImage(cloudinary.createUrl().setTransformation(CLDTransformation().setGravity("rek_eyes").setWidth(200).setHeight(60).setCrop("thumb")).generate("woman.jpg")!, cloudinary: cloudinary)

Thanks to the detailed information on the position of facial attributes detected by ReKognition, Cloudinary can add overlays while taking into account the pose of the face, and automatically scale and rotate the overlay accordingly.
Ruby:
cl_image_tag("HarlequinMask.jpg")
PHP v1:
cl_image_tag("HarlequinMask.jpg")
PHP v2:
(new ImageTag('HarlequinMask.jpg'));
Python:
CloudinaryImage("HarlequinMask.jpg").image()
Node.js:
cloudinary.image("HarlequinMask.jpg")
Java:
cloudinary.url().imageTag("HarlequinMask.jpg");
JS:
cloudinary.imageTag('HarlequinMask.jpg').toHtml();
jQuery:
$.cloudinary.image("HarlequinMask.jpg")
React:
<Image publicId="HarlequinMask.jpg" >

</Image>
Vue.js:
<cld-image publicId="HarlequinMask.jpg" >

</cld-image>
Angular:
<cl-image public-id="HarlequinMask.jpg" >

</cl-image>
.NET:
cloudinary.Api.UrlImgUp.BuildImageTag("HarlequinMask.jpg")
Android:
MediaManager.get().url().generate("HarlequinMask.jpg");
iOS:
imageView.cldSetImage(cloudinary.createUrl().generate("HarlequinMask.jpg")!, cloudinary: cloudinary)

For example, in order to automatically overlay the above image of a harlequin mask scaled to 160% relative to the detected eyes in the main image:
Ruby:
cl_image_tag("woman.jpg", :flags=>"region_relative", :gravity=>"rek_eyes", :overlay=>"HarlequinMask", :width=>1.6, :crop=>"scale")
PHP v1:
cl_image_tag("woman.jpg", array("flags"=>"region_relative", "gravity"=>"rek_eyes", "overlay"=>"HarlequinMask", "width"=>"1.6", "crop"=>"scale"))
PHP v2:
(new ImageTag('woman.jpg'))
  ->overlay(
      Overlay::source(Source::image('HarlequinMask')
        ->transformation((new ImageTransformation())
          ->resize(Resize::scale()->width(1.6)->regionRelative())))
      ->position((new Position())
        ->gravity(Gravity::focusOn(FocusOn::rekEyes()))
  ));
Python:
CloudinaryImage("woman.jpg").image(flags="region_relative", gravity="rek_eyes", overlay="HarlequinMask", width="1.6", crop="scale")
Node.js:
cloudinary.image("woman.jpg", {flags: "region_relative", gravity: "rek_eyes", overlay: "HarlequinMask", width: "1.6", crop: "scale"})
Java:
cloudinary.url().transformation(new Transformation().flags("region_relative").gravity("rek_eyes").overlay(new Layer().publicId("HarlequinMask")).width(1.6).crop("scale")).imageTag("woman.jpg");
JS:
cloudinary.imageTag('woman.jpg', {flags: "region_relative", gravity: "rek_eyes", overlay: new cloudinary.Layer().publicId("HarlequinMask"), width: "1.6", crop: "scale"}).toHtml();
jQuery:
$.cloudinary.image("woman.jpg", {flags: "region_relative", gravity: "rek_eyes", overlay: new cloudinary.Layer().publicId("HarlequinMask"), width: "1.6", crop: "scale"})
React:
<Image publicId="woman.jpg" >
  <Transformation flags="region_relative" gravity="rek_eyes" overlay="HarlequinMask" width="1.6" crop="scale" />
</Image>
Vue.js:
<cld-image publicId="woman.jpg" >
  <cld-transformation flags="region_relative" gravity="rek_eyes" :overlay="HarlequinMask" width="1.6" crop="scale" />
</cld-image>
Angular:
<cl-image public-id="woman.jpg" >
  <cl-transformation flags="region_relative" gravity="rek_eyes" overlay="HarlequinMask" width="1.6" crop="scale">
  </cl-transformation>
</cl-image>
.NET:
cloudinary.Api.UrlImgUp.Transform(new Transformation().Flags("region_relative").Gravity("rek_eyes").Overlay(new Layer().PublicId("HarlequinMask")).Width(1.6).Crop("scale")).BuildImageTag("woman.jpg")
Android:
MediaManager.get().url().transformation(new Transformation().flags("region_relative").gravity("rek_eyes").overlay(new Layer().publicId("HarlequinMask")).width(1.6).crop("scale")).generate("woman.jpg");
iOS:
imageView.cldSetImage(cloudinary.createUrl().setTransformation(CLDTransformation().setFlags("region_relative").setGravity("rek_eyes").setOverlay("HarlequinMask").setWidth(1.6).setCrop("scale")).generate("woman.jpg")!, cloudinary: cloudinary)

Heres another example, this time with glasses.
Ruby:
cl_image_tag("glasses.jpg")
PHP v1:
cl_image_tag("glasses.jpg")
PHP v2:
(new ImageTag('glasses.jpg'));
Python:
CloudinaryImage("glasses.jpg").image()
Node.js:
cloudinary.image("glasses.jpg")
Java:
cloudinary.url().imageTag("glasses.jpg");
JS:
cloudinary.imageTag('glasses.jpg').toHtml();
jQuery:
$.cloudinary.image("glasses.jpg")
React:
<Image publicId="glasses.jpg" >

</Image>
Vue.js:
<cld-image publicId="glasses.jpg" >

</cld-image>
Angular:
<cl-image public-id="glasses.jpg" >

</cl-image>
.NET:
cloudinary.Api.UrlImgUp.BuildImageTag("glasses.jpg")
Android:
MediaManager.get().url().generate("glasses.jpg");
iOS:
imageView.cldSetImage(cloudinary.createUrl().generate("glasses.jpg")!, cloudinary: cloudinary)

Overlaying the above image scaled to 150% relative to the detected eyes in the main image, which is then presented as a 200 pixel wide round thumbnail centered on the face:
Ruby:
cl_image_tag("woman.jpg", :transformation=>[
  {:flags=>"region_relative", :gravity=>"rek_eyes", :overlay=>"glasses", :width=>1.5, :crop=>"scale"},
  {:width=>200, :gravity=>"face", :radius=>"max", :crop=>"thumb"}
  ])
PHP v1:
cl_image_tag("woman.jpg", array("transformation"=>array(
  array("flags"=>"region_relative", "gravity"=>"rek_eyes", "overlay"=>"glasses", "width"=>"1.5", "crop"=>"scale"),
  array("width"=>200, "gravity"=>"face", "radius"=>"max", "crop"=>"thumb")
  )))
PHP v2:
(new ImageTag('woman.jpg'))
  ->overlay(
      Overlay::source(Source::image('glasses')
        ->transformation((new ImageTransformation())
          ->resize(Resize::scale()->width(1.5)->regionRelative())))
      ->position((new Position())
        ->gravity(Gravity::focusOn(FocusOn::rekEyes()))))
    ->resize(Resize::thumbnail()->width(200)->gravity(Gravity::focusOn(FocusOn::face())))
    ->roundCorners(RoundCorners::max());
Python:
CloudinaryImage("woman.jpg").image(transformation=[
  {'flags': "region_relative", 'gravity': "rek_eyes", 'overlay': "glasses", 'width': "1.5", 'crop': "scale"},
  {'width': 200, 'gravity': "face", 'radius': "max", 'crop': "thumb"}
  ])
Node.js:
cloudinary.image("woman.jpg", {transformation: [
  {flags: "region_relative", gravity: "rek_eyes", overlay: "glasses", width: "1.5", crop: "scale"},
  {width: 200, gravity: "face", radius: "max", crop: "thumb"}
  ]})
Java:
cloudinary.url().transformation(new Transformation()
  .flags("region_relative").gravity("rek_eyes").overlay(new Layer().publicId("glasses")).width(1.5).crop("scale").chain()
  .width(200).gravity("face").radius("max").crop("thumb")).imageTag("woman.jpg");
JS:
cloudinary.imageTag('woman.jpg', {transformation: [
  {flags: "region_relative", gravity: "rek_eyes", overlay: new cloudinary.Layer().publicId("glasses"), width: "1.5", crop: "scale"},
  {width: 200, gravity: "face", radius: "max", crop: "thumb"}
  ]}).toHtml();
jQuery:
$.cloudinary.image("woman.jpg", {transformation: [
  {flags: "region_relative", gravity: "rek_eyes", overlay: new cloudinary.Layer().publicId("glasses"), width: "1.5", crop: "scale"},
  {width: 200, gravity: "face", radius: "max", crop: "thumb"}
  ]})
React:
<Image publicId="woman.jpg" >
  <Transformation flags="region_relative" gravity="rek_eyes" overlay="glasses" width="1.5" crop="scale" />
  <Transformation width="200" gravity="face" radius="max" crop="thumb" />
</Image>
Vue.js:
<cld-image publicId="woman.jpg" >
  <cld-transformation flags="region_relative" gravity="rek_eyes" :overlay="glasses" width="1.5" crop="scale" />
  <cld-transformation width="200" gravity="face" radius="max" crop="thumb" />
</cld-image>
Angular:
<cl-image public-id="woman.jpg" >
  <cl-transformation flags="region_relative" gravity="rek_eyes" overlay="glasses" width="1.5" crop="scale">
  </cl-transformation>
  <cl-transformation width="200" gravity="face" radius="max" crop="thumb">
  </cl-transformation>
</cl-image>
.NET:
cloudinary.Api.UrlImgUp.Transform(new Transformation()
  .Flags("region_relative").Gravity("rek_eyes").Overlay(new Layer().PublicId("glasses")).Width(1.5).Crop("scale").Chain()
  .Width(200).Gravity("face").Radius("max").Crop("thumb")).BuildImageTag("woman.jpg")
Android:
MediaManager.get().url().transformation(new Transformation()
  .flags("region_relative").gravity("rek_eyes").overlay(new Layer().publicId("glasses")).width(1.5).crop("scale").chain()
  .width(200).gravity("face").radius("max").crop("thumb")).generate("woman.jpg");
iOS:
imageView.cldSetImage(cloudinary.createUrl().setTransformation(CLDTransformation()
  .setFlags("region_relative").setGravity("rek_eyes").setOverlay("glasses").setWidth(1.5).setCrop("scale").chain()
  .setWidth(200).setGravity("face").setRadius("max").setCrop("thumb")).generate("woman.jpg")!, cloudinary: cloudinary)

The ReKognition add-on is utilized to automatically extract detailed face attributes from your images, and enables advanced image transformation and categorization based on the detected facial data, with relative scaling and rotation of overlays achieved automatically.

The ReKognition add-on is available to all our free and paid plans. If you don't have a Cloudinary account, you are welcome to sign up to our free account and try it out.
Update - December 2015: The add-on described in this post is no longer available since ReKognition terminated their services. However, all features described here are still available via a different and even better add-on: Advanced Facial Attributes Detection


